


How To Use The Camera Shake Reduction Filter In Photoshop CC
Share:
Love it or hate it, one of the great things about being an Adobe Creative Cloud subscriber is having access to the latest photo editing technology right away. (How much would we all love a camera and lens subscription service!?)
I first heard about Photoshop CC’s new camera shake reduction filter back in the summer and I finally had a change to shoot a series of photos specifically designed to test it out.
In this article, I will show you how to use the Adobe Photoshop CC Camera Shake Reduction Filter along with a few example photos.

Camera Shake Reduction Filter Sample Photos
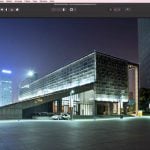
To give the new camera shake reduction filter released with Adobe Photoshop CC a tough test, I photographed a landscape with a long exposure and a subject.
These photos combine two different types of camera shake that would be difficult for Photoshop to fix.

Canon 5D MkII, 4.0 sec at f/22, ISO200, 28mm
This photo was taken with my camera on a sturdy tripod and a four second exposure. I wanted the longest exposure I could get by stopping down my lens to its smallest aperture (f/22) in order to get that perfectly smooth looking water.
I did not use a remote shutter release or mirror lock-up mode because I honestly did not expect there to be much of a problem with camera shake just from making the exposure – but as we will see, even with the camera on a rock solid tripod, there actually is quite a bit of camera shake introduced.
I also wanted to have a subject in the photo. To do that in one frame, I asked the model to pose and then stay as still as possible for the exposure. Obviously, no one can stay perfectly motionless for four seconds. But, if your subject is in a comfortable pose, they hold their breath and don’t blink, it is possible to get pretty close.
This type of movement isn’t really camera shake, but it is a common problem and I wanted to see if Photoshop’s camera shake reduction filter could deal with small amounts of subject movement as well.
Of course there are other ways that I could have shot this photo.
First off, four seconds is not quite long enough for perfectly smooth water. It would have been better to use a neutral density filter for an exposure of 10 seconds or more.
Secondly, I could have shot the long landscape exposure in one frame, then changed my camera settings to shoot the subject in a separate frame with a short exposure and combined the two in Photoshop later.
But either way there is some post production work involved.
Using the Adobe Photoshop CC Camera Shake Reduction Filter
I started with my normal photo adjustments in Lightroom before I jumped into Photoshop.
Totally unrelated to using the camera shake reduction filter – but one thing about shooting at f22 is that you really realize how filthy dirty your lens and sensor are!

Anyway, once you have your photo in Photoshop CC, create a copy of your working layer and then go to Filter > Sharpen > Shake Reduction
Here is a quick video that outlines how to use the camera shake reduction filter:
Motion Blur Reduction Examples
As you can see in the tutorial video, the camera shake reduction filter in Photoshop CC does a pretty good job at reducing blur resulting from both camera shake and a small amount of motion blur.
If you want a closer look, here is a 100% crop of the camera shake reduction filter removing a small amount of motion blur:


There is still a little bit of motion blur present, and I found that I had to be careful not to crank up the filter too much which starts to introduce some pretty obvious artifacts. But overall, it takes a fairly blurry part of the photo and really sharpens it up nicely.
Camera Shake Reduction Examples
With actual camera shake – which you can see in the rocks in the foreground of the following 100% photo crop examples, Photoshop CC’s camera shake reduction filter really does a wicked job in sharpening up small amounts of baseline camera shake.


What is really interesting to me is that I was not expecting much baseline camera shake to be present in the photos. As I said, I was using a very stable, heavy tripod and a rock solid ball head, so I was really surprised when I saw how much better my photos looked with just that small amount of shutter release and mirror camera shake cleaned up.
Final Thoughts About The Camera Shake Reduction Filter
Like with so many new advances in photography gear and photograph editing technology, there is an obvious trap for users to rely on tools like this as a crutch to “fix” poor images that should have been captured better in camera.
And realistically, the camera shake reduction filter now included with Photoshop CC is not something that you are going to use every day.
However, I think there are certain creative situations, like those illustrated in this article, where you can really use camera shake reduction to your creative advantage.


JP Danko
JP Danko is a commercial photographer based in Toronto, Canada. JP can change a lens mid-rappel, swap a memory card while treading water, or use a camel as a light stand.


Join the Discussion
DIYP Comment Policy
Be nice, be on-topic, no personal information or flames.
5 responses to “How To Use The Camera Shake Reduction Filter In Photoshop CC”
This seems like a nice touch-up, but when I think of “camera shake”, I’m thinking of real botch jobs… images that have that “double-vision” look to them. Will this help correct that? My dad was a medic at ground zero during 9/11, and he took a picture that would’ve been quite powerful if it didn’t come out all shaky… I’ve been trying to figure out how to correct it for a while now.
I agree. The results of the above images seems very similar to what basic sharpening could offer.
We may get a bit more change their through this way. Thanks for the article in detail.
Photoshop CC is the latest software for designing. This will really help you to occur a excellent representations along with the term of camera shake reduction. Thank you.
DIYPhotography’s guide to Photoshop’s Camera Shake Reduction filter shows how it can correct blur from subtle camera movements, like tripod shake or mirror slap. While effective for minor issues, it may not fully resolve severe motion blur or introduce artifacts if overused.
DIY Photography
Photo Retouching LDT, we specialize in refining your images beyond automated fixes. Whether you’re dealing with product shots, portraits