


How To Build A Spherical Panoramic (360) Head
Jan 19, 2013
Udi Tirosh
Udi Tirosh is an entrepreneur, photography inventor, journalist, educator, and writer based in Israel. With over 25 years of experience in the photo-video industry, Udi has built and sold several photography-related brands. Udi has a double degree in mass media communications and computer science.
Share:
With software like PTgui and Adobe’s built in CS6 photomerge stitching of almost any sequence of semi-overlapping photos into a panorama is a no brainer. That goes for hand held, and definitely for tripods. (And even for the iPhone 4S panorama feature)
 Head")
But if you want a precise panorama, a “regular” tripod and head combo is not enough. If you want to get your panorama pieces perfect for stitching you have to rotate not around the camera base, but around the camera’s entrance pupil. This is where a dedicated pano-head comes into play.
A panoramic head has calibration options so the camera rotates around the entrance pupil which depends both on lens and camera. There are dedicated pano-heads out there like the excellent panosaurus, Nodal Ninja and 360 Precision, there are some super cool DIY options out there ranging from easy through medium to complex.
5teve over at photography-on-the.net was inspired by Dr. Sean Parkin’s design and built quite an impressive DIY pano-head. Aside from being a kickass pano-head, one of the nice things about it is that it uses no “heavy” tooling and can probably be built at your garage even if you don’t have a lathe or a CNC machine at your disposal.
As far as featured go, this head is just packed. It “clicks” every 30 degrees of the rotator head, allowing for a repeatable panorama; It allows for careful calibration of the entrance pupil; And it can be used as a gimbal head in a pinch.
Between those two articles there is all the data you need to make one of those babies, including the plans, parts, tooling process and the final assembly. As well as a bit of info about anodizing at home, bearings and springs.
Here are some exploded 3D views of the head
 Head")
 Head")
 Head")
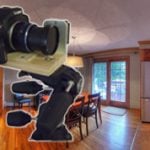
And here are the resulting 360×180 panoramas
 Head")
 Head")
And finally here are some pictures taken during the tooling process.
 Head")
 Head")
 Head")
 Head")
Thanks for the heads up, Rick
[My homemade spherical panoramic head design and Homemade Panoramic Head]

Udi Tirosh
Udi Tirosh is an entrepreneur, photography inventor, journalist, educator, and writer based in Israel. With over 25 years of experience in the photo-video industry, Udi has built and sold several photography-related brands. Udi has a double degree in mass media communications and computer science.


Join the Discussion
DIYP Comment Policy
Be nice, be on-topic, no personal information or flames.
One response to “How To Build A Spherical Panoramic (360) Head”
I produce a DIY Panohead in acrylic for my students in Colombia: http://www.mariocarvajal.com/quimbaya-360-rotula-panoramica-360-casera-diy-panoramic-head-homemade/