


Homemade Camera Panoramic Head
Oct 4, 2010
Udi Tirosh
Udi Tirosh is an entrepreneur, photography inventor, journalist, educator, and writer based in Israel. With over 25 years of experience in the photo-video industry, Udi has built and sold several photography-related brands. Udi has a double degree in mass media communications and computer science.
Share:
 The following post about creating a polycarbonate panoramic head was written by Barry Young. It is a slick design that uses semi-fixed drilled holes for vertical panning and polycarbonate for an even slicker look. In Barry’s words:
Both of my DSLRs, an Olympus E1 and a Sigma SD10, are somewhat limited (by today’s standards) in the number of megapixels they churn out. That doesn’t mean that I intend to upgrade them any time soon.
Occasionally though I want to capture a particular scene in the highest resolution I can and so, like many other photographers, I too have had a go at creating my own DIY panoramic head.
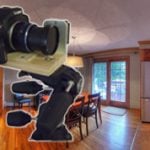
As you can see it is very much like many others you will find on the net, the main difference being that it is made of 12mm transparent polycarbonate, which makes it look slightly different from the norm.
The Bits
Most of the raw materials were sourced on Ebay, except the nuts, bolts and the bracket.
The main material used is the 12mm transparent polycarbonate. I chose this due to it’s rigidity and workability. Originally I had hoped to find some in black, but a good offer came up for a transparent A4 sheet which they would also cut into three for me as well. With the benefit of hindsight the 10mm or maybe even 8mm thick polycarbonate would probably be more than capable of holding my kit.
The ‘swing arm’ is a camera flash bracket, and the spirit level is of the ‘bulls eye’ variety.

The metal right angle bracket was actually the most difficult item to source. I scoured DIY shops and online trade suppliers for over a month trying to find something that would be strong and streamlined, without any success. Finally, in a stroke of luck, we were dismantling some redundant desks at my workplace and there were the brackets of my dreams. So I asked nicely and managed to get half a dozen to take home.
The build was on!
The Build
As you can probably tell from the images I am not a master craftsman by any stretch of the imagination, but projects like this give me real joy to undertake.
Firstly I modified the flash bracket by removing the flash holder itself.
Then, after bolting together the base and side using the bracket I created my ‘swing arm’ by attaching the flash bracket to some of the polycarbonate and pivoting this through upright using a strong bolt (and a washer between the upright and arm as a spacer). On either side of the pivot bolt I used two selftapping screws to keep the flash bracket attached firmly to the polycarb.
The semicircle of holes in the upright were originally intended to be used for a pin to hold the ‘swing arm’ at different elevations, however due to the inherent friction given by the washer that separates the upright from the arm, this has never been needed. The arm always stays at the required elevation no matter which of my DSLRs is being used, and they are no lightweights.
I also created a duplicate quick release plate for my tripod head, which allows me to easily mount it for use. The tripod head I use is of the ball and socket variety and is able to rotate around it’s base, which makes it ideal for the side to side sweep needed for panoramics.

One word of warning – polycarb edges can become extremely sharp when cut, so spend some time making it more user friendly with a file and sandpaper.
The total weight of the pano head comes out at approximately 1.2kg before a camera is attached.
The Business
There are many tutorials available on the net about how to go about working out the nodal point of your lens/camera combination, so I’ll not repeat it here. Suffice it to say that my set up allows me to use either my SD10 or the E1 with it’s (permanently attached) battery grip. To allow this, given that the lenses used will then be at different distances from the arm, I have two vertical pivot points on the base. I can therefore connect the quick release plate at the appropriate pivot point for the camera in use.

In use it’s just a case of levelling the tripod (using it’s inbuilt spirit levels) attaching the pano head using the quick release plate, checking that the pano head is also level (using the ‘bulls eye’ level) and then adjusting the sliding arm backward/forward as appropriate for the camera/lens.
I don’t have this marked out as I find that near enough is actually good enough. It is my experience that the adjustments only have to be approximate to give acceptable results. Certainly, for a landscape I could move the camera on the sliding arm a couple of centimetres either way and, as long as there were no objects close to the camera, this would work out fine. Your mileage may vary.
Finally, the proof of the pudding and all that. The image, below, of the cactus was produced from a series of 25 shots taken from only 7 inches away using an Olympus E1 and ZD35mm Macro. It was then stitched using Hugin just using the default workflow.

So, if this DIY pano head is good enough for something this close it is certainly good enough for landscapes.
More Resources
- If you are wondering how the heck to Find The Nodal Point of Your Lens
- And how to find the Nodal Point in a video form
- The cheaper version of The Panorama Head El Cheapo
- and finally it can all be stitched using Hugin – Panorama photo stitcher

Udi Tirosh
Udi Tirosh is an entrepreneur, photography inventor, journalist, educator, and writer based in Israel. With over 25 years of experience in the photo-video industry, Udi has built and sold several photography-related brands. Udi has a double degree in mass media communications and computer science.


Join the Discussion
DIYP Comment Policy
Be nice, be on-topic, no personal information or flames.