


Build a Panoramic Head For Perfect Panoramas
May 26, 2011
Udi Tirosh
Udi Tirosh is an entrepreneur, photography inventor, journalist, educator, and writer based in Israel. With over 25 years of experience in the photo-video industry, Udi has built and sold several photography-related brands. Udi has a double degree in mass media communications and computer science.
Share:
 I do some real estate photography that requires indoor panoramas. Those are kinda hard to take because the small space and proximity of objects really makes any parallax errors show significant distortion on the final picture.
First I bought the Panosaurus (which was HUGE and a bit cumbersome as it support any camera) but it does work. This got me thinking: do I really need a panoramic head that can support any camera at all, or do I just need to support my Lumix GH1 and 9-18mm lens.
After making a few brackets, I decided that this one is going to be focused on ease of manufacturing.
Tools &Supplies
- Drill & Drill bits
- hack saw, screw driver, 1/4-20″ tap
- 90 degree aluminum square
- Countersink drill bit
- A piece of 3/4″ pine board.
- A piece of 1/4″ plywood
Step 1- Establish The Nodal Point For Your Camera/Lens Combo
The nodal point is the axis that if you rotate the camera around it you will get no parallax error. There are some great resources for finding your nodal point, the guide on John H Panos is one of the best there is.
Adjust the diagram below (click on it for a PDF) so it will fit the distance between tripod mount and nodal point right for your camera (it marked by the red lines).

Step 2 – Preparing The Base
After figuring out the center focal point to establish the distance from the camera mount to the tripod mount, transfer drawing onto a the 3/4″ pine board and cut accordingly.
Next cut the aluminum bar according to the template. If you don’t really know how to cut aluminum, go to your local shop, those things can be nasty.
Then use a piece of 1/4″ plywood to keep the camera from rotating.
Both the aluminum bar and the pine wood should now be fitted with
threads for a tripod plate: The pine is fitted with a 1/4-20 TEE nut and the aluminum should be tapped.

The next step is to add the 1/4″ aluminum piece on the side so that you can rotate the camera to take vertical panoramas. Vertical panoramas are the for for tight spaces.
The rest of the DIY pano is pretty much held together with a few wood screws.
The camera mounts with a 1/4-20 handle screw.
Samples
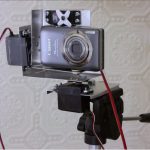
Here is how the head looks like when mounted horizontally and vertically on a tripod


and here are the resulting images


About The Author
Jon Petersen is a photographer based in the US, he runs Bikerag.com and Cablecam.org

Udi Tirosh
Udi Tirosh is an entrepreneur, photography inventor, journalist, educator, and writer based in Israel. With over 25 years of experience in the photo-video industry, Udi has built and sold several photography-related brands. Udi has a double degree in mass media communications and computer science.


Join the Discussion
DIYP Comment Policy
Be nice, be on-topic, no personal information or flames.
One response to “Build a Panoramic Head For Perfect Panoramas”
I’m a bit confused. What “90 degree aluminium square?” I see an AL bar but no square and no 90 degree. Please clarify.