


Studio Lighting – Homemade Cheap Flash Diffuser (DIY)
Mar 8, 2006
Udi Tirosh
Udi Tirosh is an entrepreneur, photography inventor, journalist, educator, and writer based in Israel. With over 25 years of experience in the photo-video industry, Udi has built and sold several photography-related brands. Udi has a double degree in mass media communications and computer science.
Share:
") In this article Aron Brand will demonstrate how, using homemade and accessible materials, you can improve the light quality of a simple slave flash, and get a natural and soft light. This sort of light is good for jewelry photography, shooting items for eBay and portraits. Note the picture at the end of this article, not only showing softer shadows, but also pops the look of the metal, giving it more polished, expensive look. Similar methods to obtain the same effect can be a light tent, of a flash mounted softbox. Good luck.
In this article Aron Brand will demonstrate how, using homemade and accessible materials, you can improve the light quality of a simple slave flash, and get a natural and soft light. This sort of light is good for jewelry photography, shooting items for eBay and portraits. Note the picture at the end of this article, not only showing softer shadows, but also pops the look of the metal, giving it more polished, expensive look. Similar methods to obtain the same effect can be a light tent, of a flash mounted softbox. Good luck.
Materials:
- A strong slave flash or a long sync cable
- Two cheap tripods with a plastic pan/tilt head. One with flash adaptor on.
- A good steady tripod to hold the camera
- Aluminum pictures frame size 100×75 cm
- A 1/4″ screw with matching “butterfly” and disk
- Half transparent drawing paper – two sheets of 100×75 cm
- Glue tape.

Instructions:
- Drill a 1/4″ hole at the bottom of the frame
- Drill a 1/4″ hole at the bottom of one of the cheap tripods. Yea, I know, it will ruin the tripod. I used a semi-broken tripod for this. Maybe you can get a bad-shaped tripod for really cheap at your local camera store.
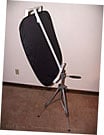
- Screw the frame to the tripod and tighten the screw with the disk and ‘butterfly’. I used an aluminum stripe to keep the frame from wobbling, but it is not necessary. See picture for details
- On each side of the frame, spread and tape a drawing sheet. Now you have a thin flat box, with paper as top and bottom and aluminum frame for sides.
Ok, now you have a great flash diffuser, and you can use all the axes of the tripod to manipulate the diffuser: tilt, pan and rotate.
- Place the flash on a tripod, and set the flash to its widest angle. Place the tripod about 1-1.5 meters from the diffuser.
- Make a test shot. If you are using a digital camera, fill the frame with the diffuser and shoot. The entire diffuser should be burned, if you only get a burned circle in the middle of the diffuser, place the flash further ftom the diffuser.

What can I use it for?
You can use it to shoot small or shiny objects, such as jewelry, action figures or small items for eBay.
This light is also very good for portraits.
Finally, you can use it where ever a large square light source is needed. It has a lot of similarities to a softbox.
Cons
Unlike softbox, a lot of the light produced from the flash gets lost (this is also called light spill). So you will have to use a strong flash.
Concepts
The further the diffuser is from your object the “harsher” light you get. Your light reflections will be smaller and the shadows harder. The closer the diffuser is to your object, you will get softer shadows. You can use this information to control light: place your diffuser close to your object to soften the light, and place it far to harsher it. Note that if the diffuser is very far from the object, you may want to use direct flash.
This is a shot of this “studio” in action. The two pictures are identical except the use of the diffuser.

See how the watch on the right looks newer, brighter and younger.

Udi Tirosh
Udi Tirosh is an entrepreneur, photography inventor, journalist, educator, and writer based in Israel. With over 25 years of experience in the photo-video industry, Udi has built and sold several photography-related brands. Udi has a double degree in mass media communications and computer science.


Join the Discussion
DIYP Comment Policy
Be nice, be on-topic, no personal information or flames.