


First impressions review of the Sigma 105mm f/1.4 Art lens – The “Bokeh Master”
Aug 7, 2018
John Aldred
John Aldred is a photographer with over 25 years of experience in the portrait and commercial worlds. He is based in Scotland and has been an early adopter – and occasional beta tester – of almost every digital imaging technology in that time. As well as his creative visual work, John uses 3D printing, electronics and programming to create his own photography and filmmaking tools and consults for a number of brands across the industry.
Share:

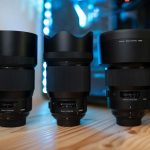
There’s no way around it, the new Sigma 105mm f/1.4 Art lens is freakishly huge. Compared to the Nikon 105mm f/1.4E lens released a couple of years ago, it just looks ridiculous. The Sigma is substantially bigger and weighs about 70% more than the Nikon. It even weighs more than my Nikon 70-200mm f/2.8 zoom.
But how does it actually feel to shoot? And how good are the images? I’ve had the opportunity to play with one over the last few days, so this post goes through some of my initial thoughts, and what I think of the lens so far. If you want the short version, though, I love it and hated having to give it back.
The version of the lens I was using was Sigma SA mount with the Sigma MC-11 adapter on a Sony A7II. Sure, not the most recent of Sony bodies, but as the A7II is still a pretty popular camera, it seemed like a good match up to try.
Initially, holding the whole setup, the lens feels pretty front heavy as one might expect. Little Sony bodies aren’t the best for balancing out with big heavy lenses. But after a while, figuring out how was most comfortable to hold the lens to try and achieve a better balance, life became a little easier. It’s definitely one that’s going to take some getting used to if you shoot Sony.

We also tested it briefly with the Sigma SD Quattro H. With this body, it felt much better as the SDQH is a bit heavier than the lightweight Sony A7II, which helps to balance things out more evenly. I imagine would it would balance well with a DSLR, especially if you’re using a body with a grip. That would be a very heavy combo, though.
But how are the photos? Are they really worth having to deal with all that weight? Initially, I wasn’t so sure. My go-to 105mm lens for the past few years has been the Nikon 105mm f/2.8 Micro-Nikkor. It’s a much lighter lens than the Sigma 105mm f/1.4 Art, and it also works quite well for portraits – as well as its obvious macro functionality.
As often seems to be the way when I receive toys to play with, the weather wasn’t the greatest. So, for my first couple of days, I was mostly just seeing how it photographed things around the garden. Trying to get a measure of just how shallow f/1.4 depth of field is with a 105mm lens on a full frame sensor. And, oh boy, is it shallow!
First test, minimum focus distance. This lens obviously doesn’t shoot macro like my 105mm f/2.8, but just how much (or little) depth of field do we get at its minimum focus distance? This view on a person would be an extreme closeup. You wouldn’t be able to capture their entire face, but you can really see here just how shallow f/1.4 is at 1 metre with a 105mm lens.

Shooting anything this close at this aperture is going to be a struggle, especially when even slight movements from you, the photographer, can massively shift the plane of focus. But on the plane where it is focused, the sharpness and detail are very impressive.

But flowers and random things in the garden aren’t a great real-world test – at least, not for what is supposed to be a portrait lens.
So, over the weekend, I went for a wander through Glasgow with my friend and fellow photographer, Paul Monaghan, to photograph a few strangers. We took a little lighting gear with us in the form of a Pixapro Pika200 (Godox AD200/Flashpoint Evolv 200) and 60cm square softbox. This is why my friend came along. I needed a voice-activated light stand.
When we showed up to Glasgow, it was pretty dull. But with sun forecast, we decided to hunt out a coffee shop while we waited for it to come out. Side note, apparently we have Tim Hortons in Scotland now. When did that happen? Anyway, at some point during our coffee, I went out to make a phone call and Paul sneaked this shot.

Handheld at 1/160th of a second is pretty good. Paul was a good, 20ft away for this one, and he was shooting through a big glass window. Even still, the detail picked up by the sensor wide open at f/1.4 is pretty astounding.

After the sun started to make a more reliable appearance, we headed into the city. There was a bunch of stuff going on in Glasgow over the weekend. The European Championships, Festival 2018, Merchant City Festival, Encontro Street Band Festival, and a whole bunch more besides. So, plenty of opportunities to meet and photograph some interesting characters.
As the street band festival was on, they were an obvious subject. The sounds coming from around the city were amazing. Everything from brass bands to whole armies of drummers of all kinds of different musical styles.
We decided to start with the brass band in all natural high contrast sunlight. If you want to test the chromatic aberration issues of a lens wide open, these are the best (or, worst, depending on your perspective) conditions in which to test it.

Bear in mind, that there are no lens profiles available for the Sigma 105mm f/1.4 Art in Adobe Camera Raw or Lightroom at the moment. So these are as they come without any lens correction, and CA/Fringing correction in ACR is disabled in all of these images. It seems to handle the strong sharp contrast changes very well indeed. It wasn’t completely faultless, though.

In the very brightest highlights along high contrast edges of the instrument, you can see that there is a little purple fringing. It’s not a massive amount, and it’s easily cleaned up with a little tweaking to ACR’s Chromatic Aberration sliders, but it’s there. The image also shows a little green fringing in some of the out of focus areas off in one of the corners, too. Again, it’s quite minimal and easily cleaned up in ACR.

The 105mm f/1.4 seems to handle CA and fringing very well indeed. The one difficulty I did have, though, was the autofocus not being able to keep up with a depth of field quite this shallow. It may be more down to the A7II’s older autofocus system and my technique more than anything else, but it did seem to miss quite a few.

You can see in the shot above that the face is not in focus. It was in focus as I looked through the viewfinder to hit the shutter, but the subject’s movement was too quick to remain in the plane of focus.
With a depth of field this shallow, you may experience more misses than you’re used to vs shooting something like a 70-200mm f/2.8. But the more advanced autofocus systems of the Sony A9 or A7III, Nikon D850 or D5, or anything with Canon’s dual pixel autofocus may help to increase your odds of hitting your target.
Once the distance between myself and the subject was increased, the autofocus was able to keep up more easily. The increased depth of field meant that the focus distance didn’t have to be quite as accurate as much closer subjects.

Even at a distance, you can see that the 105mm f/1.4 throws the background out of focus quite nicely. Sure, it’s not mush, and you can still make out what is actually behind the subjects, but it blurs enough to offer separation from the subject. And it’s so sharp you can even read the writing on the sleeve of his shirt.

But it’s when you see images from this lens on a Foveon sensor that you really start to realise just how sharp it is. Bear in mind, the Sigma SD Quattro H has a 1.3x crop factor, so the field of view is a little narrower, coming in at similar to that of a 137mm lens on a full frame body.


It was shortly after this that we busted out the flash and set up the softbox to start approaching people and ask if we could shoot their portrait. I love photographing strangers. You get to meet some very interesting people. It’s not the easiest thing in the world to do, going up and striking up a conversation with random people, but that’s a topic for a whole different post.
Adding flash into the mix can make things tricky when you’re shooting street portraits. I get two or three shots with each person at most. So, with changing light and limited time, you have to know your gear and have your settings dialled in before you shoot. This will come with practice as you use your equipment more, but we started with a few test shots in a park before we started. That way, once we have a subject, we know our exposure’s going to be pretty good and we’ll get what we need in just one or two shots.

You can see when we go 100% crop just how shallow it is. Even at this kind of distance, shooting horizontally rather than filling the frame vertically, the depth of field is extremely shallow. The near eye is sharp, and the one just slightly further back is not. This seems to be a common look these days, as the craze for super fast primes continues, but it’s not one I like personally. But, the purpose of this day was to test the lens wide open. So, here we are.

Balancing the flash with the ambient light is fairly straightforward. Get the ambient exposure where I want it, using the sun as a rim/backlight, and then add flash. Dial the flash power up or down and adjust the distance to get the brightness, falloff and softness I want. As long as the flash is the same distance from any other subject I may photograph and the ambient exposure doesn’t change, then the settings should be good for anybody else I may photograph.
So, we headed back into the city centre to look for people who might let us make their portrait. When I saw the hat & goggles of the gentleman below, I knew I had to shoot his photo. So, we approached and asked, and here’s what we got. The AD200 in the 60cm softbox is just out of frame to camera left.

You can see that we start to get a hint of those “bokeh balls” in this shot from lights through a window way behind the subject. Bright sparkly bokeh in the background of photos isn’t a big deal to me. I usually find them to be quite distracting, but for those that are interested, here’s a close-up.

Even with the lens wide open, you can see that the bokeh isn’t perfectly round. But it’s not displeasing. Of course, there’s a person in this photograph, too, so let’s talk about that. When this lens nails focus, boy does it nail it. It’s very rare that I shoot lenses wide open, but there’s something about this lens that makes me want to do that all the time. It’s incredibly sharp, and with minimal chromatic aberration and colour fringing, it’s a dream to shoot wide open.

This is another example of just how thin that depth of field is. On a fairly normal head & shoulders headshot, the depth of field stretches from about halfway down the nose to the subject’s near eyelashes. In fact, the eyelashes of the subject’s left eye (camera right) are sharp, while the eyeball itself is not. This lets you see just how rapidly that plane of focus starts to go. If it isn’t so obvious in the shot above, here’s a closer look.

I can’t see myself ever sticking to f/1.4 for such close-up shots with this focal length, simply due to the shallow depth of field. I don’t mind ears being thrown out of focus, but I do want to have everything between and including the front of the nose to the eyes to be sharp. Obviously, stopped down to f/2 or f/2.8 this wouldn’t be quite so much of an issue, and would still throw the background out very well. But, if you have to stop it down to f/2.8, then there are plenty of other lens options out there that offer more versatility.
For me, I’d typically use a lens like this from further back, similar to the shot of drummer above, or for environmental portraits. And for that type of thing, this is an absolutely stellar lens. After wandering the streets of Glasgow, we decided to stop off for a coffee before heading home. Here, the lighting was a little lower, which forced us to drop out shutter speed down to 1/160th of a second.

I was a little worried that the A7II’s 24MP sensor might pick some blur from camera shake at that sort of shutter speed, but I needn’t have. The 100% crop shows that it’s still razor sharp, handheld at 1/160th – although this will vary depending on personal ability and handholding technique.

Final Thoughts
Overall, The Sigma 105mm f/1.4 Art has really impressed in the brief time that I used it. Way more than I expected it to. And even though it doesn’t really offer me anything for my own needs over lenses I already own, I still really want one. I was tempted by the Sigma 135mm f/1.8 Art after playing with it shortly before its release last year, but to me, this one absolutely blows the 135mm away.
It’s quick to autofocus even with the Sigma MC-11 – when the Sony A7II chooses to hit its target – and although it comes with a whole lot of weight, I think it’s worth putting up with for the kind of results this lens produces. I was walking around with the Sony A7II and Sigma 105mm f/1.4 Art combo for a good 5 or 6 hours on Saturday, and while you definitely feel that you’re carrying something substantial, it wasn’t unbearable. If you’re not used to heavy lenses, though, you may be in for a shock. And depending which camera you shoot, you might find that it’s rather front heavy, causing some wrist strain.
Handling, though, was much better than I anticipated. I think if I were using this with a light body in the future, I’d probably go monopod-mounted. While monopods can often slow you down, I find the Manfrotto Neotec 685b to be very quick to adjust and has been my monopod of choice for about a decade now. So, I don’t think it’d slow things down too much vs regular handheld use.
The results are amazing. And while I did have a few shots miss focus due to subjects being faster than the A7II’s autofocus, when it managed to find its subject perfectly, the results were incredible. I’d be very curious to try an F mount version of this lens against Nikon’s own 105mm f/1.4E to see how the images and performance vary between the two.
Even though I don’t have a genuine need for the Sigma 105mm f/1.4 Art over other lenses that I already own, I know it’s going to haunt me until I get one. It’s a sexy lens that I have no practical use for, but I still want one. So, I’ll stick it on the list and maybe it’ll happen one day.
- Sigma 105mm f/1.4 Art – Nikon (B&H | Amazon)
- Sigma 105mm f/1.4 Art – Canon (B&H | Amazon)
- Sigma 105mm f/1.4 Art – Sigma (B&H)
- Sigma 105mm f/1.4 Art – Sony (B&H Pre-order)
Many thanks to Paul for helping me this weekend, and for the image right at the top of this post – A breakdown on how Paul made that is coming soon!

John Aldred
John Aldred is a photographer with over 25 years of experience in the portrait and commercial worlds. He is based in Scotland and has been an early adopter – and occasional beta tester – of almost every digital imaging technology in that time. As well as his creative visual work, John uses 3D printing, electronics and programming to create his own photography and filmmaking tools and consults for a number of brands across the industry.
Related Posts
 Sigma officially announces the 105mm f/1.4 Art series “Bokeh Master” lens
 Photo leaks of Sigma’s new 105mm f/1.4 Art lens for Nikon, Canon, Sigma and Sony
 Comparing Sigma’s Bokeh Master 105 f/1.4 Art with 85 f/1.4 and 135 f/1.8
 First look at the new Sigma 105mm f/1.4 Art, 70mm f/2.8 Art Macro lenses & E Mount release schedule
Join the Discussion
DIYP Comment Policy
Be nice, be on-topic, no personal information or flames.
One response to “First impressions review of the Sigma 105mm f/1.4 Art lens – The “Bokeh Master””
Well explained. I can clearly understand that the photographs can clearly explain and express the emotions or picturizes the exact scenario of the scene.