


Endeavours Of A New Studio
Apr 18, 2009
Udi Tirosh
Udi Tirosh is an entrepreneur, photography inventor, journalist, educator, and writer based in Israel. With over 25 years of experience in the photo-video industry, Udi has built and sold several photography-related brands. Udi has a double degree in mass media communications and computer science.
Share:
 Well, actually, the right title for this one should be “Endeavors Of A New Home”, since I am building a whole home and not just a studio, but hey! This is a photography blog, so focus is on lighting and studio. Of course the new place will be packed with tricks, but now, it is in the building process.
Studio Location @ My Soon To Be Home
It was not easy. I had to forfeit the fight over the flooring, the look and feel of the living room, and I think I remember a vague promise to wash the dishes for the next 5 years, but I got it. Wify and I are building a basement at our new house and it is going to serve as a studio. My wife did mention something about doubling the space as a kid’s playspace, but I was too buzzed to hear this.
Both my wife I and agree that way things are at the current apartment are no good. I double the living room as a studio space, which means that I can use it late at night, or sometimes on the weekends.
As you can see below, this is how the studio space is going to look like. Sure, it is on the basement, has little natural light, and the washing machine and dryer are nearby. But it is a dedicated space.
Space is medium – 5.5 meters by 4.8 meters. Nice and cozy.

There are some more random bits about the place (including explanation of the gun image) below.
Taking Down a 10 Ton Wall
 So shit happens. The working guys over at my new house put a 10 tons wall when there should be no wall at all. It had to be taken down.
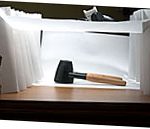
The image sucks, I know. What you see in the image is a hammer end. What you can’t see is that this head is connected to a huge bulldozer. Taking down this wall felt like opening a wound in the open flesh. I originally came with a portable gear pack, and thought “bulldozer, working guys, tons of image moments”. Let me tell you, once that hammer started taking down the wall, it hurt. It hurt like an open wound. The whole house was shaking. Putting up a setup (even just a brolli stand and umbrella) was the last thing on my mind.
The lesson here – don’t wait. Place the lightstand and strobes before the action starts – who knows what can happen later.
Taking The Night Shift
 I am not the only one building a house in that particular neighborhood. In fact about 180 families are building at the same time. Some started a few months before me, some started a few months later. Now some of the homes are ready take in the owners and will be full with live people soon. But now, they are all still empty.
Empty means no people there at might. “No people” means anyone can come and take whatever they want (which of course they have).
So we tallied up and decided to put a neighborhood watch at nights. Last night was my turn. As the watch ended and the new guys came to replace us, I pulled up the camera and suggested to take a shot – you know if we die on duty, they’ll have something to remember us by ;)
Scouting was simple – a lot of “naked” concrete, blocks and dried up cement. This shot was actually taken at my soon to be front parking space.
On my portable kit I have a strobe, a homemade speedstrap, my homemade snoot and some gels. Oh and a light weight lightstand – the Bogen 3373. That’s it.
The simple ingredients dictated a simple setup. With one strobe I had no chance of lighting the entire place so I decided to play shadow games. This is something I read in the Strobist blog a long, long time ago.(I could not find the post, though- it was a shoot of a football player, I think. Hit the comments if you have the link).
So I put a strobe, camera left, with the speed strap and a snoot. This was to prevent spill and flare.
More home Studio Updates Soon.

Udi Tirosh
Udi Tirosh is an entrepreneur, photography inventor, journalist, educator, and writer based in Israel. With over 25 years of experience in the photo-video industry, Udi has built and sold several photography-related brands. Udi has a double degree in mass media communications and computer science.


Join the Discussion
DIYP Comment Policy
Be nice, be on-topic, no personal information or flames.
One response to “Endeavours Of A New Studio”
“So we tallied up and decided to put a neighborhood watch at nights.”
Wouldn’t want anybody to steal stolen land from you huh?