


How I created a Star Wars themed image for a wedding
Nov 7, 2016
Steve Thewis

We love it when our readers get in touch with us to share their stories. This article was contributed to DIYP by a member of our community. If you would like to contribute an article, please contact us here.
Share:

What started off as a bit of fun and a favour for a family member ended up here on the DIYP blog! Awesome!
Month’s prior to the wedding I was asked by my sister in law to photograph her wedding. As I’m not a wedding photographer at all, I wasn’t so sure about it. I had a think and decided to give it a go. As I was (besides being the photographer) a guest at the wedding and they didn’t have massive demands, I was pretty cool about it.
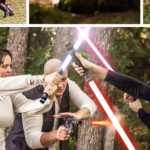
Both bride & groom are Star Wars geeks so I had the idea of creating a Star Wars themed wedding image for them. Something different… I’m a fan of mood boards and planning, and that’s what I did for this wedding. Having checked out PixelSquid before, I knew that using their Star Wars objects and characters was the way forward.
PixelSquid is a stock photography site with a twist. The photos are photoreal renders of 3D scenes/ objects … You can rotate them to view it from any one of their preset angles. Once you’ve registered on the site and installed the PixelSquid Photoshop plug-in, you can select a model through your web browser, click Add to Photoshop and the object will appear in the PixelSquid plug-in panel, ready to be used… How cool is that? Make sure to check out PixelSquid!
The lightsaber is a real piece I borrowed from my good friend and amazing prop-maker Shortie.
These are the steps I took to build the initial composite:

1: The original image was shot with the end result in mind. I knew I needed enough space in the sky to add the Death Star, X-Wing Starfighter and the AT-AT Walker. In Camera Raw I brought back some detail in the highlights and shadows.
2: I added the Death Star to the image and played around with the blend modes. I love the look of the Death Star in the Rogue One poster, so I wanted to have a play with that idea. I ended up using the Soft Light blend mode.
3: Adding the AT-AT was a bit trickier. I used the Color Range selection method to create a selection of the trees. That selection I then added to my AT-AT layer to make it look as if the At-AT was coming from behind the trees.
4: Of course I had to add BB8!!! Who doesn’t love BB8? The standard grass brush in Photoshop helped me to fake BB8 standing in the grass next to the groom.
5.Let’s turn on the lightsaber! I used a white brush to fill the blade of the lightsaber (on a new layer filled with black and blend mode to Screen). I then duplicated this layer a few times and added a Gaussian Blur to each layer except the first one we created. When adding the blur I slowly built it up… for example, the first copy we add 4px, the second 30px and the next one 90px…To finish it off I used a Color Balance Adjustment Layer to add a color. Duplicate this Adjustment Layer the same amount as the lightsaber copies and clip each copy to a copy of the lightsaber. For the glow coming from the Lightsaber I used a coloured brush and painted the glow in on a layer set to Color Dodge.
6: Inspired by the Rogue One poster I added in some Starfighters. I then added a Motion Blur to each Starfighter. For the trail I used a simple cloud brush.. here is how the construction looks like:

Now I’ve added all the main objects to my image it’s time to make it all blend and create a look for this image.

One of my go to techniques when it comes down to creating a look for my image is adding a Gradient Fill. For this image I picked a blue to orange gradient. Blue to enhance the sky and orange to warm up the image a bit. I set the blend mode to Soft Light.

Of course I did a bit of dodging and burning in this image. There’s many different ways of doing this but for this image I used the good old 50% Grey Layer set to Soft Light of Overlay method.
I then created a stamp (Shift – Alt – Cmd/Ctrl – E) and run the Camera Raw Filter. In Camera raw I added a vignette, boosted the contrast and added a blue tint to the shadows.

I finished the image by adding some flares to add to the atmosphere using the flares from raw.exchange.

I hope this little walkthrough was helpful and gave you a little insight to how I created this image. As always, if you have any questions, feel free to drop me a message
And before I forget… A massive thank you to Darth Vader (Stephen) and Stormtrooper Chris for the video message to the bride and groom.
About the Author
Steve Thewis (a.k.a. DigiSteve) is a photographer, retoucher and digital artist from the UK. You can check more of his work on his site, and instagram, and connect via twitter and facebook.
We love it when our readers get in touch with us to share their stories. This article was contributed to DIYP by a member of our community. If you would like to contribute an article, please contact us here.


Join the Discussion
DIYP Comment Policy
Be nice, be on-topic, no personal information or flames.
2 responses to “How I created a Star Wars themed image for a wedding”
How can people like this weird 80’s stuff? No way.
Just like other people like 70’s disco