


How I created some Christmas Evil in Photoshop
Dec 12, 2017
Clinton lofthouse
Clinton Lofthouse is a Award-Winning Photographer, Creative Director, and artist based in the United Kingdom, who specialises in creative retouching and composites. Proud 80’s baby, reader of graphic novels and movie geek!
Share:
 As the holiday season is nearly upon us, and we are about to get drowned in a sea of Tinsel and mistletoe. I thought it would be a good time to give you a breakdown of one of my older images, Bad Santa. So put on your festive jumpers, grab a cup of Eggnog and settle down by the stockings because we are about to get festive!
This image was part of a 2 photo shoot. One I created for Dark realm collective, the other was this portrait.

So to get started I need to find a good background image. I was thinking small town America ( yes I know, Ive watched too many American movies) as it fits well with the theme.
 Now as you can see from above this background needs a little work, but most of the bottom will not be seen, so we can just focus on the tops of the building and the sky. We have a lot of white skies so let’s add in some moody clouds. To do this just bring in an image of some clouds and put the layer on to multiply. This will just leave the darks of the cloud which blend nicely into the white.
 We want this to look like Christmas, so lets add some snow. To do this I set my brush to white, turned up the hardness to around 70% and began to dot the brush around the image.

We have our snow, but now I want to set the mood with a colour on our background image. I want to choose a colour that lends itself to the fantasy but also to the festive season. I went with green because it blended itself nice with both.
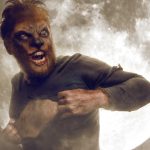
 We have our background to work on, so now we need our model. Our bad Santa for the was the awesome Pip Atkins and makeup by the awesome Anna Czarniecka.

I cut out Pip with the pen tool and used refine edge to cut out his beard. Once that was done I slipped him straight into the layers panel above the background. But two things need changing. We need to match the model to the background colour so he fits into the scene, and we also have to match his claws to his face. We do this by using colour balance and pulling greens into the midtones, darks and a tiny bit into the highlights. Then to match the hands I created a hue/saturation adjustment layer and played with the hue slider and saturation slider. I did this until the greens blended in a more pleasing way with the rest of the image.

My favourite part, the styling. This is done with dodge and burn. I create a curves dodge and burn group and begin to darken the darks, lighten the lights and go over the small details. You can find plenty of info on how to do this in previous posts.

Now to make the model blend into the scene more realistically we have to add snow in front of him. Always think about little details, and sell the fake as we composite artists like to say. To add the snow in I found a snow texture on Deviant Art. I basically brought it into my layers palette and switched it to a screen blend mode. It erased the blacks and only left the whites, which was the snow. I then added some motion blur to the snow to make it look as if it was falling.

With things looking pretty good, I now added some detail to the image using topaz detail. A very good sharpening plug-in that I use on all my images. I then with a curves adjustment layer played with the tone a little. Adding more darks into the image, and adding more contrast to the face.

Finally, I added some light flare to the light at the sides of the models face. I did this by creating an empty layer and putting it on a screen blend mode. With a brush on a low opacity, I sampled the highlight colur and brushed it gently over the lights. I then added a photo filter on top of all the layers with a green tone, to enhance the colour and blend all the tones together.
And there we have it. One festive edit for all you good folks.
Have a fantastic December! :)

Clinton lofthouse
Clinton Lofthouse is a Award-Winning Photographer, Creative Director, and artist based in the United Kingdom, who specialises in creative retouching and composites. Proud 80’s baby, reader of graphic novels and movie geek!

Join the Discussion
DIYP Comment Policy
Be nice, be on-topic, no personal information or flames.