


Create High Speed Photography Multiple Exposure Photos With Miminal Gear
Aug 25, 2014
Laya Gerlock
Laya Gerlock is a Portrait and Product photographer based in the Philippines. His passion is teaching and sharing his knowledge in Photograpy and has been doing this for 6 years.
Share:
You know those ads that have a bottle of soda and an edited splash on the sides, seems like they are the standard for light drinks now. Seeing one of those inspired me to do try and recreate such a shot, and of course share it with you.
What you will need:
- A DSLR
- A Flash (can be either speedlight or a studio strobes)
- Wireless radio trigger
- Various lighting modifiers
- A place where you can make a mess
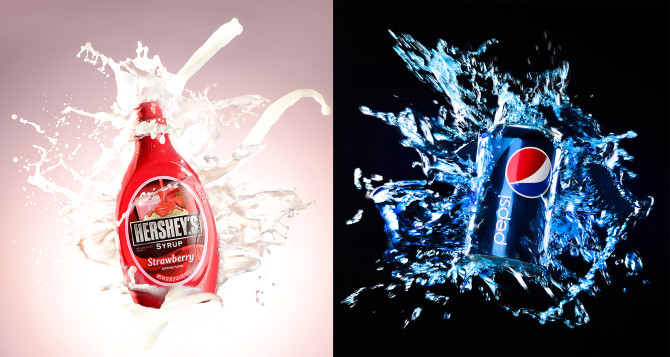
Hershey Milk Setup
For this shot, I was using 3 speedlights. My main light was a sb-600 with a shoot through umbrella placed on the right side of the sauce. A kicker light was placed on the back left of it. And I had another flash with pink gel pointing at a seamless white paper (though smaller papers will do just as well). Here is how the setup looks like:

Pepsi Setup
While similar in concept, lighting a Pepsi can, had to be a bit different. For this setup I placed the main light at camera left with a shoot through umbrella, 2 monoblocks with softboxes on the back left and right of the can for a strong rim light, and a speedlight at the back with a blue gel and a snoot pointing at the background. Kinda like this:

Flash Durations:

The strobe you are using will have a lot of impact on how the shot is done. With the Pepsi shot, I was using a Chinese studio strobe with slow flash duration which caused some motion blur. With the Hershey milk shot, I was using my speed lights with a short flash duration which was freezing the milk complexly.


Here Is How It’s Done:
- Place your camera on a tripod, this is crucial. Since you’ll be compositing photo’s you don’t want the subject to move. It would make your life so much easier in post.
- Mount or set your subject to a “tripod table”, use double stick tape if needed.
- For the Pepsi shot, I cut a hole in the bottom and shoved a light stand inside of it.

For the milk shot, I used foam double stick tape, and placed on a flash holder on top of the light stand.

I was shooting at ISO 200, 1/160/ @f5-6-11.
You can also use a wireless trigger or shutter release cable for your cable for this.
First, take a clean shot of the subject, this will be used as the bottom layer of your composite stack.

Now, it’s time to have fun, I used water with blue food coloring for the Pepsi shot, and milk diluted with water for the Hershey picture.

I took about 50 shots or more for each set, splashing all over the can and bottle. Make sure to splash on all sides of the subject so that you have a lot of splash photos to work with.

How to Edit:

Start with the first image of the subject, the one without any splashes. Edit the background and remove distracting elements if you have any – dust, scratches, stains on the backdrop and so on…

Choose the shots that have the best splashes – make sure you have splashes on all sides of the subject. Drag it down to the Layers in Photoshop.
It’s easier to do this part a splash at a time. Hide all the splash layers and start with the one you wanna work with first. There are different techniques in doing this but I used layer mask to select the splashes that I want. Do this for the next layer. Then rinse and repeat. You may have to go back and forward a bit to fine tune your selection of splashes.


After getting the splashes you want, merge the layers (CTRL+alt+shift+e) and apply dodging and burning on the splashes and the subject to get a little bit more contrast for the shot.
Of course, you are then welcomed to tweak the photos in any way you like…


Here Are The Final Images:


Filed Under:
Tagged With:

Laya Gerlock
Laya Gerlock is a Portrait and Product photographer based in the Philippines. His passion is teaching and sharing his knowledge in Photograpy and has been doing this for 6 years.


Join the Discussion
DIYP Comment Policy
Be nice, be on-topic, no personal information or flames.
2 responses to “Create High Speed Photography Multiple Exposure Photos With Miminal Gear”
Useful. Thanks for sharing.
cheers ;) sharing is caring :) haha