


Build Your Own 2.5x Super Macro Rig for $230
Sep 10, 2017
Micael Widell

We love it when our readers get in touch with us to share their stories. This article was contributed to DIYP by a member of our community. If you would like to contribute an article, please contact us here.
Share:
Last summer I bought a macro lens. A normal one, giving 1x magnification. This means that your subject will be projected as big on the sensor as it is in real life. So if you shoot a bug that is 36mm long, it will completely cover a full frame sensor from side to side. I discovered that macro photography is just so much fun. It is much easier to take a cool looking macro photo than a cool looking street or landscape photo. I completely fell in love with macro photography.
But the summer of 2017 I felt that I wanted to take it to the next level: I wanted to try a super macro lens, with a magnification of 2x and beyond. I wanted to really get up close to insects and bugs. I made one!
There are only a couple of super macro lenses on the market. The Canon MP-E 65 is perhaps the most well known. It is a great lens, but it costs north of $1000. There is also one from Venus Optics called Laowa 60mm Ultra-Macro, but that one is also rather expensive and has some problems with distortion. So I decided to find something cheaper.
After a lot of searching online, I stumbled on a Swedish blog with an excellent article in Swedish on how to build a super macro rig with cheap parts from Amazon or eBay. All credit for this setup should go to John Hallmén who authored the original article. The only limitation of this setup compared to a conventional macro lens, is that the magnification is fixed. You can only adjust it by adding or removing extension tubes. But I did not find this to be much of an annoyance.
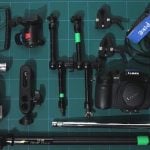
I ordered all the parts, including flash, reverse mount adapter, a Canon 40mm f2.8 lens (which is extremely sharp and has great bokeh, probably better bokeh than the Canon MP-E 65), a step-up ring, an articulating arm to mount the flash, a flash cord, a straight flash bracket, and extension tubes. Putting these things together, will give you a powerful super macro rig capable of capturing ants and other very small insects in full size! The only pre-requisite you need is a Canon EF compatible camera, which means most Canon cameras or a Sony camera with a Canon EF adapter.
Essential parts
- Canon EF 40mm f/2.8 STM Pancake Lens (around $50 used)
- Meike reverse adapter (around $55)
- MeiKe MK-300 Flash (around $33)
- Vello CB-600 Straight Flash Bracket (around $10)
- Articulating arm 7″ (around $14)
- Fotga Extension tubes for Canon EF (around $40)
- Vello TTL-Off-Camera Flash Cord for Canon EOS 0.5 m (around $20)
- 52-58MM Step-Up Adapter Ring (around $8)
In total (if you buy the Canon lens used): $230 USD
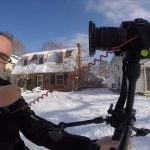
See the video above for detailed instructions and more sample photos. The parts can be put together in a few minutes.
Sample photos
Here are some photos I took with Sony A7 and the above setup:


About the Author
Micael Widell is a photography enthusiast based in Sweden. He runs a YouTube channel about photography, where he posts lens reviews, DIY tips, and photo walks regularly
We love it when our readers get in touch with us to share their stories. This article was contributed to DIYP by a member of our community. If you would like to contribute an article, please contact us here.


Join the Discussion
DIYP Comment Policy
Be nice, be on-topic, no personal information or flames.
3 responses to “Build Your Own 2.5x Super Macro Rig for $230”
I use Canon and I have Vello Macrofier (which costs $100). It reverses lenses (and comes with various rings of various diameters to fit almost any lens you want to reverse). I use it mostly now with my Voigtländer 20mm and according to my calculations, this simply gives me 3.17X magnification. Also, I can still add extension tubes of course and increase the magnification but didn’t try that yet. The macrofier also provides aperture control.
Extension tubes are cheap. I use them all the time.
I tried ET and lens reversing – the problem with ET is the magnification power and the focusing distance (which sometimes theoretically falls behind the front of the lens). Too much ETs can make it cumbersome to move the camera around as well.