


How to build your own DIY car photography rig for under $50
Jun 19, 2017
John Aldred
John Aldred is a photographer with over 25 years of experience in the portrait and commercial worlds. He is based in Scotland and has been an early adopter – and occasional beta tester – of almost every digital imaging technology in that time. As well as his creative visual work, John uses 3D printing, electronics and programming to create his own photography and filmmaking tools and consults for a number of brands across the industry.
Share:

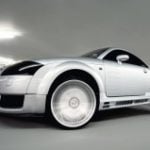
Photographing moving vehicles is both fun and challenging. You want to get the car perfectly sharp, while the environment becomes a blur of motion. Often such images are created with a specialised, rig. These rigs attach to the vehicle at one end, and allow you to mount your camera on the other.
Such rigs can be very expensive, though. If you just want to experiment, there’s no point spending hundreds or even thousands of dollars on such a system. But there are less expensive options. In this video from Practical Photography, we see one DIY vehicle camera rig build that costs only around $50. The results are rather good, too.
https://www.youtube.com/watch?v=F8vwZ_AKgW8
The video does assume that you already own a tripod with a removable centre column, but the extra items needed specifically for this setup should cost no more than around $50. You could probably find them for much less if you shop around.
Other than this and your tripod centre column, all you’ll need to assemble it are some cable ties and gaffer tape.
After deciding the view you want from your camera, the first step is attaching the suction cup mounts. These should be arranged so that the two form a line toward where the camera will be. The further these are spaced out, the more sturdy the rig will be.
Cable ties are then used to attach the pole to the suction cup handles. These will take the strain of the weight of your camera on the end of the pole, but it could still potentially twist. Gaffer tape on top of the cable ties should prevent the pole from rotating.

The tripod centre column attaches to the other end of the pole, again using cable ties, wrapped in gaffer tape. The trick here is to mount the camera upside down underneath the pole. That way, from the camera’s perspective, the pole is mostly cutting through the sky and not the vehicle itself. This makes it much easier to remove from the shot in post.

Once everything is tied and taped down, you just need to attach your camera. The technique for shooting the images is identical to using more expensive rigs. This means a fairly slow shutter of around 1-2 seconds, with the vehicle moving quite slowly. In the video, the car was moving at only 1-2mph to achieve the effect.
To offer the most potential shot options once back in the computer, the camera was set to shoot timelapse. This means you won’t have to deal with a remote shutter and triggering it manually. In the video, they went with shutter priority mode to ensure they had the motion blur they wanted. The camera figures out the aperture based on how the environment changes while the car moves.

It was quite a bright sunny day when they shot this video. We do get those occasionally in England. So, they placed a 6 stop ND filter over the lens to be able to get that 1.3 second shutter speed. You can see even going at only 1 mile per hour, the long exposure makes it look like they’re zooming down the road.

You can also see in this shot why the camera was mounted beneath the pole, and not above it. It does cut into the car a little, and there is some reflection to clean up, but most of the pole is in the sky. If the camera were above the pole, the pole would be cutting through the vehicle, and the moving environment. This would be much tougher to have to deal with in post.
Once the rig is removed and cleaned up, you get something like this.

Even with the expensive rigs, you’d have to deal with removing it in post. It’s just a fact of automotive photography life.
Something that wasn’t mentioned in the video was to ensure your car is clean. Presumably, that’s because one would expect the car to be clean anyway if we want to photograph it. But it’s worth noting. Dust, oil, pollen and other substances on the surface of the body paint, or on the windshield can spell disaster if you’re not careful.
If you get serious about shooting this kind of thing regularly, it’s worth investing in more substantial rig. While this might get you the shots you want, a painter’s pole isn’t really designed for the weight of a heavy DSLR & lens. So, you may have to shoot more images to eliminate any bounce from the flexing pole entirely.
The commercial rigs generally use single piece steel, aluminium or carbon fibre poles which are more rigid and help to ensure you get the shot you want sooner. But at least with this option you can experiment and see if you even like it without having to spend a fortune.

John Aldred
John Aldred is a photographer with over 25 years of experience in the portrait and commercial worlds. He is based in Scotland and has been an early adopter – and occasional beta tester – of almost every digital imaging technology in that time. As well as his creative visual work, John uses 3D printing, electronics and programming to create his own photography and filmmaking tools and consults for a number of brands across the industry.


Join the Discussion
DIYP Comment Policy
Be nice, be on-topic, no personal information or flames.
12 responses to “How to build your own DIY car photography rig for under $50”
I think for 31 quid, they could have bought two carriage bolts and nuts to mount the pole to the suction cups rather than use tape and zip ties. For £35, they may have been able to buy a short length of steel pipe to insert the extension pole into to minimize the flex. Overall, neat topic and well done!
Jerome Lejeune :-D
Why use ND filters and then raise the iso to 1600?
I might put a cheap Vivitar point-and-shoot on that rig, but not a DSLR.
I presume you need to avoid oncoming cars on narrow country roads…
nope, nope, nope. I’ve had my pro rig pop off in the cold, this is just asking to cause thousands of dollars in damage to both equipment and the car. When dealing with a client’s vehicle, duct tape and zip ties are just beyond the pale of hack.
mate you only go 2 mph and a shuter speed of 4/5 seconds
it’s funny that you think I don’t know this. I’ve been shooting rig shots for 7 or 8 years. It’s also funny that you think what you said has any bearing on my initial reply.
well they dont state they do it for clients. “If you get serious about shooting this kind of thing regularly, it’s worth investing in more substantial rig”
What part of “thousands of dollars in damage” don’t you understand?
go to sleep mate. or read the whole thread again!!! if you can read that is???? BYE
Please, explain to me what I’m missing, then. Is it that you just WANT to drop your camera to the ground while damaging your own car?