


Watch and learn how to photograph snowflakes at home
Feb 19, 2021
John Aldred
John Aldred is a photographer with over 25 years of experience in the portrait and commercial worlds. He is based in Scotland and has been an early adopter – and occasional beta tester – of almost every digital imaging technology in that time. As well as his creative visual work, John uses 3D printing, electronics and programming to create his own photography and filmmaking tools and consults for a number of brands across the industry.
Share:
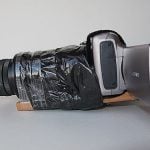
With big chunks of the world seeing snow right now, and not being able to get out much, it’s a great time to learn how to photograph snowflakes! This video from Jens at Another Perspective walks us through the process, which you can do with even an entry-level camera. You will also need either a macro lens or some extension tubes, too. And a close-up filter like the Raynox DCR-250 shown in the video might help, too.
The trick to figuring out how much magnification you need, which you can do by understanding how big snowflakes are and the magnification factor of your lens and overall camera setup, which Jens explains how to do in the video – and one of the things I like about it. Jens actually goes through the problems and how to tackle them.
When you’re dealing with something this small, it can get disheartening when you’re not getting the results you were hoping for. Perhaps your lens just doesn’t get you close enough and your subject isn’t as big as you want it to be in the frame. Or maybe the subject itself is much smaller than you’d hoped for. After all, snowflakes can range in size from as small as 1mm up to a pretty huge 10mm.
That’s a massive difference in size, and you’ll need 10x more magnification on the smaller flake compared to the larger one to get them appearing the same size to the sensor. Personally, I use the Nikon 105mm f/2.8D AF Micro-Nikkor for almost all of my macro work, and will often stack it with extension tubes to be able to focus much more closely and get that subject larger in the frame. It’s a fun setup.
As well as the potential issues of focal length, focus distance and magnification, Jens covers a number of other issues in the video that you might face, including how to keep the camera steady and focus properly on such a close subject as well as how to light the snowflakes using flash (and how not to use flash with a macro lens).

John Aldred
John Aldred is a photographer with over 25 years of experience in the portrait and commercial worlds. He is based in Scotland and has been an early adopter – and occasional beta tester – of almost every digital imaging technology in that time. As well as his creative visual work, John uses 3D printing, electronics and programming to create his own photography and filmmaking tools and consults for a number of brands across the industry.


Join the Discussion
DIYP Comment Policy
Be nice, be on-topic, no personal information or flames.
One response to “Watch and learn how to photograph snowflakes at home”
A real DIY veteran on this matter is Alex Kljatov. Check out his pictures and his workflow: https://alexey-kljatov.pixels.com/myblog.html