


Upgrading a simple DIY PVC camera dolly with a motor and big wheels
Feb 12, 2018
John Aldred
John Aldred is a photographer with over 25 years of experience in the portrait and commercial worlds. He is based in Scotland and has been an early adopter – and occasional beta tester – of almost every digital imaging technology in that time. As well as his creative visual work, John uses 3D printing, electronics and programming to create his own photography and filmmaking tools and consults for a number of brands across the industry.
Share:

Anybody who shoots video or timelapse knows that the key to getting great shots often involves camera movement. This is why sliders and dollies are so popular. Almost every timelapse shooter or filmmaker I know owns one. Of course, they’re not cheap. So lots of people have come up with ingenious ways to build their own. Including one from way back in 2011 by Frugal Filmmaker that costs less than $20.
For Eric Strebel, though, while it worked great, he wanted more. So, he upgraded the one he made to add a motor. The problem is, it’s too fast. So now he’s upgraded it again to turn it into a motorised Hot Rod table dolly. The construction extends Frugal Filmmaker’s original design quite nicely. It’s a fairly simple modification, but you may need to use a few more tools.
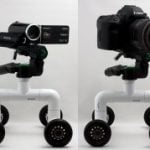
Eric’s motorised version of the table dolly uses a direct drive type system, using pressure on the top of one of the wheels to drive it forward. This gave him 8 revolutions per minute of the wheel, or one full revolution every 7.5 seconds. That’s quite quick, ever for tiny roller blade wheels. One revolution is around 22cm in total distance travelled. Around 3cm per second, or 1.76 metres over a whole minute.

The theory is that the larger wheel will rotate more slowly, and thus allow a slower speed. But, mathematically, this doesn’t make sense if you’re also moving the motor to the outer edge of the wheel. The motor’s still spinning at the same speed, and sure, you’ll get fewer revolutions per minute on the wheel it self, but with the circumference of it being proportionately longer, you’ll still travel the same distance. But, the motor does have a variable speed control circuit in there, allowing Eric to slow it down. The larger wheels should also help it to move more smoothly over ground that isn’t perfectly flat.

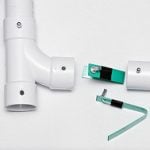
One pretty neat feature of the motor mount is that it’s spring loaded. This allows you to quickly and easily free it from the wheel to push and position it manually. That’s one of the biggest pains with many motorised dollies and sliders. You have to use the motor itself to reposition it where you want it, which often takes forever. No such issue here.
If you don’t fancy doing all this tooling to make the parts fit perfectly, but you’re a dab hand at 3D software, you might want to consider designing and 3D printing your own parts. Regular PLA should stand up quite well to this kind of use. Personally, though, I’d 1probably go with ABS or PETG for the motor mount itself, due to potential heat build up on the motor, if you go the 3D printing route.
I’d probably also extend the leg that comes down from the top piece to hold the crossbar with the two front wheels, too. Right now, it wouldn’t be rotating parallel to the ground if you want to have the camera turn as it moved. At tiny angles this wouldn’t be a massive deal, but at greater angles, you’ll have one wheel slightly off the ground – which could cause potential wobble as it moves.
Overall, though, it’s a very neat modification. The principles of this could be applied to just about any DIY dolly design. Of course, you’re on your own when it comes to cutting and measuring and making it all work.
If you haven’t seen the original video from Frugal Filmmaker on how to make the basic dolly, here it is.

John Aldred
John Aldred is a photographer with over 25 years of experience in the portrait and commercial worlds. He is based in Scotland and has been an early adopter – and occasional beta tester – of almost every digital imaging technology in that time. As well as his creative visual work, John uses 3D printing, electronics and programming to create his own photography and filmmaking tools and consults for a number of brands across the industry.


Join the Discussion
DIYP Comment Policy
Be nice, be on-topic, no personal information or flames.
2 responses to “Upgrading a simple DIY PVC camera dolly with a motor and big wheels”
John, I think you’re wrong about the small motor shaft to large wheel diameter not slowing down the dolly.
This is the same as a small gear at high speed to a large gear. The fact that the large gear is the wheel doesn’t change the fact that the ratio is much reduced. Doesn’t matter where the motor is. Its all about the ratio of input to output. Here’s a neat web app that allows you to play with gear ratios. http://geargenerator.com/#50,50,25,6,1,0,5494.500000000409,2,1,6,1.5,4,27,-90,0,0,104,26,4,27,-60,0,0,2,-228
Love these articles! Let’s have more DIY stuff!