


Tethering through Lightroom
Jan 22, 2017
Clinton lofthouse
Clinton Lofthouse is a Award-Winning Photographer, Creative Director, and artist based in the United Kingdom, who specialises in creative retouching and composites. Proud 80’s baby, reader of graphic novels and movie geek!
Share:

Anyone who has ever taken self-portraits will know the exhausting little jig that goes from in front of the camera lens, and around to check the screen on the back.
I’m pretty sure they now have this merry little dance down as fitness routine in your local gym, they call it the selfie workout! I joke, but anyone who has been dressed in full costume, running back and forth in a warm room. Wiping the sweat from their brow, and jumping back again before the timer runs out, will know my pain. The image above was created through this very technique.
I recently decided to purchase a tether cable from Amazon, not only would it help with self-portraits. But it would also be very handy to have whilst shooting models, who don’t have to squint to see themselves on a small screen on the back of my camera. My program of choice for this………Lightroom! Now before I hear a harmonic cry of ‘you should be using Capture One’ bellowing over the hilltops. Let me fill you in on my experience of tethering through Adobe’s image processor and organizer. And you too will find taking self-portraits like this easier….

So why am I tethering, and why with Lightroom?
Tethering is something I have been meaning to do for a while now, but not got around to it. Shooting with models in my studio, I was beginning to feel that it wasn’t enough to see the images on the back screen of my camera. My camera being a D90 and the screen only three inches. You pretty much have to have your nose touching the screen protector so you can get a good feel of the image. Across the studio where I shoot is a 32-inch monitor, it would make more sense to view the images on the larger screen, but then also the model can see the images from where she is stood. Therefore they are able to assess their poses and make changes if necessary. Also, they do not have to deviate from where they are stood, which means I don’t have to refocus when using a tripod. This isn’t too bad when shooting with other models. But when you are creating a self-portrait like the one below, things get tricky…….oh how I wish I had started tethering that day!

Now why Lightroom I hear you ask? Well simply, I don’t have capture one. I have used LR since I first picked up a camera. I use it mainly for cataloging my images, and for some small final adjustments to images after they have been edited in Photoshop. I also use it to export my images. Therefore since Lightroom is part of my workflow already, it makes sense to also tether through LR than buy capture one, and have to learn a whole new system and layout.
To tether to LR from your camera you will need a tether wire. My Nikon takes a Type A to Mini B connector tether wire. There are many various wires ranging from around the £50 mark like this Tether Tools wire….

To under £10. I went for A Lindy wire at £9.99. If I’ve learned anything from buying accessories for photography, it is that the cheaper accessories will usually do just as good a job as the branded ones….most of the time. Just do a little research first.

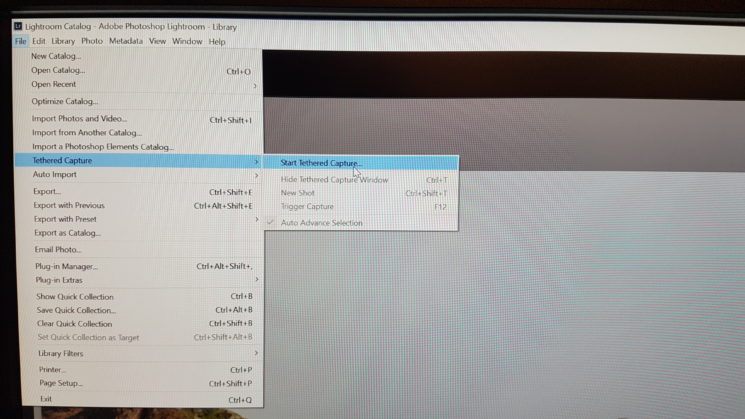
So let’s get down to the actual tethered shoot. As this was going to be a selfie, I set up my camera on a tripod, set up the light at a guess, and locked in focus. With tether wire in hand, I found the correct port. Pretty much every camera should have one. I then connected the other end of the wire, which is a USB connector to my desktop PC, and started up LR. Once in Lightroom go to File. Scroll down to Tethered Capture and choose Start Tethered Capture. As so…
Next, a dialog box will pop up called Tethered Capture Settings. On here you can name your session, manage file naming, file destination and add metadata.

As this was only a test, I only used the Session Name box. I would recommend giving this a relevant name as it saves the session automatically to your LR, and will be easy to find the images at a later point through the session name, and its just good practice.

Once you click OK, the box will disappear and a your tether controller tool will pop up. This controller is fairly simple. It has the name of the session, the camera settings, and a develop module. The little tool can be moved around the screen with the cursor so it doesn’t block any photos, and can also be hidden. If your tool says No camera detected, simply turn your camera off and on again and it will appear.

You are now ready to shoot tethered. I took a shot of my screen. The image takes a few seconds to pop up, but not too much of a drastic wait. Once the image is on the screen it will, as I said before, show you the settings at which the image was taken.

Simple yes, but it does the job. Another cool thing which I also know Capture one does, is that you can add develop settings to your images. So if you want to show a client a preview of how the images will be looking color or tone wise, you can simply go to the tether controller. Click develop settings, and from there choose the desired preset. You can also design your own presets in LR, so if beforehand you build a present, once tethering you can choose it from the list of presets.

So there it is. Simple yes, effective yes. I’m not sure what you guys want whilst tethering, but for me, I just want a tool that does the job with no frills to complicate things. Lightroom’s interface is easy to use. I believe even someone with little experience would easily be able to work it out and shoot tethered within minutes. I found my experience shooting a self-portrait far more relaxing. I could take the shot from my pose position, wait two seconds and see it clearly in LR, on my monitor. I cannot give you a Lightroom vs Capture One in regards to tethering as I have only used Capture ones tethering briefly, and it wouldn’t be fair. But from the small amount of time I did use it, Lightrooms tethering seemed to be just as good with little difference between them. I would love to hear your opinions though if you have used both.
And if you were wondering about the outcome of my first tethered self-portrait, take a look…… You can find out how I created this ultimate selfie on my Blog.


Clinton lofthouse
Clinton Lofthouse is a Award-Winning Photographer, Creative Director, and artist based in the United Kingdom, who specialises in creative retouching and composites. Proud 80’s baby, reader of graphic novels and movie geek!
Related Posts
 Adobe confused as to what a Nikon looks like – uses Fuji X-T20 to promote faster Nikon tethering
 Darktable just dropped 3.4.0 with improved tethering and live histogram, and color calibration
 Nikon launches two free apps for tethering and transferring photos from camera to smartphone
 Capture One 22 v15.3.0 update brings Sony wireless tethering, magic eraser, and early iPad support
Join the Discussion
DIYP Comment Policy
Be nice, be on-topic, no personal information or flames.