


How to shoot great casual portraits with just one light
Mar 27, 2017
John Aldred
John Aldred is a photographer with over 25 years of experience in the portrait and commercial worlds. He is based in Scotland and has been an early adopter – and occasional beta tester – of almost every digital imaging technology in that time. As well as his creative visual work, John uses 3D printing, electronics and programming to create his own photography and filmmaking tools and consults for a number of brands across the industry.
Share:

Long before I decided to start shooting portraits, I was asked to photography people. Friends, family, their friends, and their friends. At the time, I wasn’t interested in photographing people, and didn’t really have much idea how to go about getting great photos of people. I usually declined and deferred to people who knew what they were doing. But it’s a valuable skill to learn.
In this video, photographer Joe Edelman shows us how to get great casual portraits and headshots using very minimal kit. With just one light and one modifier, Joe shows us how to create some fantastic portraits. I wish I’d had this video 15 years ago.
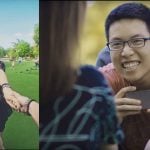
Like Joe, getting a more casual portrait it something I try to do on every shoot now. Models are often already fairly comfortable, but for paying clients or friends, they’re not used to having a camera thrust in their direction. They’re certainly not used to being “posed”.
Casual portraits like these, help you work on the overall mood and expression of your subject. Whether in the studio or on location, it helps your subject relax and become at ease with the camera.
Prep work
The basis is starting off with a casual outfit. You’re subject’s probably not going to be too casual if they’re wearing a tuxedo or a ball gown. You could go simple with jeans and a plain white top, or make it more commercial. You can even do glamour in a casual way.

But whichever route you take, it’s important to plan the outfit with your subject in advance of the shoot. You don’t want them turning up in loud coloured patterned shirts and dresses for this kind of thing. It might make them feel casual, but it’s usually not going to make for the best photos.
Have them take some selfies in the mirror wearing the clothes they’re considering for the day. This way, there’s no surprises on the day, and you both know exactly what’s going to be shot. And make sure to remind them that the clothes should be clean, ironed and on hangers, so you’re not worrying about creases and wrinkles.
Setup
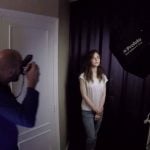
Shooting in the studio, Joe has neutral grey walls. Instead simply having them stand in front of the background, Joe positions them sideways on to the background. He then shoots along it, with the wall going away from the camera, rather than parallel to it. This can help make the image feel more like it was shot in a regular room rather than an actual studio.

Joe uses a large octabox for this type of shot, but you can use whatever gives you the type of light you prefer. Larger, softer light sources do tend to make the images appear a little more friendly and casual, though, in my experience. But, there’s nothing really stopping you from going with a hard bare bulb light source if you wish. As Joe mentions, hard light does make the image much more dramatic.
Soft light gives a very pleasing look, and it’s easy to get very different looks simply by moving the light.
Shooting Tips
Because the images are all about the subject, you want to remove as many distractions as possible. This is why picking out the outfits in advance, mentioned above, is so important. But you’ll often want to also have them remove jewellery. Bright sparkly necklaces, earrings and other ornaments can quickly become distracting.
A makeup artist will also help to highlight their facial structure and features. It’s less retouching work in post, too. The cost of hiring a makeup artist for the shoot can be much less than the lost income from the hours you might otherwise spend sitting at your computer in Photoshop.
Poses
As Joe says, “the key to making these shots work is the pose, or lack thereof”. You don’t want your subject to look posed. They should appear comfortable and relaxed. While you don’t want them to look posed, you can’t just ask them to go up and lean against the wall. Well, you can, but you probably won’t get what you expect. So you do need to pay attention and offer tips, and then find that compromise between comfort and aesthetics.
The problem is just human nature. Joe says that one of the most common problems is that when the subject first leans on the wall, they slink down against it. This isn’t a very flattering look. Hands are another important point to pay attention to, if they’re in the shot. But don’t constantly fuss about the hands, you’ll just make your subject paranoid, they’ll be making conscious efforts to try to look relaxed which has the opposite effect.
Options
You don’t have to do this with big studio strobes. You can do it with speedlights, too. Of course, you may be limited on the size of modifier you can use, so bear that in mind. Whatever type of light you’re using, though, if you have several then you can add another to the shot as a background light. Using a gel to light the background will help to introduce some colour contrast to your shot and help to make your subject stand out even more.

A third light can be added as a rimlight, just to add a little more background separation. You’re really only limited by your imagination.
And you don’t need to have your subject standing, either. You can have your model seated against the background for a look more like this.

Whenever I’m dealing with a new portrait client or subject. I usually spend the first 30-60 minutes doing shots like this. It gets them used to the camera, and it lets you get to know your subject a little more. It also helps you to learn what topics will get them to elicit a certain look or emotion. Ultimately, it leads to better photographs.

John Aldred
John Aldred is a photographer with over 25 years of experience in the portrait and commercial worlds. He is based in Scotland and has been an early adopter – and occasional beta tester – of almost every digital imaging technology in that time. As well as his creative visual work, John uses 3D printing, electronics and programming to create his own photography and filmmaking tools and consults for a number of brands across the industry.


Join the Discussion
DIYP Comment Policy
Be nice, be on-topic, no personal information or flames.