


How I photographed these star trails at the Nabatean ruins of Shivta
Jun 14, 2016
Ron Kishinevsky

We love it when our readers get in touch with us to share their stories. This article was contributed to DIYP by a member of our community. If you would like to contribute an article, please contact us here.
Share:

I’ve always been inspired by the night sky. But I always thought that it would be difficult to shoot. And I guess it was not easy way way back, but today’s tech makes it easy twice: new sensors are extremely sensitive to light and are producing great high-iso, low noise results. This opened up a whole new area of photography for me – night sky photography.
Back to the story…
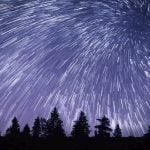
Shivta national park is one of my favorite locations to shoot stars at night. There is an amazing foreground – the ruins – which provide a an intereswting foreground vs the black foreground and a starry sky. The impressive ruins of Shivta date to the Nabatean, Roman and Byzantine periods. Shivta is one of the largest Nabatean settlements in the Negev, and recognized as a UNESCO world heritage place.
The location is pretty close to where I live, it’s about a 1.5 hours drive. Than, by local standards, it’s relatively far from any major city (43km southwest of the city of Beer Sheba), and located in the dead middle of the Negev desert. The light pollution is low enough to make the stars visible.
Planning
I use Stellrium both on my phone and on my PC and check moon phases to plan my photography. This app has the option to dial my location coordinates in and get a simulation of what is going on in the sky at any time I want.
The best time to shoot star trails is when the moon between the Waning Crescent phase to Waxing Crescent Phase. When illumination is at the 0-30% range. When I shot this photo, the moon was a Waxing Crescent and at about 30% illumination. It was bright enough to light the foreground without “light polluting” the sky.
I planned my shot to face north and get the northern star in the frame. All the stars moving around the northern star which makes circles on the final star trail photo.
Gear
- Nikon D610
- Samyang/Rokinon 14mm f/2.8 IF ED MC Aspherical
- Manfrotto 190X Tripod + Manfrotto 804RC2
- Remote with intervalometer
The Shooting
I arrived right after sunset, when the place was still lit and started searching for composition. This way I could still see how the foreground will look before darkness swallowed everything. I also took some shots of the foreground with last-light with just to see that I’m satisfied with the final composition and to get lit up foreground with closed down aperture to get everything sharp. If I needed to blend a well exposed shot, I would have a backup.
There are couple ways to setup the camera to shoot intervals:
- Some cameras have internal intervalometer that you can set up (Not my favorite way).
- Switch the camera to burst mode and lock the button on the remote control. This is the easiest way but some cameras limit the number of shots in a burst. So you need to release the button every hour and relock. Otherwise, the camera will stop. On the D7200 I did not experience this issue, but on the D610 I got 100 photos limit.
- Setup an external intervalometer. Put the camera on Bulb mode and setup the duration of each exposure and delta on the external device. (I used 30 sec and 1)
Camera setup
- Manual Mode
- Manual Focus
- Apreture: 2.8
- ISO 2000
- RAW
- High ISO NR- OFF
- Long exposure NR- OFF
- WB I used it on auto, with the intention of matching the WB in post.

Right before starting the time lapse I put the lens cap on and took one photo with the selected exposure. This is a dark reference frame that later will be used in the stacking.
After the night has and the sky got dark enough for the start to be visible, start the intervalometer and stay there for couple minutes just to make sure that the camera handles the shots well.
I ran the intervalometer for about 2.5 hours making a total of 300 frames.
Post processing
There are two editing phases for star trails; I use Lightroom to edit the photos to my liking in terms of exposure, contrast and so on, then I use StarStax to combine them.
In Lightroom I only edit one frame from the session and then synchronize the settings to the rest of the photos.
Here is the before and after the processing and my lightroom settings.

I mostly fix white balance, crop and minor straightening (if needed), lens vignetting, and overall exposure to bring out the stars and to get rid of bit of light pollution that I got on the left.


Here is what a single photo looks like after the edit:

After the photos are synced I export them from lightroom as .tiff files for best quality. (this can take up to 30 minutes). I also export the dark frame without any modifications.

After the photos are exported I drag them to the StarStax panel and add the dark frame (I do that by pressing the second button just above the photo list. Circled in blue line in the photo)

On the right side you will find the settings I used: Gap filling mode – to make the lines clear without any dots. Subtract dark image – the dark image is used to reduce overall noise of the image.
After the final image is stacked I export it again as TIFF and import it back to Lightroom for some last touch-ups and color balance.

At the end, I did not end up using the bright foreground I shot prior to the timelapse. The moon did an awesome job lighting the foreground.
Here is the final result again:
About the author
Ron Kishinevsky is a photographer based in Israel, with a specialty in landscape & nature photography. You can follow Ron on his Facebook page, 500px profile and Instagram.
We love it when our readers get in touch with us to share their stories. This article was contributed to DIYP by a member of our community. If you would like to contribute an article, please contact us here.

Join the Discussion
DIYP Comment Policy
Be nice, be on-topic, no personal information or flames.
2 responses to “How I photographed these star trails at the Nabatean ruins of Shivta”
I don’t understand what you did on the foreground. The star trails show that you combined pictures taken over several hours. During that time, the moon would move and the shadows of the foreground objects would move. So did you mask out the foreground on all the images but one?
Hi! the foreground got lid by the moon, and the StarStax software did amazing job blending all the light parts together as the moon moved through the time of shooting.