


Photo Breakdown – Amazing Star Trails Night Exposure
Dec 15, 2013
Guest Author
We love it when our readers get in touch with us to share their stories. This article was contributed to DIYP by a member of our community. If you would like to contribute an article, please contact us here.
Share:
Over the last few years I was obsessed with macro work. I decided to take a short break and experience/experiment with other forms of photography. I had a short (and enjoyable) period of underwater photography which ended abruptly when I introduced my beloved 60D unprotected to the ocean (not as enjoyable). After that unpleasant experience, I decided to stay away from large water habitats and expand my horizons by driving off to the desert and shooting the night skies (pun totally intended).

Choosing a desolated location in the desert is not a random choice. The location was chosen because it is completely dark. One of the prime factors to making a good night photograph is the amount of ambient light (A.K.A light contamination) The desert has none. There are several ways to find “dark” or unpolluted locations. One way is to use light-maps either online or from your local astronomy club. Another is to use Google maps nightlight maps. The basic rule being – The darker the better.
I used a full frame Canon 6D (which I got as a present-to-self after losing my 60D to the water lords). Since it is a full frame camera, it gives good Noise to ISO ratio, enabling high ISO captures with relatively low noise. The lens I used is a Rokinon 14mm Ultra Wide-Angle f/2.8. It is an ultra wide lens which gives great quality for the price. Between being 2.8 which lets a lot of light in; and being 14mm which capture a wide frame it is practically unbeatable for the price.
Shooting star trails actually means shooting the effect caused by the rotation of earth in relation to the starts, making them look like they are moving is a circular pattern.
Settings
There are two main factors that influence the “length” of the trails – focal length and combined time of exposure. To get a longer trail in a frame, you can either expose for longer duration or use a longer focal length. Star brightens is mainly a factor of aperture and ISO.
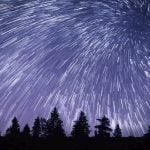
Using a 14mm lens meant that in order to capture long star trails I need a pretty long exposure. How long? 4 hours for the photo at the top of this post. (for comparison sake, here is what a 90 minutes exposure looks like)

I had to make a choice between one 4 hours long exposure, or stacking multiple shorter exposures. I opted for stacking several shorter exposures for the following reasons:
- Even with a full frame 6D, 4 hours means lots of noise.
- With a long exposure a stray car shining into the camera will destroy the photo. With several short exposures I can isolate a “bad frame” and remove it from the sequence.
- I can make the cool time lapse that you can see below.
Here is the setup I used to create the photo:
- I placed the camera on a heavily anchored tripod (stabilizing it from the desert wind).
- Framing was done with Liveview and extremely high ISO exposures.
- Noise reduction was set to off so the exposure will not have any gaps.
- After several tests, I set the camera on ISO 4000, f/4 and 30 seconds exposure. Here is what a single frame looks like:

If you don’t own an intervalometr (I don’t) a simple way of creating multiple consecutive shots is to set the camera to continuous shooting. And using a locked down dumb remote. The camera will take a photo every 30 seconds until the remote is unlocked.
Once the camera starts running you can sit down and enjoy the night.
After an hour you get bored and wish you’d brought a good friend along.
Post Processing
This photo was made with 450 exposure of 30 seconds each over the course of four hours. The individual stills were stacked using a free program called StarStaX. Using StarStaX is fairly straight forward – load the photos, give a go command and wait until the photos are stacked. Once the finished photo is done, you can tweak it in Photoshop, add contrast, remove noise and so on.
Here is a short time-lapse showing the individual photos:
About The Author
Nadav Bagim (a.k.a AimishBoy) is not going to write about himself in a third-person style as you would expect from these “about” sections. He will not present himself as 32 years old who lives in Ramat-Gan, Israel, and enjoys being a B.Sc student in Brain Sciences. He will not describe how he marched storming into the photography world 6 years ago and got enchanted by its magic after getting a SLR-Like camera, and he defiantly won’t say a word about the addiction to photographing that made him purchasing his first DSLR camera (so you can see HIS point of view of things).
He will not mention that he is an autodidact, because everybody is nowadays… and will not describe how he enjoys shooting nature, macro, landscapes, thoughts, ideas and many more objects and subjects that pop into his head – because that you will be able to see for yourself in his galleries. However, the one thing Nadav is willing to write is a big Thank You, for taking the time to visit his site and view the photos. He surely hopes you will enjoy them. So… Thanks! (: More photos at AimishBoy.com and on Facebook
P.S. – Like this kind of photo? check out our Complete Guide For Photographing Star Trails

Guest Author
We love it when our readers get in touch with us to share their stories. This article was contributed to DIYP by a member of our community. If you would like to contribute an article, please contact us here.


Join the Discussion
DIYP Comment Policy
Be nice, be on-topic, no personal information or flames.
8 responses to “Photo Breakdown – Amazing Star Trails Night Exposure”
Very nice!
You forgot to mention that you captured a meteor at :13.
An added bonus :-)
More likely a satellite – a meteor wouldn’t have been visible in more than one frame.
Cool enough though :)
…or maybe an airplane.
how did you power the camera?
my canon 40d only lasts about 100 shots with a battery grip
sounds like your batteries are knackered! I’d buy some new ones..
And also read up on battery maintenance, there are some rules that make a HUGE difference in battery life.
my d700 has 2k shots on the battery with more to go…
…and that’s just the grip battery. 100 shots is even small for a point and shoot. get new batteries!
These shots are brilliant. I have a trip to Ireland coming up in a few days and I’m hoping to take your tips and create some great sky photos of my own. Truly enjoyed it. Thanks so much for sharing!