


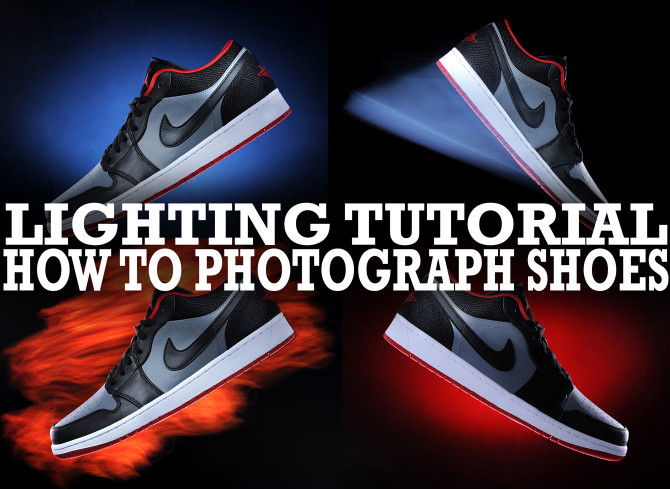
Lighting Tutorial: How To Photograph Shoes
Jul 18, 2015
Laya Gerlock
Laya Gerlock is a Portrait and Product photographer based in the Philippines. His passion is teaching and sharing his knowledge in Photograpy and has been doing this for 6 years.
Share:
I recently bought a new pair of shoes and before I use them and get them all dirty (as I always do in two seconds), I wanted to play around with them for a bit. Here is a step by step tutorial on how I made the shoes looks so fine. I tried to shoot them as straight out of the camera as possible, there is just some very minor editing to be done at the end.
What you will need
- A Camera (duh!!)
- Flash Triggers
- Studio Strobes or Speedlights
- Gels (for strobes, or bigger)
- Nylon
Step 1
The first thing is getting the correct placement for the shoes with as little distractions as possible. What I did with mine is I got some nylon strings and a ladder and hung the shoes on two steps of the ladder. You can also mount your shoes upside down and stick a light stand thru the feet hole to keep `em stable, but you’ll have to flip your photograph in photoshop after.
Step 2
Start of with the background light. Place a gelled strobe on the floor pointing at background. I used one of the black walls at my home studio as background. The speedlight was around 1/4 power. My camera settings were ISO 200, 1/160 shutter, f8.

Step 3
Add highlights on both sides of the shoes. Place one light with a softbox for kickers and rimlights (or a bare strobe) this strobe should be pointing at the back of subject left or right. I started by placing a light below the subject pointing up to get some highlights on the bottom of the shoe. The studio strobe was at 1/4 power.

Place another highlight on the top part of the shoe. I got another studio strobe and positioned it on the back left of the subject with the same power, 1/4.

Optional: You can place another light on the back right of the subject to also get some rim light on the right of the shoe.
Step 4
Add your main light or your key light. Place a Bare light in front of the shoe on the left side and point directly at the subject. To control your light from spilling place a snoot in front of it. I placed a speedlight with a DIY snoot made out of an illustration board on the right of the camera pointing at the top right of the shoe. It’s important to use a bare light so you can get more texture out of the subject.

I got a big illustration board and cut a hole in the middle for my lens and placed it in front of my camera to fill some light on the shoe.

Step 5
Place another light on the left side of the subject. Same setup with Step 4, a speedlight with a DIY snoot.

Final Setup:

Post processing
Open your image in photoshop and create a new layer

Select the Spot Healing tool and brush the sides of your image. I got the ladder and the speedlight on the sides of the image so I started with brushing that first. Adobe Photoshop CC 2015 does a great job in healing.


The next step is healing the nylon cords out of the photo. This is very simple, select a very small brush (just a little bit bigger than the nylon) and click on one side of the cord. Hold Shift and click on the opposite side of the cord to create a straight line. Repeat on the other cords.
The last part is just adding levels to your liking.

Final Images


I wanted to add a bit more spunk to the image so I tried dragging my shutter and light painting the subject, you can check this tutorial on how to mix flash and lightpainting, and how to lightpaint using an iPad and iPhone.
I lowered my shutter speed to 15-30 seconds and turned off all the ambient light. After clicking the shutter I light-painted using an iPhone and played around with different colors and shapes to get different results.


Filed Under:
Tagged With:

Laya Gerlock
Laya Gerlock is a Portrait and Product photographer based in the Philippines. His passion is teaching and sharing his knowledge in Photograpy and has been doing this for 6 years.


Join the Discussion
DIYP Comment Policy
Be nice, be on-topic, no personal information or flames.
2 responses to “Lighting Tutorial: How To Photograph Shoes”
Nice shots! Refreshing and inspiring article!
thank you :)