


The 8 Steps Recipe For Mixing Flash And Light Painting
Jun 19, 2014
Laya Gerlock
Laya Gerlock is a Portrait and Product photographer based in the Philippines. His passion is teaching and sharing his knowledge in Photograpy and has been doing this for 6 years.
Share:
There are so much possibilities when mixing flash and light painting together, and so many great photographers out there that have done amazing things with this technique, so here is a basic photography tutorial on how to mix flash and light painting in one exposure.

What you Need:
- A Camera
- A Flash
- A (Wireless) trigger for your flash
- A Flashlight (Or other tool of the trade)
- A Shutter release cable (optional)
- A tripod

8 steps for getting the job done: Step 1

Step 2
Set your camera to the longest shutter setting, or the time you need to light paint, you can also use a shutter release cable to shoot in bulb mode. (Normally I just set my camera to 30 seconds, it is plenty of time)

Step 3
When doing self portraits, I normally set my camera to timer mode so that I have time to get to my position.

Step 4
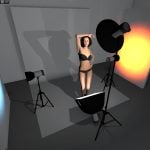
Set your aperture to expose for your flash. Normally my setting would be ISO 200, at f8. The power of my sb-600 would be at 1/4 power. Those setting may vary for different strobes and different subject to strobe placements, but they are a good starting point. Make sure you expose right for the strobe before starting the light painting session.

Step 5

Pre-Focus on your subject. While the light is still on, focus on your subject then switch your AF to manual mode so you can click the shutter even in the dark. It is better to have no ambient light hitting your subject so that you have no ghosting when the subject moves.

Step 6
Set your camera to front curtain sync so that the flash will trigger once the shutter opens.

Step 7

activate the time and get into position
Step 8
After the flash pops you will be exposed, then you can move out of the frame to do the lighting painting bit. Make sure to point your flashlight (or whatever light source you are using) directly at your camera.
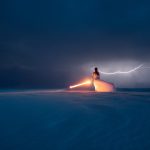
Here are three samples on getting a simple light painting done.


And more complex examples of this technique


Laya Gerlock
Laya Gerlock is a Portrait and Product photographer based in the Philippines. His passion is teaching and sharing his knowledge in Photograpy and has been doing this for 6 years.


Join the Discussion
DIYP Comment Policy
Be nice, be on-topic, no personal information or flames.
One response to “The 8 Steps Recipe For Mixing Flash And Light Painting”
it’s a second curtain for the flashlight will be behind the model, not first curtain ?