


Lessons I learned from my first photography trip
Sep 6, 2019
Matthew Silvey

We love it when our readers get in touch with us to share their stories. This article was contributed to DIYP by a member of our community. If you would like to contribute an article, please contact us here.
Share:

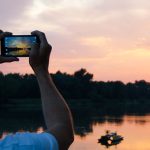
Recently I took my first ever photography trip to California. My plan was to hit up Mt Shasta, Lassen Volcanic NP, and Lake Tahoe. I wanted to share some of the things I did right as well as some of the things I did wrong.
What I did right
-Planned ahead. Thanks to my research I was able to get some great shots of Mt Shasta, The Milky Way, and Lake Tahoe.
-Went at the right time. I had planned my trip for when schools and colleges had restarted and the weather was hopefully still good. This worked out perfectly, the weather was awesome and the crowds were few. Especially at Lassen Volcanic NP.
-Brought the right gear. I had bought a USB charger for my camera batteries and had the good sense to get an extension cable and a car charger to charge my batteries in the car when I went from location to location as I was sleeping in a tent for a few nights and I would have limited access to electrical outlets.
-Got the right bag. I spend a lot of time finding a camera bag that would fit my needs and I eventually got the Lowe Pro Flipside Trek 350. Having room for two water bottles and a place for a first aid kit and food was great for hiking up and down mountains. Not to mention, the feature that allows you to twist the bag around to the front and not have to put your camera bag down all the time was really useful. Plus it was carry-on size.
-Set aside time to relax and enjoy myself. Self-explanatory.

What I did wrong
-Didn’t plan ahead well enough. I missed the fact that a couple of the places I was going to charged parking fees and I didn’t have enough cash on me for them. So I had to go elsewhere.
-Got the smaller bag. After hiking all day and cramming my bag full of stuff, I wish I would have went with the 450 model over the 350. I still had room for all my camera gear, but the extra space would have been great for hiking gear.
-Planned too many locations. In the future I’m going to stick to one place at a time for the most part and really explore while keeping my eye out for good compositions. Having three different locations in four days was too much for my first trip.
Conclusion
Overall I will grade my first photography trip as a B+. I have a lot of room for improvement and I look forward to my next trip. If you have anything you learned from your first photography trip feel free to include it below.
About the Author
Matthew Silvey is an amateur photographer who had been wanting to get into photography since college, over 10 years ago! But he started doing it a little over a year ago, after deciding he was tired of waiting for the right moment. When not doing photography, Matthew is an avid hiker and fitness enthusiast.
Make sure to check out more of Matthew’s work on his Instagram. This article was also published here and shared with permission.
We love it when our readers get in touch with us to share their stories. This article was contributed to DIYP by a member of our community. If you would like to contribute an article, please contact us here.


Join the Discussion
DIYP Comment Policy
Be nice, be on-topic, no personal information or flames.
4 responses to “Lessons I learned from my first photography trip”
I wrote a list for myself, it was after a birthday party of my friends. Event shooting, just like weddings etc. I would rather myself much worse, i didn’t prepare at all. On the other hand i had no ambition and i was shooting just for fun. Anyway, some walkable lessons.
– make it a story: document people arriving and event preparation, main events, people leaving
– don’t miss important events (giving presents, children dancing etc.)
– find a good spot for the events. Look for good view, light and background
– try to take pictures of all people and take multiple shots (people close eyes, make ugly faces etc)
– don’t be lazy and move around, shoot from different angles and in different locations/settings
– i would go for standard zoom for must of the time (Fuji apsc 18-55mm) and prime for portraits (Fuji apsc 50mm or 56mm) next time
In the end, it takes a lot of effort to do it properly, and i was talking only about organization. There is also the shooting itself and preproduction (choosing the right photos being the hardest for me)
Having never done event shooting before this seems like a good list!
Nice article. What great are you shooting with? I am rather great photographer myself using Fujifilm and i was considering photo backpack, but i can’t think about things i would put in the huge camera department. I usually have under 1kg of gear in Lowepro GearUp Camera Box M, tiny Manfroto tripod, spare battery and some cleaning stuff.
I used a Nikon d3300 with the 18-55mm kit lense for both of these shots. I also carried a Tamron 70-300mm, cleaning kit, tripod, and a set of filters for both lenses. For a bag I had a Lowe Pro Flipside Trek 350.