


How To Build A DIY Light Blaster™ And Create Photographic Projections
Oct 1, 2015
Wesley Chen

Udi Tirosh is an entrepreneur, photography inventor, journalist, educator, and writer based in Israel. With over 25 years of experience in the photo-video industry, Udi has built and sold several photography-related brands. Udi has a double degree in mass media communications and computer science.
Share:

A while back I saw the Light Blaster in a online shopping site, I liked the effect and that Inspire me to build a Light Blaster on my own.
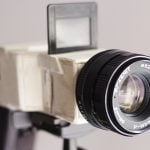
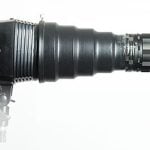
My first order of business was to look for something that would serve as the body of the unit. I needed a material that is strong enough to carry a lens and light enough to not overwhelm a light stand. I decided to a use a small plastic food container from the dollar store as my Light Blaster body.

I actually used two of those boxes to build my light blaster – one box will operate as the slide chamber and the other box will be used to mount the lens. I used a manual NEX to Canon EF convertor as means to mount to the lens.

The next thing was to calculate the location of the slide. The distance from the lens to the slide needs to be the same distance as ‘regular cameras’ would have from the lens to the sensor. This measurement is called flange distance and for Canon EF LENS it is 44.14mm. If you are using another mount, you would have to look up that system flange distance.

Come to think about it, this is my DIY Light Blaster MKII, mark 1 has the wrong flange distance as you can see below:

Here is a test from mark 1, the wrong focal length made it impossible to focus:

OK, we got that out of the way, back to mark II
This is how the build looks like when it is assembled. As for the actual assembly instructions – let me share a hint – USE TONS OF GLUE.

Now some gaff take and we are done. Here is how the assembled unit looks like


At this point you should be very excited and do a test shot, just to make sure everything works. Here are the first shots I made with my DIY project and while they are not very artistic, I am quite proud of them.


How To Change Slides and Projection Patterns
I am using standard empty slide mounts for that, you know….. those:


Since preparing a slide may take quite a bit of time, I am printing them on a transparency. This is the pattern I am using and I am printing them on the highest resolution I can. If you need slides, you can download this layout I made.
Here is how the slide mounts into its designated slot:

Here is a quick BTS showing how the device works:
https://www.youtube.com/watch?v=3UBbgqAyXcU
Sample Photos


 About The author
Wesley Chen is a photographer from Tai-Chung city, Taiwan, you can follow his flickr stream here.
We love it when our readers get in touch with us to share their stories. This article was contributed to DIYP by a member of our community. If you would like to contribute an article, please contact us here.


Join the Discussion
DIYP Comment Policy
Be nice, be on-topic, no personal information or flames.
8 responses to “How To Build A DIY Light Blaster™ And Create Photographic Projections”
Try it with an old slide projector, replacing the lamp with a flashgun, or taking off the entire optical block.
Also ich nehme einfach meinen alten Beamer ;-)
Damn.
I thought this was about how to build a DIY Light SABER.
Disappoint.
I was hope I’m a JEDI Knight,and made a light saber for myself.
But I’m photographer now. :)
Why not just use a slide projector?
Because this projector can use in anywhere without power supply, just need a speedlite let it work.
also a slide projector wouldn’t be as bright as you would need it to match the strobes on the front
How do you print the transparencies? Inkjet or laser? And what is the brand of paper and printer? I’ve recently tried this, and have yet to get a usable slide. The ink is kind of spotty.
Thanks!