


How To Build And Use A Light Blaster™ Projector For The Studio
Dec 21, 2015
Zatsepin Alex

We love it when our readers get in touch with us to share their stories. This article was contributed to DIYP by a member of our community. If you would like to contribute an article, please contact us here.
Share:

A Light Blaster is a device that projects slides or transparencies onto walls and models. There is a commercial Light Blaster version for small strobes out there and it does have a studio adapter. But I, as always, prefer to go the DIY route :)
Though this article will have a lot of build info, the reason I made this is because I had a photo in mind and wanted to create it. Of course that once the tool is built, it pushes me to use it in creative ways.
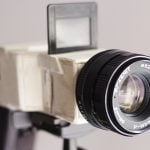
What You’ll need
Once you have a studio strobe, you would only need a few more parts, most can be bought for relatively cheap:
- A 50mm 1.8 lens, you can use an old manual lens
- A studio snoot, note that different flashes have different mounting options for a snoot, so pick the one that fits your flash
- A set of extension tubes for Nikon or Canon (depending on your lens)
- A diffuser, this can be a circular piece of translucent plastics.
Preparing The Slides
You need to make slides from a transparent material. I opted for a sheet of transparency paper. Draw the patterns using your favorite program and print away. Each of the circles you make, need to fit the inner part of the extension tubes.
Make sure that you are using a transparency paper that fits your printer, as laser and inkjet printers have different types of transparency papers. Now you need to cut the transparency paper into circles.
I’ll explain how to fit those slides in the projector in a second.
The Build

We are going to use the extension tube as a means to place the slide away from the lens. This is needed so the image can focus.
If you look at the extension tubes, they have two rings, one ring usually mounts to the camera, and the other ring is used to mount a lens. We are going to use both. The side that connects to the camera should be glued on the snoot.
Now connect ring #2 to the camera mount. The slide comes after that. If you cut the slides it in the right dimension, it kinda fits just inside the thread, while still allowing for ring 1 and ring #3 to be connected. Now comes the lens ring.
The last part is to mount the lens on the lens ring and mount the modified snoot on the studio flash.
Using the DIY Light Blaster
Once the contraption is made, you need to place and focus it. One of the slides I made was a calibration slide, and I used that one to make sure I am in focus every time I am using the projector to create a backdrop:

Of course, you can decide if you want to project 100% parallel to the wall (and have some light on your model), of project a little bit sideways and have your subject clean:


Lastly, since light is additive, you want your key light NOT to hit the background and ‘take away’ the shadows that the proctor creates. This will create a very milky looking background.
So grid or flag your key light, so it does not hit the wall where you are projecting to.

Using the Light Blaster for back projection
This is probably my most favorite use for this light modifier. I am using it to create rays of light in the studio, and I am going to show you how it is done.

I am using a very simple gobo for this setup. just a black disk with several holes in it to let the light come through.
The projector is placed behind the model and the model’s body is actually hiding the strobe.
A gridded key is lighting mode model’s face and body
Another strobe at camera left, and behind the model provides a kicker light
A smoke machine is used so the rays are visible.
Here is the lighting scheme for this setup:

note how the “rays of light” are just spots of light when seen from the projecting side.

About The Author
Alex Zatsepin is a photographer based in Moldova. He specializes in Dark Art, fetish, and psychedelic styles. You can see more of his photos on his portfolio and his Facebook page.
We love it when our readers get in touch with us to share their stories. This article was contributed to DIYP by a member of our community. If you would like to contribute an article, please contact us here.


Join the Discussion
DIYP Comment Policy
Be nice, be on-topic, no personal information or flames.
8 responses to “How To Build And Use A Light Blaster™ Projector For The Studio”
very cool!
the projected images appear small. How does one fill a 9 foot background in a 20 foot long room?
using a wider lens
willdmo x2 that’s the advantage of using interchangeable lenses! just be sure to use a wider lens with a fast aperture.
You are REALLY AWESOME Alex!!! Thanks a whole bunch!!!! I have been waiting someone to do this DIY for a long time!!!!! This is so cool!!! Thanks a lot really!!! Woooohoooo!!!
Happy 2016 :)
What size does the tranparent prints need to be
Hey Alex, great idea! Can’t you throw a slide tray between rings to make it easier to switch? Have you tried that?
You are amazing Alex. it works.. i just want to ask about transparency paper and the printer you are using..