


How I transformed a human into AAYLA SECURA on a low budget
Aug 5, 2018
Steve Thewis

We love it when our readers get in touch with us to share their stories. This article was contributed to DIYP by a member of our community. If you would like to contribute an article, please contact us here.
Share:

With an athletic build, an exotic beauty, and blue skin, Aayla Secura stood out among the many faces of the Jedi ranks. I invited Fawlkes Forge Cosplay to the studio to create some cool images as she portrays Aayla perfectly. I asked her how and why she started cosplaying. Here is what she had to say.
Having always loved dressing up, be it in costumes for amateur theatre productions or Halloween, I was so happy when Cosplay became a wider part of modern culture. I love being able to become a different person for a few hours and see the faces of people I interact with. I especially love seeing children’s faces when they actually believe I am the real character. It is also a massive boost to be part of a group of like-minded individuals who enjoy raising money for charity and generally being geeky together. What more could you ask for than to raise money for a good cause whilst doing something you love.
Gear and Light Set-up

The light set-up used here is my go-to setup when I photograph cosplay in the studio.
I use two Godox SK400II in small strips lights placed slightly behind the subject to create rim light. The main light is another Godox SK400II in a 90cm octa placed overhead. This setup creates a clean image that is easy to separate in post.

Camera and lens are the Canon 6D mounted with a Sigma 105mm macro lens
Let’s get to work in Photoshop
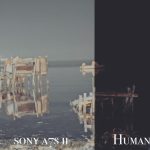
1. This is our starting image. It is pretty much straight out of the camera. In Camera Raw I brought back a bit more detail in the shadows by dragging my shadow slider to the right.

2. To get rid of the mess in the background and clean up the skin I used a technique called “frequency Separation 2.0”. It’s an amazing technique that I discovered through RGG-EDU. Definitely worth looking into!

3. In the next step, I added a textured background (and floor). I brought in the new background (Texture) and changed the blend mode of this layer to Soft Light. All that was left to do was to add a mask and brush away the texture on the subject. As you can see, by using this technique, our original shadows remain so we don’t have to mess about with creating our own.

4. To bring the focus to our subject’s face I created a vignette. There are many different ways to create a vignette in Photoshop. Any will do. I then added a bit of contrast by creating a black and white adjustment layer with its blend mode set to Soft Light.

5. To turn on the lightsaber I kept it nice and simple. I used a soft white brush and drew a line on top of our lightsaber. I then opened the blending options and added an outer glow with its blend mode set to Screen (in this case I picked blue).

6. In this next step, I used Nik Color Efex Pro 4 detail extractor. Although I’m using a plugin in this step, I believe you should be able to recreate the effect by just using Photoshop.

7. My favorite step! Dodge & Burn. I created a new layer and filled it with 50% grey. I then set the blend mode to Overlay. I used the dodge tool with an exposure of 10%-20% to enhance highlights and by pressing ALT I changed to the burn tool without having to change the settings for the burn tool. With the burn tool, I enhanced the shadows.

8. In this step, I used the liquify filter to enhance the body shape a little bit and I gave a bit of motion blur to the lightsaber.

9. There are many ways you can add color grading to an image in Photoshop. For this step, I used the curves layer and tweaked each channel until I ended up with something I liked.
10. Time to add a bit of atmosphere. I used the Snow pack from RawExchange. I use the Free Transform Warp Tool to shape the “snow”. Once happy, I changed the blend mode to screen to get rid of the black.

11. In this next step I added a bit of glow (coming from the lightsaber). I created a new empty layer and changed the blend mode to Color Dodge. I then picked a darker blue color and painted in the glow with a low flow.

12. I wasn’t happy with the colors at this point so once again a used a Curves Adjustment Layer and played with the channels until I ended up with the look you can see in the final image.

13. This is a new step for me. I like messing about in Photoshop… You never know what comes out of it. I used a motion blur and added a decent amount of blur in. I then added a black mask, used a white brush with a very low flow and just painted some of the motion blur over our subject. This might not be everyone’s taste but I like it
Here is the full pricess sped up
 About the Author
Steve Thewis (a.k.a. DigiSteve) is a photographer, retoucher and digital artist from the UK. You can check more of his work on his site, and instagram, and connect via twitter and facebook.
We love it when our readers get in touch with us to share their stories. This article was contributed to DIYP by a member of our community. If you would like to contribute an article, please contact us here.


Join the Discussion
DIYP Comment Policy
Be nice, be on-topic, no personal information or flames.