


How I shot a lunar eclipse sequence on film and entirely in-camera
Jun 3, 2021
Jason De Freitas

We love it when our readers get in touch with us to share their stories. This article was contributed to DIYP by a member of our community. If you would like to contribute an article, please contact us here.
Share:

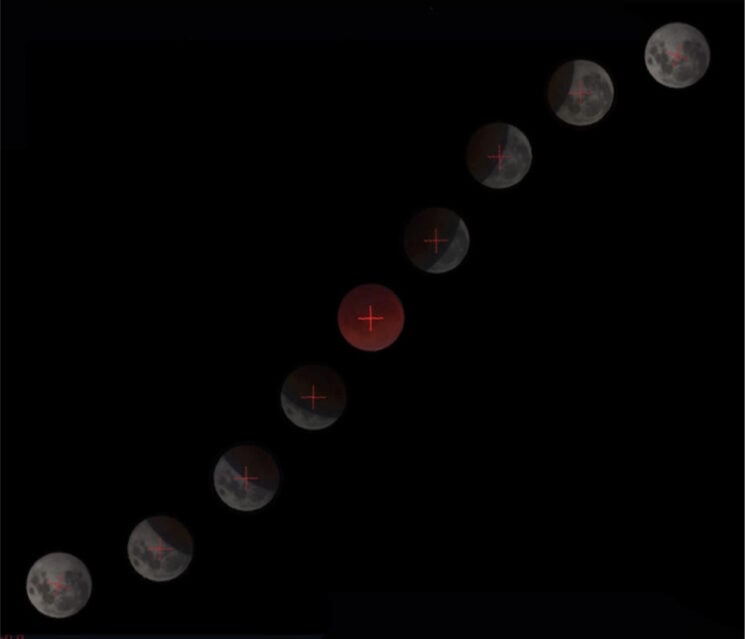
G’day from Australia, my name is Jason De Freitas (@jase.film on Instagram), and I’m a photographer mostly known for my analog astrophotography. In this article, I’ll describe the process and decisions I went through to take this lunar eclipse multi-exposure sequence on medium format film.
The Aim
There are two common but very pleasing eclipse sequence shots that I’ve seen a lot. The first kind of sequence is the process where you take several different photos of the moon during different phases of the eclipse with a long focal length to combine them later in Photoshop. Usually you will wait for long periods of time to get big differences in partial eclipse magnitudes. Combining them with a composite in post allows you to bring each moon image closer together for a more pleasing composition with the moon appearing much larger. I had personally not seen this done in-camera before.
The second kind of sequence however is one that I have seen done in-camera several times. The method is to use a very wide lens and take multiple exposures when the moon has moved just past one diameter length. This creates a long sequence of very small partial phase changes with the moon’s movements as they actually occur in the field of view. In this kind of sequence, the moon is very small in the frame and it can be difficult to see the eclipse phases well however it gives you the chance to place the event in context with a landscape.
For my location on the east coast of NSW, Australia, the partial eclipse began too high in the sky to compose it with a foreground landscape. I decided I would therefore attempt a composite sequence instead and for a challenge, I would see if I could do it in-camera. I shoot with film mainly because I love the process but it also encourages me to try to get results straight out of camera so that I can view them as slides on a light table or project them.
I didn’t have the luxury of deciding the composition in post, so I used Stellarium (free planetarium software) to plan out the shot. It allows you to input your sensor size (or film size in this case) as well as your focal length to preview what your field of view will look like. I decided to shoot this photo with a medium format camera since the size of the moon in the frame is relatively small and grain could limit the size of prints. Medium format slides are also just incredibly satisfying to look at on a light table.
I used screenshots to generate this composite plan in Photoshop based on a 600mm lens that I have.
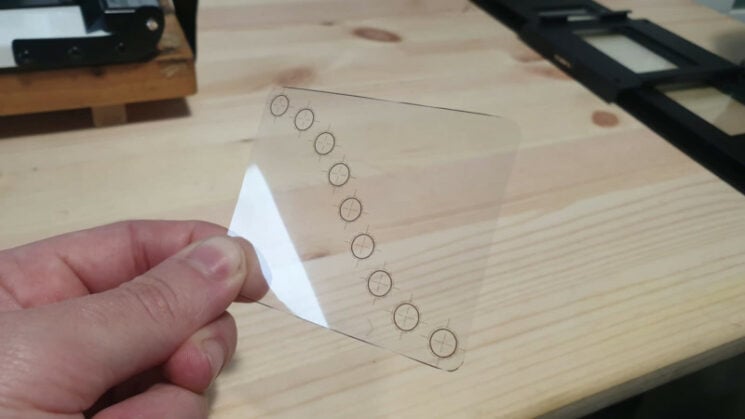
Creating a Custom Viewfinder Template
I used a Pentax 67II for this shot and if it had grid lines on the focus screen I could have possibly estimated each shot position. Instead, I came up with a simple way to make custom frame lines using inkjet transparency sheets. Using my Photoshop plan as reference, I sketched up a template using SolidWorks — it’s engineering CAD software, but I only used it because I work with it for my day job. Adobe Illustrator probably would make more sense to use instead! The end result was this template, scaled accurately to the size of the ground glass and predicted moon diameter in the field of view.

The next step was to print it out on paper to make sure it fit correctly on the focusing screen. Finally, after that, I printed out the template on inkjet transparency film with a regular home printer and cut it to size.

Exposure
Exposure settings change during different stages of a lunar eclipse but fortunately, it’s quite easy to plan for. Mreclipse.com has a very useful table to work that out beforehand. However, during totality (the blood moon part) the exposure can vary a few stops and isn’t predictable so you have to meter. I decided to bring a DSLR with me to use as a meter since slide film needs precise exposure, unlike negative film.
Execution
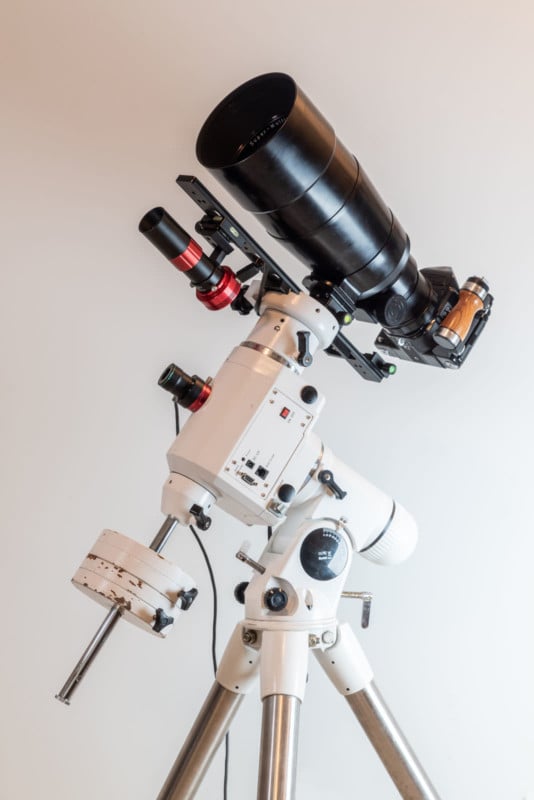
I had everything planned out, the times I would shoot each phase I wanted and the exposures I would need. I mounted my Pentax 67ii with the Takumar 600mm f/4 on a SkyWatcher NEQ6 equatorial mount. For short moon exposures at this focal length, you can get away without an equatorial mount especially with higher ISOs. However, totality can require exposures of a few seconds at the 100-speed film I was using so I wanted to make sure my shot was as sharp as possible.
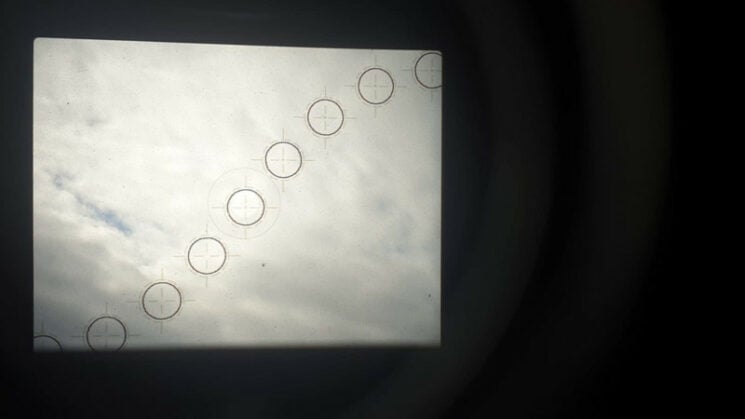
I started shooting according to my plan, the template worked a treat. The moon appeared slightly bigger than my template circles so I could easily see them align the moon very precisely. Three shots in and everything was going great until I cocked the shutter. I was holding the multi-exposure lever as I needed to however for whatever reason it didn’t engage and my frame advanced! That is not what you want during a 9-shot multiple exposure. Fortunately, it was still pretty early on in the eclipse so I had to scramble a new plan in my head and start again on the next frame.
Instead of a sequence going from full moon to full moon, I decided to go for a sequence from partial eclipses before and after totality. This time all 9 multiple exposures worked successfully and I had my shot!
Result
As always with film, you’re forced to accept some delayed gratification — or mild stress about whether your shot worked or not. The next day I developed the film in E6 chemistry. I use a sous vide machine to regulate the temperature and it works a treat. I was thrilled that everything went perfectly to plan; well the new plan but I think I like it better than the initial one.
The next step was to digitize the frame for sharing online and printing. I use a DSLR with a 1:1 macro lens to stitch several images together into one very high-resolution file. Some of you reading might think that’s ironic to go through all that just to scan it with a digital camera and while that’s not lost on me the final step to me is to mount the slide in a projector for viewing. The end result is a hybrid between a full analog process and a digital sharing age.
I’m absolutely thrilled with the shot I achieved, the satisfaction of achieving it all in-camera is an obsession that I continue to chase with more complex shots.
About the Author
Jason De Freitas is a fine art photographer from Australia. His work revolves mainly around astrophotography on film, and he develops and scans all of his films as well. You can find more of Jason’s work on his website and Instagram and order a print of this awesome eclipse photo here.
We love it when our readers get in touch with us to share their stories. This article was contributed to DIYP by a member of our community. If you would like to contribute an article, please contact us here.


Join the Discussion
DIYP Comment Policy
Be nice, be on-topic, no personal information or flames.