


Get perfect Martini splashes in the studio with just a couple of speedlights
Aug 25, 2017
John Aldred
John Aldred is a photographer with over 25 years of experience in the portrait and commercial worlds. He is based in Scotland and has been an early adopter – and occasional beta tester – of almost every digital imaging technology in that time. As well as his creative visual work, John uses 3D printing, electronics and programming to create his own photography and filmmaking tools and consults for a number of brands across the industry.
Share:

Liquids are a great source of photographic fun. It’s a topic which fascinates many photographers. There’s so much to experiment and play with. Splashes are particularly intriguing to me a a photographer, because you never really know exactly what you’re going to get. You might fire of 50 or 100 shots before you get the one you want.
That’s where this video from photographer Dustin Dolby steps in to save you a little frustration. With minimal kit, and a little compositing, you can often create fantastic end results much more quickly.
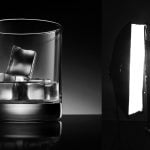
As with many of Dustin’s other videos, the setup and kit is fairly simple. Just one camera and lens on a tripod, and a couple of speedlights to light the scene. Dustin sets one behind a large diffuser to create his background. You can either blow this out to pure white, or light it with a gradient as shown in the image. Backlighting it helps to ensure minimal shadows on the backdrop.

With the background backlit, we can see through the glass itself, and we can see some light peeking through the fruit, itself. With the glass placed on a sheet of plexiglass, you can see it creates a great reflection of both the background and the base of the glass itself.

The trick to shooting liquids is to keep your flash power to a minimum, if you’re using speedlights. With speedlights, and some strobes, the lower the power, the shorter the flash duration. This means you’re effectively getting exposures faster than the fastest shutter speed of your camera. If you need more power, your best option is to either raise the ISO if your camera can handle it, or add more flashes at a lower power. Otherwise, water droplets flying through the air can turn into a blur.

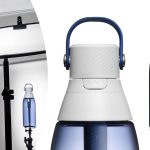
With a light added in front and to the side of the glass, we start to get more light on the fruit, and a few interesting reflections on the glass itself. Now it’s time to put some water into the glass, and start dropping ice cubes. Dustin’s first shot didn’t go quite as well as he’d hoped. You can see below that he caught a shadow of the hand that was holding the ice cube.

But, you can see when combined with one of the first shots of the empty glass, it blends together rather well, and you’d never be able to tell. A few more shots offers a little more variety.

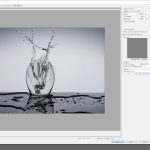
And this is where the compositing comes in. You could spend literally hours dropping ice cubes into a lass of liquid and not get exactly the look or feeling you were going for. By combining different splashes, though, you can get the results you want much more quickly.


You can mix far more than just two images, though. This is why we shoot a bunch to cover different areas of the shot. Then just take the elements from each that you like the look of to create your final image.
In an ideal world, you may want to try to get everything perfect in camera. But it often just doesn’t always work that way. And it gets infinitely more difficult if you’re trying to do it without the benefit of optical triggers and other gadgets which let you repeat drops exactly time after time.
I’ve used similar techniques to this when shooting portraits on location at waterfalls. I want to shoot fast to freeze the droplets, but you can’t control mother nature. On some frames the droplets look better than others. So, I lock the camera off on a tripod, use a remote shutter, and blend spray from multiple images in post to get the final result I was going for.
Filed Under:
Tagged With:

John Aldred
John Aldred is a photographer with over 25 years of experience in the portrait and commercial worlds. He is based in Scotland and has been an early adopter – and occasional beta tester – of almost every digital imaging technology in that time. As well as his creative visual work, John uses 3D printing, electronics and programming to create his own photography and filmmaking tools and consults for a number of brands across the industry.
Related Posts
 How to shoot atmospheric photos of glass with just a couple of speedlights
 How to shoot translucent product photos on a white background with just a couple of speedlights
 What’s Better For Shooting Splashes, Milk Or Elmer’s Glue?
 How to photograph and post process water splashes using minimal equipment
Join the Discussion
DIYP Comment Policy
Be nice, be on-topic, no personal information or flames.