


How to fake realistic background blur in Photoshop in 3 simple steps
Aug 30, 2017
John Aldred
John Aldred is a photographer with over 25 years of experience in the portrait and commercial worlds. He is based in Scotland and has been an early adopter – and occasional beta tester – of almost every digital imaging technology in that time. As well as his creative visual work, John uses 3D printing, electronics and programming to create his own photography and filmmaking tools and consults for a number of brands across the industry.
Share:

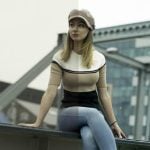
Shooting with 200mm f/2, 135mm f/1.8 and 105mm f/1.4 lenses is the dream of many portrait photographers. But such lenses are not inexpensive. We may only have a kit zoom that will never give us the look we really want. But, there are other options. Stop down for sharpness, then simulate that shallow depth of field in post. It won’t look quite the same as doing it optically, but it’ll can get you pretty close with a little effort.
In this video, Unmesh Dinda from Piximperfect shows us an easy way to simulate a shallow depth of field in Photoshop. The technique involves using a depth map. This tells various plugins how far away something is. This allows us to get that blur falling off as we get further from the camera. It allows you to get that soft blurry background in just three simple steps.
Even though the steps are simple, they are not quick, as evidenced by the fact that this tutorial is 20 minutes long. Of course, Unmesh is explaining it to us as he goes, which is naturally going to slow down the process. Doing it for yourself, more practise will speed up your workflow, and it will largely depend on the image you choose.
The first step is to create a selection of the subject. This is the most important step to get right. You need to have your selection be as close to perfect as possible. There’s no right or wrong way to do this, though. Just use whatever selection methods you’re used to. Then refine the edges to tweak things just a little and turn it into a mask.
After the mask is completed, we need to paint in the environment, to create a smooth transition between white to black along the ground. This is our depth map. We know that our subject sits sharply defined from the background, so we would expect to see a sharp transition from black to white.

For the ground, though, it’s perpendicular to the camera. There’s no sharp transition between the foreground and background. So, it needs to be a smooth transition. The further the ground gets from the camera, the more blurred it becomes.
The final step is to run the Lens Blur filter, using this layer mask as a depth map. This then causes the background to be blurred, coming into sharper focus as it gets closer to the foreground. Our main subject, the person in the foreground remains sharp throughout.


So, while it is a simple three step process, it is a rather long one, especially the whole masking bit. But this is why people spend so much money on those fast lenses. For a start the results just look better if you can do them in-camera anyway. But, the money spent on the higher end super fast glass is easily saved with the amount of time you don’t have to spend sitting at a computer.
But, if you’re on a low budget with basic kit, have a lot of time on your hands, and want to give it a try, this can be a good option.

John Aldred
John Aldred is a photographer with over 25 years of experience in the portrait and commercial worlds. He is based in Scotland and has been an early adopter – and occasional beta tester – of almost every digital imaging technology in that time. As well as his creative visual work, John uses 3D printing, electronics and programming to create his own photography and filmmaking tools and consults for a number of brands across the industry.


Join the Discussion
DIYP Comment Policy
Be nice, be on-topic, no personal information or flames.
12 responses to “How to fake realistic background blur in Photoshop in 3 simple steps”
This kind of article makes me very sad. If you’re going to condone cheating, might as well write an article telling people always shoot in P mode, because….why respect the craft?
Defocussing the background to enhance perceived sharpness of the subject is a legitimate technique. It’s different from trying to make someone look thinner or taller, which I agree, is cheating.
It’s actually the very same thing as what you referred to, making someone look thinner or taller. The blur wasn’t shot in camera, but after the fact in post. If you want to defocus, that’s what the aperture setting is for. 5.6, 2.8, 1.4, and so on. Those will achieve a natural fall off on DOF, as well as achieve natural bokeh. If your background is in focus with your foreground, then you’re shooting with too high an F stop.
Btw, the blur in the article photo looks incredibly fake (which it is). If someone puts out work that looks photoshopped, they’ll get very little respect from people who know it’s been obviously retouched. :/
I honestly gotta say, I don’t get the mentality like yours. I can understand getting upset if they lie, but otherwise, who cares? If you’re using the tools you have to the best of your abilities, who cares how the final product was achieved.
This puritan attitude helps no one, hell even the amazing Ansel Adams “cheated” by blocking and exposing light to areas of his photos until it looked how he wanted it. He already had it “correctly” exposed, but he wanted it to look far more interesting so he “manipulated” the photo with the tools he had at that time to do so. I’ve seen plenty of photos that I can tell RIGHT AWAY were completely faked, but they’re awesome, and exciting and interesting, so I couldn’t care less that they’re faked.
As long as your not lying and trying to deceive people that the photo wasn’t edited or modified, who cares how you got there?
It’s cheating, nothing more, nothing less. Yes, Adams was a master at dodging and burning to achieve his photos. But this is 2017 and we are talking about a digital medium. Adjusting colors and tones and sharpening is one thing, but completely changing out the background by blurring it in post is cheating. You ever shoot at f16 all the time and later blur your background? Me neither. Nothing puritanical about it, it’s just not an honest photo. And the primary reason now that many national photography organizations require the photog to provide their dng/raw file, along with their submission in order to prevent a fraudulent photo. And they ain’t doing it to be puritanical, they do it to keep the art form honest. You do know that many magazines now ban retouching?
Who cares how someone got there? I do, as well as many many other photographers who take pride in their work and their craft and don’t like to see it cheapened this way. When i need a “background blur”, i do it the old school way and shoot under f5.6 all the way to f1.4- no photoshop needed!
lol, I don’t think the person who made this video is a photojournalist or working for Nat Geo. Oh yea, those guys have some serious integrity and rightly so, but this video sure isn’t for that audience is it? if you’re some young punk with pie in the sky dreams and all you have is the kit 18-50mm, good luck getting any background blur on this kind of shot, even at 3.5. And you’re right, it is 2017, and in Ansel’s day, that minor “retouching” was about as much “manipulation” then as this is today.Where do you think Photoshop got their name from?….
I’m sure you and the many others like you that take so much pride must hate photographers like Benjamin Von Wong (who’s known for a good bit of compositing photos together), Trey Ratcliff and his exposure-stacked HDRs. What insults to the craft and world of photography they and those like them must be. anyone who uses the clone tool or the spot healing brush, or wants NO blur so they focus-stack a bunch of pictures….
I’m very much aware a lot of magazines are doing that, but let’s be honest, you really think it’s for integrity ? honesty? not because they’re getting caught too easily now in the age of the internet and are losing potential clients? you really think they’re banning that because of “respect for the craft?” LOL
Trust me, like everyone else, I would LOVE to get it all in-camera, but I like to say “if I can’t take the shot, I’ll make the shot”. If we’re talking certain kind of photo competitions, Nat Geo type landscape, war/photojournalist, you’re godamned right it better be 100% sincere. But for the internet, for Johnny and Peggy Sue…. really?
LOL
no, thank you, we don’t need to lie :)
Ha, this is really nifty! Thanks for sharing this John! <3
First off, how could anyone consider this cheating? It’s MUCH harder to do and takes far more skill than turning a knob on a lens! Secondly, how can ANYTHING be considered cheating? This isn’t an article about photojournalism, where the goal is to capture exactly what happened, exactly as it appeared in real life. A good artist SHOULD have a vision and they SHOULD employ whatever tools necessary to achieve that vision. It’s not cheating to edit a photo unless you’re selling the photo as “unedited”. In fact, not editing a photo is more often than not either the hallmark of an amateur, or a lazy person. All of the great photographers of the past edit their photos. Whether it’s done a darkroom or a computer is of no consequence.
I will say, however, that it still looks pretty fake to me, but I could see how the average person may not see it that way. If this was done with a lens, then you’d get progressively more blur as you drop back further into the photo. You can also better simulate this in PS, but it’s going to take even more time, and many layers of progressively more blur. This might be good enough for certain situations where the client isn’t demanding perfection, but rather just something useable in a fast turn around. And sure it would have been easier to do this from the camera, but maybe you couldn’t afford a lens that fast, or maybe the photo was originally taken for another project and is being repurposed for this client. In any case, there’s nothing wrong with learning a new technique, even if you are adamant about not wanting to use it yourself.
This is a good technique that should be a part of every working photographers bag of tricks.
Sure it would have been easier to shoot it with a wider aperture but sometimes circumstances and workflow dictate otherwise. I used this very technique on a still from a video I shot recently.
One thing to note is sometimes just masking the subject isn’t enough as you may get artifacts in the blur at the mask edge. When needed mask the subject, copy the layer and do a content aware fill or clone the background around where the sharp areas of the mask is. This background layer can now be blurred without the skin tones interfering with the green background.
The problem is that even with a primitive depth mask simulated blur still is effectively taking a background with depth and flattening it into a uniform blur. For example, in this tutorial the tree sticking up over the water is being blurred the same amount as the water even though it is like a km closer to the lens.
Real bokeh occurs because each pixel is recording light from a slightly different angle relative to every other pixel. The blur is caused by the shift in perspective. This means that real bokeh actually reflects depth and makes an image look more 3 dimensional which is the complete opposite of simulated bokeh like this which obliterates that sense of depth.
To the untrained eye this contradiction manifests as an image that just doesn’t “look” right or has a cheaper feel to it.
Simulating shallow depth of field is a lot of work to achieve poor results. Adjusting your aperture in camera is much easier/faster and produces far superior results.
The video was created by an incredibly talented photoshop artists, nothing against him personally. The problem here is not the editor, its simply that wrong approach to achieving a shallow depth of field.
Transport background applications are very good, it transports the background,
use it, it is a very good application, great application, our new society, Anna, this application.
Transparent Background