


Duplicating And Scanning Slides – A Refined Tutorial
Feb 3, 2014
Guest Author
We love it when our readers get in touch with us to share their stories. This article was contributed to DIYP by a member of our community. If you would like to contribute an article, please contact us here.
Share:
So, the holidays have rolled around once again, and sometimes we like to look at your old, but memorable, pictures from years gone by. But, having converted my photographic efforts to a digital, I continue to postpone (again) the inevitable, and disagreeable job of converting the old negative or slide collection into an acceptable digital format. This universal reluctance to bring your photos into the 21st Century is usually the caused after finding out the apparent complexity of the project or, more oft than not, the cost of the equipment.
For the past 12 years, I’ve been happily using digital photo equipment, forever clinging to the distant hope that someday I would be able to view my photographs and slides on the TV or the computer screen. I well remember how it used to be fun to drag out the slide projector and display the slides. It has, unfortunately, become less and less convenient that without clear wall space to project on, it’s just not worth the effort as the old 6ft. “pull down” projection screens just don’t cut it any more. Besides the set up of projection equipment, darkening the room and the other rigmarole one has to go through to look at slides, has driven the ‘fun’ right out of the effort so that I almost never look at them anymore. I took thousands of pictures during my travels and a lot of them were quite good.

I have looked into several different ways of converting my slides to digital. They either involve sending to a service or using a slide scanner, both resulting in a fairly substantial investment. I couldn’t justify that which would essentially be for a single use only. I’ve seen articles on how to use your digital camera to duplicate your slides, but for one reason or another they really didn’t seem to work out very well.
So, since I seem to have amassed a variety of camera equipment over the years, I decided to refine what other people have suggested, and make a truly accurate method to convert your slides by using your own digital camera.
It is best to have a macro lens that has the ability of doing 1:1 reproduction ratio. With the high pixel count found on some of the newer cameras, you can get away with less than the 1:1 necessity. So if you use three quarters of the center area, and you crop it, you still have a fairly substantial file that will render excellent resolution, bringing you closer to the resolution of the original film.
IMPORTANT: You also need to have some method to stabilize/immobilize the camera aimed at the target slide. Failure to perform this relatively simple task of vibration isolation between the two elements, will result in unacceptable blurring.
- If you look on eBay you can find one of the slide duplication accessories for an old bellows unit. It doesn’t really matter who made it since you’re not going to attach it to a bellows. You can get them in the $10-$20 range.
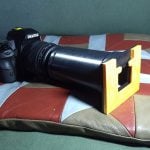
- The stabilizing bar is simply a piece of square section of aluminum tubing.
- I cut a small piece of angle to go over the end of the square section and drilled a hole that corresponded to the size of the shaft attached to the slide duplicator unit.I then drilled a hole perpendicular to the shaft and tapped it to 1/4 x 20 thread size (tripod thread).
- You use this screw to tighten down onto the shaft of the side duplicator and it allows you to move the slide duplicator shaft in and out of the tube to adjust the distance to the camera.
- I used a light system clamp, attached my tripod, to clamp onto the aluminum tube and hold it all in place.
- The camera is attached with either a Quick Release Mechanism, secured with a 1/4 x 20 screw or you can run the screw up directly to the camera’s tripod screw through the tubular section.
- You may need some spacers/shims (think large ‘penny’ washers) to raise the camera level to center on the slides.
- I attached a section of PVC pipe 2 inches in diameter about 5 inches long to act as a shade to eliminate ambient light on the slide causing reflections and undesirable flare.
- I then used a flexible two ended clamp to hold a small section of translucent Plexiglas.
- This is angled at 45° to the slide duplicator. You then place the flash about 3 feet below to flash up on to the piece of plexiglass.

Since I use the Nikon system, it has this CLS (Creative Flash System) flash system (Canon has a similar system). In this case I use the SU 800 Commander unit to control the SB 800 flash unit as a remote slave, some camera’s built in flash will also act as commander for a slave unit. This gives fairly good TTL flash control to give pretty close to a perfect exposure. Occasionally, you will need to tweak it up or down 1/2 to 1 stop flash correction to get the proper light levels on very dark slides. I’m using a
200 mm macro lens in this case (its what I have) but it will work just as well the 60mm or the 105mm. I found it was very hard to focus the unit on the slides through the viewfinder and it turns out that the focus is extremely critical. It was part of the problem I have with attempting previous methods. Since my camera has Live View, it simplifies the problem. You simply pick something like twigs flowers or lines in the photo and enlarge it to the maximum level that your camera allows. Then focus very finely on that part and shoot the picture.


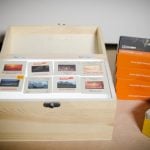
The other thing I found really handy with using an iPad as a lightbox. It’s kind of hard to preview your slides by holding them up to a lamp. But if you set your iPad to give you a screen with a pure white background, You simply place a slice on top the iPad and you can see them quite clearly. The other two items you’ll need is a soft brush and a can of compressed air of some sort. Slides tend to hold dust very tightly. So you need to brush them with the soft brush on both sides and then use the canned air to blow both sides on each slide prior to photographing them. This eliminates a lot of dust touch up in Photoshop. I found a really nifty brush at my local Home Depot, a nylon Shorty and it doesn’t excellent job cleaning the slides (or your camera gear in general) and it’s really cheap. A pair of lint-free gloves would also be an asset.

You’ll still have to import your slides into a Photoshop like program for cropping and any straightening if your rig it’s not perfectly aligned. It helps to use a carpenter’s square to check that both the camera and the side duplicator are perpendicular to each other. Macro lenses have a very narrow depth of field, so you want everything to be perpendicular or you have out of focus areas.
You can get really fancy and attach your laptop and camera together via the USB port and do the focusing on the laptop, along with storage. There are lots of programs out there that allow you to do this. I find some decent music and perhaps a decent vintage of wine makes this process less boring. It takes a lot of time to do a few hundred slides, so once you get set up you will have to grind away at it for some time.
But the results are worth more than than the effort made.
About the Author
James Wallace, Geologist former Navy Pilot and NOAA research pilot. Worked abroad for many years doing marine mammal studies from aerial platforms. Spent 10 years in Africa with the UN and European Union Humanitarian Organization in African conflict zones. Semi-Professional photographer on the side. Photography was important in all aspects of his employment. Extensive library of photographs of oceanic settings and conflicts in Africa. Photo credits include the New York Times, CNN, USA Today and several UN publications.
P.S. Scanning slides? You may want to consult with our other slide scanning tutorial as well.

Guest Author
We love it when our readers get in touch with us to share their stories. This article was contributed to DIYP by a member of our community. If you would like to contribute an article, please contact us here.


Join the Discussion
DIYP Comment Policy
Be nice, be on-topic, no personal information or flames.
13 responses to “Duplicating And Scanning Slides – A Refined Tutorial”
I decided a few years ago that this was too much work. I had thousands of photos from vacations spanning the last 45 years, going back to the Berkeley riots of the 60’s when I was in college there.
I used http://www.scancafe.com to handle the load. 25 cents per slide or photo to digitize, while doing basic color/tone corrections — which was really needed on some of the older prints that had faded.
I started by sending a couple hundred (one scrapbook). I liked it and sent a couple more. Liked it and … etc. In the end I discovered the count had been about 40,000. No way in Heck I would have done those myself, and they are now nicely on my computer (and on DVD and in the cloud on CrashPlan…)
Other than the fact that the scans from scan cafe are useless … I can prove it. I have over 100 useless scans and an Amex bill
Burt,
Then you had better luck than I. I tried a service for the very reasons you mentioned, its tedious. Unfortunately, what I got back was poor color balance and inexplicably grainy and overly contrasty.
You are describing the results I got when trying to do it myself… :)
When I have that many to do, I used either full auto on the camera, or used one setting for a full batch. Just WAY too much time and effort to really do each image properly.
I also had bad luck with two other services. I was quite happy with scanCafe though. Certainly not drum scan quality, but suitable for “keeping my memories”, which is what scanning old scrapbooks is all about.
that still looks like a significant amount of work with potentially inconsistent results. plus it ties up your camera away from grab and go moments. consider offsetting the cost of a scanner by planning to re-sell it afterwards or look into a used one. a good, flat-bed scanner with holders for slides and negatives and lighting goes for $180 (Canon CanoScan 9000F MKII ). rail the settings to the 9600 dpi, 48-bit color, no compression, no post-processing, and disable the warnings; you can use the bundled software or whatever flavor of twain scanner software you care for. I throw in some negatives, start the scan, and come back in 10 minutes to 6 completed photos. you can then automate or diy the post-processing in your favorite software with plenty of bits to blow your hdd.
What made the difference is the 45° plexiglass. It makes the ray pathing more random. When I used the flash directly, it illuminated the grain boundaries and caused the inconsistent results, bad color and contrast. I did have a Canoscan, it was a wonderful scanner, but they stopped supporting it in later versions of Mac OSX. So like a lot of computer equipment it became a museum piece.
cool, thanks for sharing. sorry to hear about the lack of mac support.
No one ever talks about the best method, which is using a Bowens Illumitran slide duplicator. Once set up (which is minimal) you can duplicate lots of slides really quickly with a DSLR.
http://members.bitstream.net/tlmartin/parts.html
yikes, that looks like a significant project. what is the cost est. and build time? is it a kit? does it do negative strips? ef mount? tease us with a photo and no details ;)
Its primarily for slides but I’m sure you could do negs with it as well.
As for cameras, it’ll mount any camera. Cost wise, I’m not sure as they’re mostly on ebay now. But with the built in flash power setting, it makes duplicating a breeze.
We just stick slides on window in cloudy weather…Then some color correcting in PS CR. Simple and fast. Same method with negatives
How about this? http://youtu.be/ypBA9SfT2Lg
Similar principal: use DSLR with macro lens to take picture of slide illuminated by projector, but automated.
Made based on several youtube tutorials.
Digitizes 900 slides in 2 hours (setup/dismantling included).
I have the controller boxed by now.
I used this method to scan 650 slides from the ’40s and ’50s, and when I tried using an iPad as the light source, I found that I could see the pixels from the iPad screen in the resulting image. Maybe my iPad is too old and not high-resolution enough. I switched to using a bright lamp behind the slide, and it worked really well. I wrote a summary of the whole process here: https://www.chrisfinke.com/2017/07/30/scanning-kodachrome-slides-with-a-camera/