


How to build a DIY 35mm slides and negatives copying machine
Jul 28, 2019
Steven Heap

We love it when our readers get in touch with us to share their stories. This article was contributed to DIYP by a member of our community. If you would like to contribute an article, please contact us here.
Share:

Like many of you, I have a large collection of 35mm slides and negative film that I have taken over the years that are currently pretty much invisible. I ditched my slide projectors with the last house move (they were 240V and hadn’t been used in 20 years!) and so all the slides were stored in their boxes for some sort of future viewing! In my early years, I took a lot of black and white films and so have all those negatives in those paper holders filed away. I’m not saying that these will be great for stock photo images, but there is a lot of my life stored in those boxes! So I’ve always wanted a way to scan them to digital and perhaps pick the best to share with family and friends.
About 7 or 8 years ago, I bought a Nikon 35mm film scanner – very expensive at around $500 and pretty slow (although extremely good) at scanning the film. I scanned perhaps 200 of my slides, but it was a hit and miss which ones I picked. Then I sold it and more or less got about the same money, so it wasn’t that expensive an exercise. But apart from that, I kept it in my mind that I should do something. I know there are overseas companies that take boxes of slides and films and return them with digital scans, but I always thought I could do it myself with a bit of effort – and perhaps do a better job! So when I saw the Amazon prime sale of a Wolverine Titan scanner with a 20Mpixel capability for only $100, I thought my prayers had been answered!
But – when it arrived, it was disappointment time. First, I have quite a number of plastic mounts for my slides. I think I used Ektachrome and the film was returned in strips that you had to mount. The plastic mounts were just too big for the slide holder and so each one had to be inserted on its own – no pushing slide after slide through the machine. Ok, I guess I could work with that, but the quality of the scans was pretty poor. Here is a 100% view from a section of a 20Mpixel scan from the Wolverine followed by one from the device I am about to describe:


So enough preamble – what is this device? My Sony camera plus 105mm macro lens! I saw quite a number of posts and videos on the web about holding the slide in a clip in front of the computer monitor and using a camera on a tripod, but it all looked very “heath robinson”, and so I set about building something that would be reliable, accurate, quick to change slides, be able to take negative film as well, and give me as good a quality as I could get. The result of this design challenge is here in all its glory!

DIY film and slide scanner using a DSLR and macro lens on a wooden mount
I’m OK at woodwork, so that is how I decided to make this – it could be built with plastic parts, or if you have a friendly uncle with some woodworking tools, I made it in about 3 hours or so. What is behind that white card at the top of the image?

Flashgun on the floor pointed up at the white card to illuminate the slide or negative
The whole thing is about 35 cm by 25 cm or so and I made it with things I had around – offcuts of previous carpentry projects, a quick-release mount for the camera L-plate, etc. but the main thing I bought was the slide and film holder. I wanted something that was well made, was easy to clean, quick to remove and fit with new slides, etc. and I found it with the Plustek slide and film holder kit. This is made for an expensive Plustek scanner and cost $29 – but it served my purposes completely.

Each slide position is spring loaded to allow you to quickly clip the slide into place and my Kodachrome and Extachrome plastic mounts fit well in the holder. Each opening has a little lug cut out in the center of the frame on the bottom edge of the holder which I used to center the slide over the lighting cutout:

Once these arrived, I was able to do a rough mounting of how it would all fit together. I wanted the camera to be solid and fixed and so I screwed a tripod mount into place at the end of the baseboard:

With the camera firmly mounted, I was able to move the film holder backward and forwards until I had the film plus some of the mount visible in the camera screen. With such a large resolution on the camera, there is no downside in taking a smaller image of the slide by giving yourself more room to line it up accurately. So to avoid making this too difficult a project, don’t try to zoom in too closely to the actual image itself.

As you can see here, I didn’t really mean to have this off-center vertically, but the tolerances of my woodworking resulted in a slight deviation from the plan. Because I wasn’t trying to be too close to the film itself, it didn’t matter!
Once I had found the distance from the film to the camera, I worked out, by trial and error, how high the slide mounting should be. I then cut a 4 x 5cm hole in the wood using an oscillating cutting tool. Drilling holes in the corners and using a jigsaw would work as well:

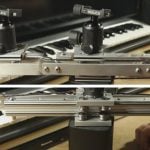
This the view from the rear showing the cutout and the bolt that aligns the slide in the frame. Then I made the runners themselves. These are simple pieces of wood with an L-shape groove cut out of them using a router.

I cut a bit deeper in the top one to allow the film holder to rise up slightly over that centering pin. There is a little bit of play but not too much as I wanted the slide to be held vertically to keep the focus as good as possible.
I can quickly slide out this holder and fit new slides into it and then take shots of those four, or exchange it with the 6 shot film holder:

For lighting, I decided that the easiest approach was to have a white card (a bit of mount from a picture frame) at 45 degrees with a flashgun and remote trigger laying on the floor under the table. As you can see, I can sit this on a glass topped table and so I’m investigating simply laying the card at 45 degrees on the top of this piece of wood above and simply have the flash under the glass table.
With the flash underneath the rig, I have no issues with having to shield the lens from the flash, and with a manual flash setting, my trigger is a very simple one as well. It just triggers the flash, no more.
My early experiments on exposure aimed to produce a pure white, just over-exposed file when no slide is in the opening. As I take this as a raw image, I can over-expose more than that and bring the brightness back in any pure white bits of the slide. With ISO 100 (for minimum noise in the shadows), I used 1/160th second at F9 with the flashgun on 1/4 power. I’m using an old Canon 550EX speedlite for this with Phottix triggers. I use a 2 second delay on the camera shutter to minimize any chances of tremors when I take the shot. That aperture should give me a sharp image even with a slight bow in the negative or slide. I don’t think I will need to refocus for each shot – the rig is stable enough that the slide to camera distance will be very similar from shot to shot.
As you can see, I used screws so that I could readjust if necessary, but so far, there has been no need for that. I think that pretty much completes my explanation of how it works – if you have any further questions, please let me know in the comments below! Now on to some copying – perhaps there is a great historic stock photo in there!
About The Author
Steve Heap is a well-known stock photographer who started in the business in early 2008 and has since grown his income to a steady $35k a year in royalties. He first wrote about his real-life experience in getting started in stock photography in his ebook, Getting Started in Stock, in 2011, and has since revised it three times to make sure it contains the very latest on the changes in the industry. You can see more of his photography work here. This article was initially published here and shared with permission.
We love it when our readers get in touch with us to share their stories. This article was contributed to DIYP by a member of our community. If you would like to contribute an article, please contact us here.


Join the Discussion
DIYP Comment Policy
Be nice, be on-topic, no personal information or flames.
10 responses to “How to build a DIY 35mm slides and negatives copying machine”
I did something similar a while back. I don’t have any woodworking skills worth a damn, but I do have a lot of Lego :) Worked great.
Interesting! I never thought of using Lego!
Got this in Germany for approx. 80 $.
Thanks Steve, Very interesting!
Thanks Elijah.
after some trial and errors I built something similar out of cardboard. On thing that had made me unhappy with my earlier efforts was stray light, so in my setup I have a cardboard tube leading to the film holder. The cardboard tube is wide enough to accommodate the lens with about 1 cm free space around it in every direction, and the inside is lined with black paper. I do my digitizing at night with my laptop showing a blank power point slide as a light source, and have not had any reflection/stray light issues with this setup.
Yes, I understand! I decided that I didn’t want to make things complicated as far as changing slides was concerned and so a flash gun underneath the rig meant that there is very little stray light. With the flash, I can make the exposure much brighter than the surrounding light and so even keeping the room lights on makes no difference to the shots I get. The front of the slide holder is always pretty close to black, showing that nothing is hitting the front surface of the film.
Steve
I don’t own a macro lens, I would need to buy one in order to use your proposed solution. If I understood correctly, yours is a 105mm F2.8. Those are more expensive. What would be the acceptable range of specs for a macro lens in order to be able to scan slides & negatives?
Thanks!
Gold! I’ve been looking at various DIY options, this seems by far to be the most direct and straightforward solution.. I had started down the path of taking a photo of the prints, but some of those discount prints are very low quality..
Thanks for commenting that the depth of field copes with bowed slides, which seem to a problem in a dedicated slide scanner.