


How To Build A Light Table (Or Inspecting 50,000 Film Slides)
Aug 2, 2013
Udi Tirosh
Udi Tirosh is an entrepreneur, photography inventor, journalist, educator, and writer based in Israel. With over 25 years of experience in the photo-video industry, Udi has built and sold several photography-related brands. Udi has a double degree in mass media communications and computer science.
Share:
When our sister company, Spiffy Gear, designed and built the Light Blaster™ slide projector they (and we) had to go over slides. Lots of slides. How many? I don’t have an exact number but it was somewhere around 50,000 35mm slides that we salvaged from flea markets, old slide projectors, 2nd hand stores and photographers who were passionate about using their old slide collections again.
")
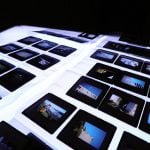
Going over 50,000 is not an easy task and we cleaned each slide and verified that it is not NSFW (some were definitely NSFW). This is a hard task to do without the appropriate tools, so we build each of the reviewers a small light table that they can watch the slides on.
If you were not shooting in the film age, a light table is a back illuminated table (or box) that you set positives and negatives on view them properly. This is how you watch contact sheets and this is how we set out to watch our mass collection of slides.
Today, I am going to show you how to build one.
Materials
")
- A wooden box – I got mine at an Arts and Crafts store
- An cool white LED strip – kinda like this one. The length you’d be needing depends on the size of the box.
- A 12V power source – I used a power adapter from an old router combined with a female Jack I bought at the neighborhood electronics store.
- A translucent piece of Plexiglas. I got mine from a sign store. They were extremely nice and took a scrap piece and cut it to size at no cost.
- Some white paint
- You would also need a soldering iron and core, some epoxy, a drill, a bit of wire and two small wedges of wood or plastic.
Steps
First you want to measure the inner length of the box. Each LED strip that you will later cut will be at that length. Make sure you leave some spare space for wiring when you cut the strips.
")
Te number of strips really depends on the width of the box, I placed a strip roughly every 3 centimeters for even illumination.
Now that you have the length and number of LED strips snap a few strips from the LED reel. The strip usually breaks every 3 LEDs. It is like a game of Blackjack you need to be as close as you can to the desired length but not go over it.
")
You want the light to be as clean as it can be, without the warmth coming from light bouncing back from the wood, so paint the box white.
Next up is the soldering part. Create a mat of LED strips, all facing the same direction and solder them positive to positive, negative to negative all on the same side.
")
The last strip is soldered to the power jack.
")
Drill (or punch) a hole and thread the power jack through the hole. Fix it in place with Epoxy.
")
Now peel off protective tape off of the adhesive side of the LED strip and apply them to the box. make sure you keep the distances even.
The last step is to affix the stow small wooden pegs to the box so that the Plexi can easily rest on them.
")
When not in use, I place a small drawer protective sheet inside and throw the power block in. This way the unit is self contained. Over above the picture below to see the light output from the box.
")
As we now say around here,
Happy Blasting.

Udi Tirosh
Udi Tirosh is an entrepreneur, photography inventor, journalist, educator, and writer based in Israel. With over 25 years of experience in the photo-video industry, Udi has built and sold several photography-related brands. Udi has a double degree in mass media communications and computer science.


Join the Discussion
DIYP Comment Policy
Be nice, be on-topic, no personal information or flames.
6 responses to “How To Build A Light Table (Or Inspecting 50,000 Film Slides)”
Simple and effective… :-) But even if I know LEDs don’t produce a lot of heat, maybe some holes to let the air move in and out could be an (small) improvement ? As painting the whole Inside of the box, including the Plexi supports…
good creative, i think it is not cheap, and it is too big.
my soft light box only 20$. can see 8*10 film
I’m using a 4″ deep desk drawer I found waiting for trash pickup. Knocked it apart and used a table saw to put a groove 1/4″ down from the top edge all around though I could have glued in support.blocks. I will add blocks to let me attach the back with screws for access to the LEDs.
Bought a set of 300 5k bright white LEDs on Amazon for $17. With rows spaced 1.5″ apart I’ll use 210, 7 rows of 30. I couldn’t find white translucent plastic (the sign store was a good idea!) so I bought a 18″ x 24″ sheet of clear plexiglass for $10 from Home Depot and used an orbital sander with 180 grit paper to sand both sides.It diffuses the light beautifully. I may try some 240 or 300 grit on the top surface to minimize the background grain when using a loupe. My surface will be 21.5″ X 12.5″, largish but I wanted to look a a box of slides at one go.
I want to use 9.6W led strip, will it be enough power?
More than enough
Gotta say I love the net-I need a light box so I can order and send out my thousand slides to be put on dvd. My projectors are antiques and g-kids and others have never seen many. SOOO I bet I can make a light box, turn to the net and bang got all I need. love folks who post stuff it’s like my personal big brain! thanks