


Create your own astrophotography calendar: A step-by-step guide
Jan 28, 2025
Soumyadeep Mukherjee
Soumyadeep Mukherjee is an award-winning astrophotographer from India. He has a doctorate degree in Linguistics. His work extends to the sub-genres of nightscape, deep sky, solar, lunar and optical phenomenon photography. He is also a photography educator and has conducted numerous workshops. His works have appeared in over 40 books & magazines including Astronomy, BBC Sky at Night, Sky & Telescope among others, and in various websites including National Geographic, NASA, Forbes. He was the first Indian to win “Astronomy Photographer of the Year” award in a major category.
Share:
Calendars are never out of fashion. Whether it’s sitting on your desk or hanging on your wall, you are bound to use it on a daily basis. Photography calendars, more specifically astrophotography calendars, are gaining popularity. It is a good way to make people appreciate your astronomical images “throughout the year”. Not only is it a great New Year gift to your loved ones, but you can sell these calendars and make a little bit of money out of them. Below, we are sharing a step-by-step guide on how you can create your own astrophotography calendar.
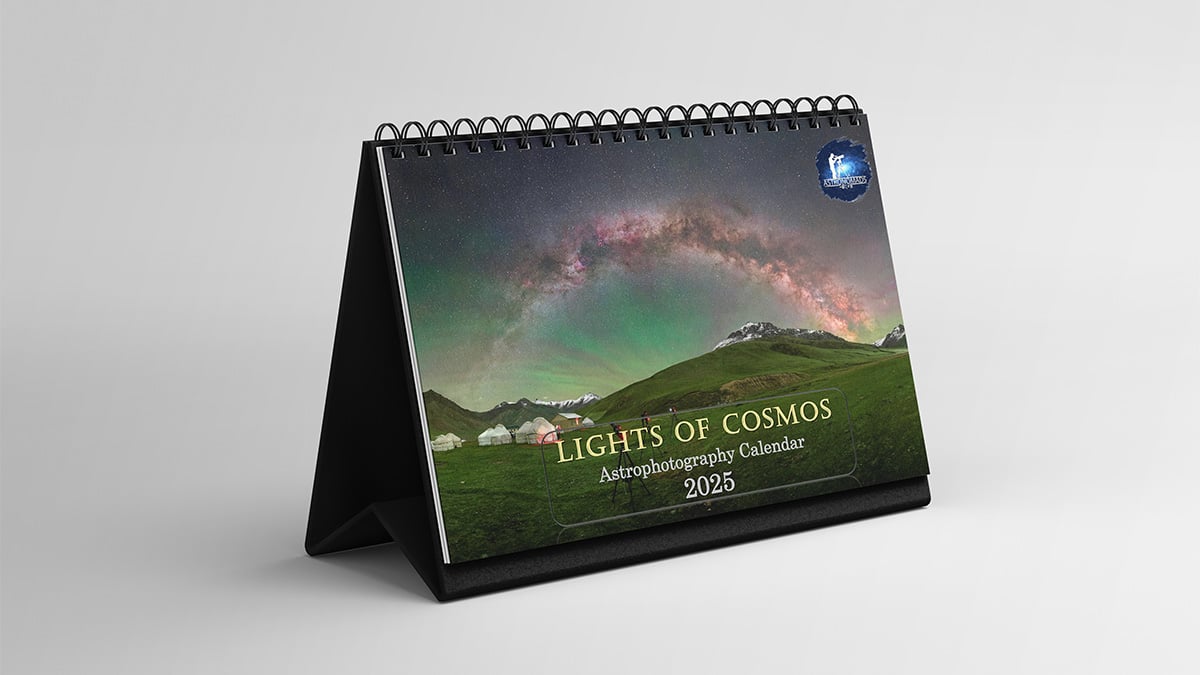
Step 1: Choose the format and size
Calendars can come in different shapes and sizes. The first thing that you need to decide is whether you want to create a desk calendar or a wall calendar. The choice may not be easy at first, but you can go with both options. The next step will be to choose the size. While desk calendars can be of A3, A4, A5 or similar sizes, wall calendars are larger and can be 12*18, 13*19 or even larger. Note that the larger size you go with, the more expensive it will get to print them. The last choice that you will need to make is the orientation of your calendar. While wall calendars are mostly portrait-orientated, desk calendars can have both landscape and portrait orientation. This choice, however, will mainly depend on the kind of images you have at your disposal.
Step 2: Designing the calendar
This is one of the most crucial steps if you are creating a calendar for the first time. The best way to do it is to get “inspired” from other astrophotography calendars. The design can be made in Photoshop or with a combination of PowerPoint and Photoshop or other designing software. If you are getting your calendars printed from a printing website, they will also have their own sets of designs, which will significantly help you get to your final design.
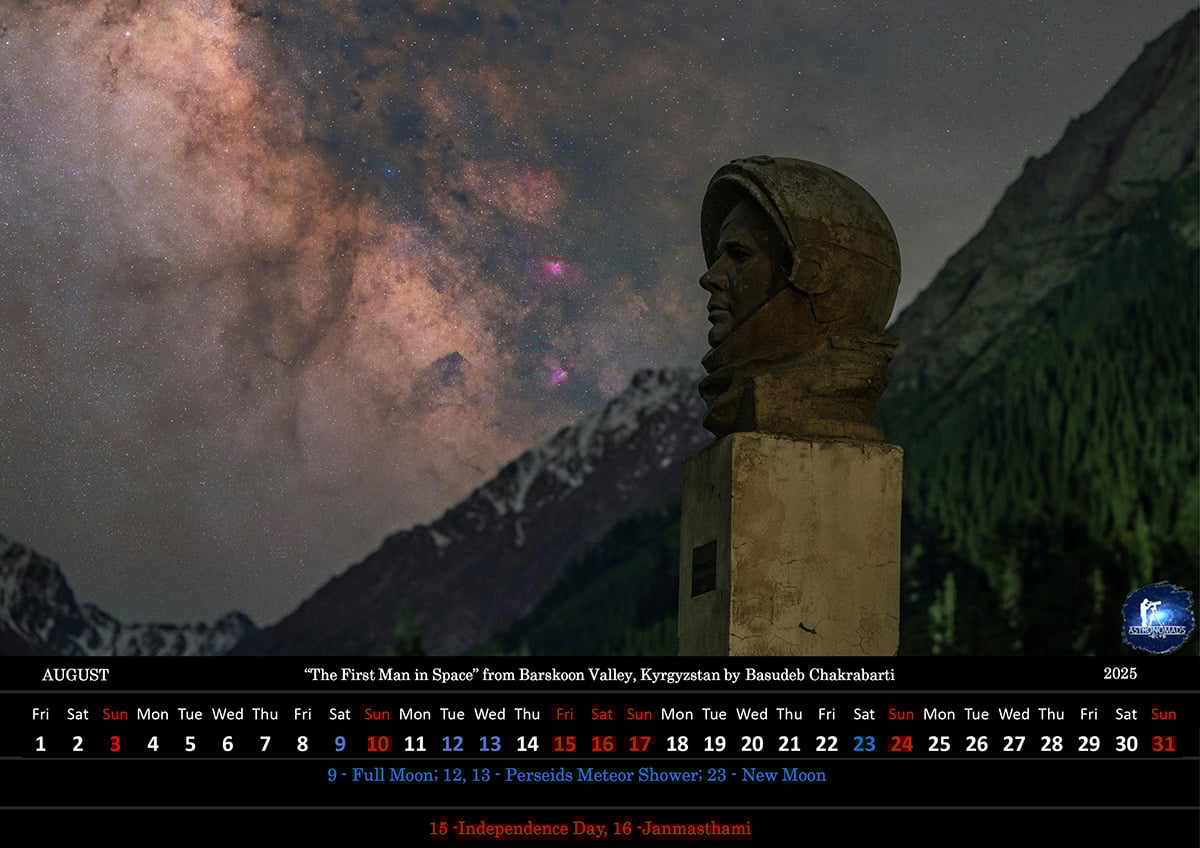
For an astrophotography calendar, of course other than the images, probably the second most important content will be the list of astronomical events and moon phases. You can import the list of important astronomical events from a few websites. The same can be done for the moon phases. Marking the four phases (new moon, first quarter, full moon, and third quarter) will make people (and astrophotographers) appreciate your calendar. You could also add in a holiday list for every month to make it more useful.
Step 3: Choosing the images
And now, the most important step of your calendar is choosing the images for every month. Your calendar should contain a minimum of 12 images for each month. For the cover, you can either go with a separate cover image or make a collage of all the 12 images and make it the cover. Your images should have parity with the orientation of your calendar and the design that you have chosen. At times, you might have to go back to your design step to suit your images.
If you decide to include 13 images (12 + cover) to your calendar, choose at least 15-17 images that fit the design. There is a possibility that the images that look outstanding on your screen may not look as attractive when printed on paper. You should have a backup image or two for this purpose.
You can also choose to add a description of each image (story behind the image, description of the object captured, location, etc.). You can do this either on every page or have a separate page for the description.
Step 4: Soft review
Once you are done with the complete design and add your photographs to the calendar, now it is time to go through each and every page. Check for the dates, spelling, punctuation, grammar and every other thing that could possibly contain a mistake. Give this process a little bit of time. Do not try to jump into the review process right after you have completed your design as your eyes might be too tired of looking at the same things. Wait for a day or two.
Repeat this soft review process multiple times until you stop finding any typos and mistakes. You can also send the soft copy to a friend and ask for a “little” help with the review process.
Step 5: Hard review
This step is mainly to check if the printed calendar is looking exactly (or very close) to what you were seeing on your screen. If you are getting yours printed from a website, order a single copy to check for this. If you are doing it from a local printing shop, ask them to just print the pages (and ignore the binding). During this process, you might come across luminance (highlight, shadows, etc.) or colours that do not match how you saw it on your screen. Don’t worry if that happens, as it is quite a common thing. All you need to do is to go back to your soft design and apply the necessary changes.
You could also observe that an image or two are not looking as good as you thought them to be. All you need to do is to go back and change these images with your backup images (step 3). The hard review process should continue until you are satisfied with the final print results.
Step 6: Printing the calendars and advertising
Once you are happy with the print results, you can go ahead with the printing. The final decision that you need to make is the numbers. If you are printing the calendars for gifting purposes, you might already have a rough number on your mind. However, if you are planning to sell your calendars, the decision might not be as easy. The best way to handle this would be to print in small numbers, around 50 to start with. You can then reorder the prints if required. From next year onwards, you will have a number to start with depending on your last year’s sales.
To advertise your calendar, you can either take pictures of your products yourself or create them with advertisement mockups available on the internet. Share these pictures with your friends, family, and followers on social media and other platforms.

Bonus tips
Here are a few tips for creating your own astrophotography calendar:
- If you are doing it for the first time, start as early as August. Steps 2 and 5 are time-consuming and often take weeks to complete. You want to have your prints ready by end of November.
- If you are unsure about the number of prints, start taking pre-orders and evaluate the quantity by those numbers.
- Take your time designing the calendar. Remember that people will be looking at them almost every day.
- Find a balance between aesthetics and utility. While many people will buy your calendars just for the photographs, others will use them for their daily utility.
- Do not compromise with the quality of the calendar. Even if they get more expensive to maintain the quality, people will appreciate that.
Clear skies!

Soumyadeep Mukherjee
Soumyadeep Mukherjee is an award-winning astrophotographer from India. He has a doctorate degree in Linguistics. His work extends to the sub-genres of nightscape, deep sky, solar, lunar and optical phenomenon photography. He is also a photography educator and has conducted numerous workshops. His works have appeared in over 40 books & magazines including Astronomy, BBC Sky at Night, Sky & Telescope among others, and in various websites including National Geographic, NASA, Forbes. He was the first Indian to win “Astronomy Photographer of the Year” award in a major category.


Join the Discussion
DIYP Comment Policy
Be nice, be on-topic, no personal information or flames.