


From Shoot To Blog, What Is The Best Way To Get Your Images Looking Great (Also On Your Blog)?
Sep 5, 2014
Dave Kai Piper

We love it when our readers get in touch with us to share their stories. This article was contributed to DIYP by a member of our community. If you would like to contribute an article, please contact us here.
Share:

First thing….
Having a good workflow from camera to web is key. It should be noted that this workflow not a wedding workflow or a image heavy workflow and is one of the more expensive setups. I guess you could call this a premium workflow or a high end workflow. It is designed for photographers who are all about quality over quantity. If you are putting out 8-10 high end images per shoot, have paying clients, you have busy sets and pressure deadlines, this might be the set up for you.
Capture One (Capture) > Capture One (Develop) > Photoshop > Lightroom > SmugMug > WordPress
The interesting here is that each step is using the best program or tool.

- Capture One – Capture & Develop
- Photoshop – Finish and Fine Tune
- Lightroom – Crop, Export & Store
- SmugMug – Show, Sell Share
- WordPress – Social Media, Advertising and everything else

Let me explain the concept, then I’ll go over each step one by one.
(Big thank you to fellow photographer and model – Emily Darcy Adams (@EmilyDarcyAdams). Emily is wearing lingeire from Maison Close with her own styling.)
While shooting onset I use a tethering cable into my laptop where I can let me or my client see the images on a big screen. We can use the tools to monitor focus, cropping, image selection and add any colour tweaks to suit ‘on the fly’ as we shoot. After each look, we select the best image(s) before moving to the next ‘look’ or set up. This ‘shoot & review’ method ensures you are getting what you are aiming for, plus, your images are being backed up to a hard drive on the fly. When it comes to tethering, there are many programs including Lightroom and some great free programs such as DigiCam Control also. Capture One has all the flagging, marking, numbering ways to select and mark images. It also has all the important meta tag and EXIF data settings that you should be using.
It is worth saying that Capture One is not the most stable program on the market, but it is very good at two things. Live tether capture and RAW conversion. Thus, this is only what they get used for. After the shoot, we take the SSD harddrive with the shoot backup on and upload it to our workdrives. This is just a direct copy over, drive to drive. Once it is on our studio system we open up Capture Pro again and import the shoot to a NEW session after setting all the correct EXIF and Meta Tag info. (We keep the images on the memory cards as long as we can as an extra back up)
When setting up your session, start with the Meta Tags and EXIF data and Keywords. Make sure they are correct and done first. You will save yourself time and effort at later stages if you take moment and do this early. If you want to rename your files, do this at the Lightroom stage later. I make sure to put in all the ownership info putting my website address and e-mail in as many places as I can. Once you have done this the first time, hit the save preset button so the next shoot you only change the bits to fit the new shoot such as Keywords etc…
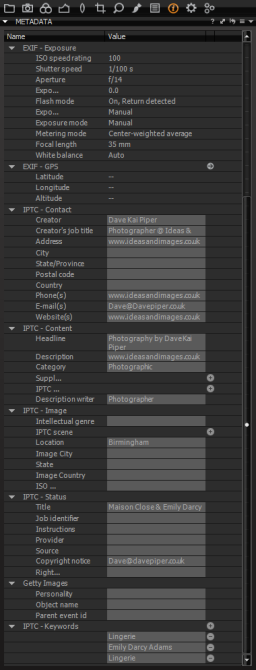
Adding Metadata in Capture one is just the same as doing it in Lightroom, Photoshop, Bridge or which ever program you are using. In the times of internet theft and miss-use of images online, this is such a vital step. Keywords are also very useful for a few reasons, mostly online reasons such as letting your image be found via google etc. When you are working with companies and people with large image banks, having well labelled, well sorted images is good as they can see you are organized and most of all, can use the keywording to index your images.
The next step is to import the image into capture pro by hitting the import button and pull all the images in. Make sure you click the ‘current location’ setting. Otherwise Capture One will import and copy them to another place. In this instance we don’t want to do that.
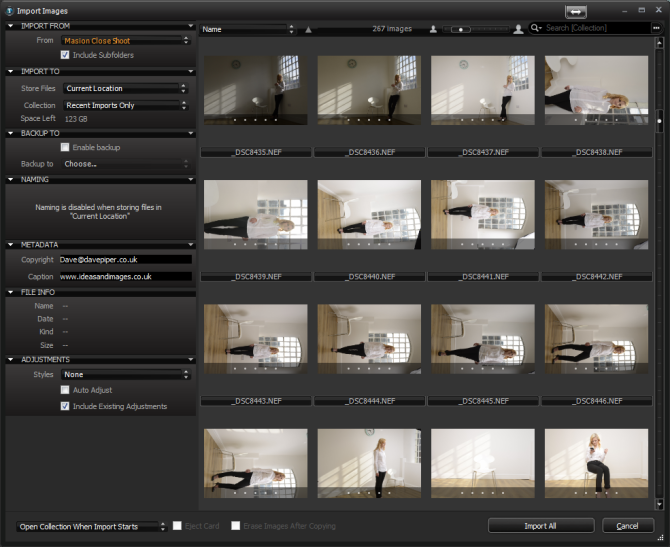
When bringing in the images to Capture Pro, you have back up options to save the images & you can use the adjustments to already start to make global changes such as white balance etc.
After a few moments your images are all in Capture Pro and you are ready to select the images you want to send to the next editing stage and finish in Photoshop. During the shoot, we had marked using the + key with flags them as green. These are the shots we liked during the shoot. Some people like to use the star rating system. Either way, use the system that makes sense to you. We bring up the selects chosen during the shoot and I then pick the top ones and run a do some global adjustments to them using the exposure, white balance or what ever is needed to get them looking good, usually a colour tweak is added too. I keep this very simple and have three presets at this stage. One cool preset, one warm one and one black and white. I go though all the potential images and see what looks good with the other images as a set.
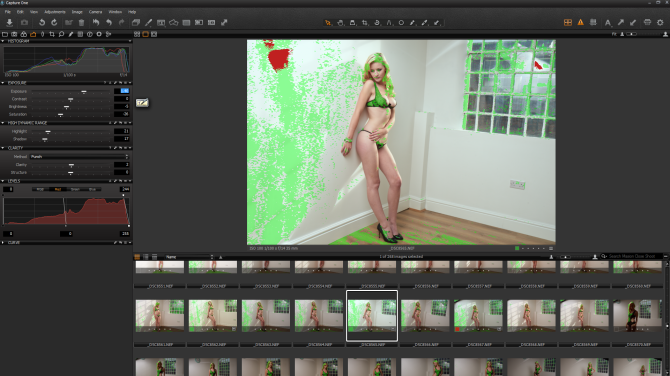
This image shows the focus mask tool and the highlight tool working. Anything in Green is in focus and anything in Red has the highlights blown. Using these tools can speed up up your workflow.

The image on the left has a preset added and is ready to be sent to Photoshop for other editing & finishing.
Capture Pro presets are very good too and worth a look at also. After this step you should have images you like ready to go. I have 20 or so images that are all marked using the green label. These are then put up for closer inspection into Photoshop. Right clicking the image you can send a ‘variant’ of the RAW image into Photoshop with the RAW processing applied. Make sure you set the new image to be created in the SAME folder as the original file, this is so after this stage Lightroom can sync and pick them all up. Also, make sure you select to send the image to Photoshop. I export 16bit TIFF files at 300dpi in sRGB in to Photoshop.
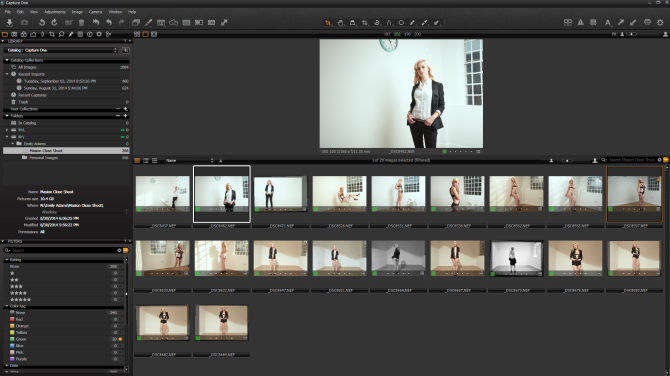
The marked images ready to be sent to Photoshop. They have all be colour corrected and ‘deveolped’

One by one edit the images using Photoshop in which ever way you want or any methods. When you save the file, make sure you save the image back into the original folder. Just click Save and it will pick the right folder up and save the image. I like to save a mix of PSD and layered 16bit Tiffs. I am not sure why, but, it seems to make me feel better, I try and never save a flattened image as this can be a problem if the client wants the images changed at a later date.. On the export settings from Capture One you can, just like in LR, select the type of file that is created and exported into Photoshop. I will just mention, very briefly that most of the Photoshop work is done using the fantastic Colour Lookup Tables giving me constituency in the editing styles and looks. Most of the time is spent on skin & hair to tidy up the images using the high frequency separation method (shown in this post )
Once you have all your images edited and looking great, close down Capture One and load up Lightroom and import the images into your catalog. (You can infact do this at the same time as putting the images into Capture One, as any changes can be found using the SYNC folder functions). As they load in you will see the RAW image come in and the edited ones too. Once they are all in you will need to pull out the edited images, this is super easy by filtering by image type. When you have all the image you want it is time to upload them to SmugMug.

Using the SmugMug Lightroom plug-in the very best way to do do this next step. Download the latest version of the plugin HERE. Then make sure you check out this guide to installing it. My advice at this stage is once you have your app synced with an empty Smug Mug account, try and make this the VERY first thing you do and use it as your primary way to upload images. If you don’t do this first, it can play havoc when you are trying to sync your files from SmugMug to Lightroom.

The plug in is very simple and very well made, uploading images to SmugMug is fast and easy. Just add the settings you want by right clicking create gallery and adding images in like you would a normal collection in Lightroom. After you press PUBLISH, they are uploaded and show on the site. If you want to add watermarks, you just select the one you want here and do the rest on the Smug Mug site. Make sure you select the Cover image too by right clicking on the collection menu sections. You can set the shop settings and all the other settings, even using a preset that you have made.

When your files load into SmugMug it is then a case of finding the right link to place them on your blog. This is best done using the pre-made ‘Direct Link’ button and placing that into the blog that you want. It could not be more simple.

If you or your client wants to print the images or have a ‘hard copy’, it is just a case of pressing the ‘Buy Prints’ buttons, if they want to download the high res Jpeg’s, they can also do this if you have placed the right settings to let them do so. SmugMug has let you also charge for digital downloads. On this occasion we are just blogging the images and the client is using jepgs, so it is very easy. Press the Get Link button and use the right size image. For my WordPress blog, I find that the Large or Middle size images work best. It is the super-fast SmugMug Server that is providing the image, but, don’t use overly big images that will slow down peoples viewing experience of your site/images

At the moment, SmugMug can not handle TIFF files and somethings are not quite as business to business as they could be, but it is just such a great way to get your images online and in one place.
Getting your images Instagram and twitter and everything I hear you say ? Well.. I do this… using the iPhone App which syncs to all the gallery sections, I just pull the image up my iPhone and then send it to what ever social media app I want to, it really could not be more simple. Load up the image, screen shot the screen and tweet, Instrgram, or do anything you like. This saves room on your phone and speeds up the process.

The cool thing is now, using this workflow, each stage is using the best program for each step, Lightroom is still looking after all the images in the catalogue, meaning I can still use Lightroom Mobile to make tweaks and do other editing, you can always skip the Capture One stage if the shoot does not need that level of work, I can look after all my images nicely and not have to have lots of images in different sizes on my hard drives for different things. Everything is in one place and looking amazing.
About The Author
Dave Kai Piper is a UK based Fashion & Portrait Photographer. As well as being a Pentax Ambassador, Fuji X-Photographer, 3 legged thing & Lexar Ambassador, DKP works as a consultant though Ideas & Images for such companies as Future Publishing. DKP is also an Adobe Community Professional. You can follow Dave on his Blog, Facebook and Twitter.
Filed Under:
Tagged With:
We love it when our readers get in touch with us to share their stories. This article was contributed to DIYP by a member of our community. If you would like to contribute an article, please contact us here.


Join the Discussion
DIYP Comment Policy
Be nice, be on-topic, no personal information or flames.
16 responses to “From Shoot To Blog, What Is The Best Way To Get Your Images Looking Great (Also On Your Blog)?”
As Alton Brown says “Organization will set you free.” Goes doubly so for technology as cooking.
lol !! True !!
Please please please proofread this article. The errors are painfully distracting.
thanks for the heads up Seth. Hope it is better now.
“It should be noted that this workflow not a wedding workflow or a image heavy workflow and is one of the more expensive setups.”
To be fair, this really comes down to: “This process is slow, expensive, complicated and low-volume. Out of reach for 90% of our readers. Too slow for 90% of our readers. And too involved for 90% of our readers. The following is interesting, cool, and definitely for anyone with the time, resources, money, patience and clients to support it. Look at this workflow and weep. Your Picasa/Lightroom/Lightzone images will never look this good. Just come to terms with it.”
Friendly request: Can you give me a good workflow that works for 90% of your readers and will not send me into foreclosure?
So just because 90% of the readers don’t get it, the 10% who do should have to read something that’s dumbed down and changed to high volume for the masses? Nah thanks. This is a great article for us 10% who can benefit.
No no no, I believe you miss understand me. Each of those 90%’s were independent of one another and separate road-blocks. Therefore, the target audience is actually quite lower. Figure, 10% of 10% of 10% of readers.
Like you said, interesting, and can benefit, but do you really think you will be executing this workflow any time soon?
“Capture One (Capture) > Capture One (Develop) > Photoshop > Lightroom > SmugMug > WordPress”
Let’s get back to the elephant in the room, shall we? The Blog is named “DIY Photography.” For those of you who are acronymically challenged, that is “Do It Yourself Photography.”
To be fair, simply taking a photo yourself is “doing it yourself,” but that is not the spirit of the title.
This Blog has a target market, and audience, and a readership (again, let’s be clear, those are three separate groups, mutually exclusive).
The target market is people who want to DIY Photography, the Audience is people who are intrigued by the idea of DIY photography and want to keep up to date on it, the readership are the actual readers of the blog.
If you are reading this and will be using the above workflow, read something else. That is not DIY, that is industrial, expensive, complicated, and long-winded. Please stop reading it, and please stop writing it.
This is not an attack on the author. But, as all too often happens, blogs change from their initial purpose when single authors’ interests change. This is not a personal blog, and it is not a soap box, it is a website about DIY Photography.
If you do not think you can keep it that way, kindly pass the reigns. Or, a better business decision, make another blog and run two, double the ad revenue, etc. Win win.
But please stop passing off go-pro footage, expensive workflows, etc content I want to read. Thanks.
Howdy !!
Well, firstly , thank you for reading the article, it is always nice to know, these things are not a 2 min job to put together and they do take time and effort. You are very right on many points, but, as my very first statement says, this workflow is not for all people and I enjoy this blog just as much as anyone else. I thought it would be a good fit for the blog, hence why I sent it over in the first place. Having a DIY ethic is great,it is about free thought and doing things the way you want to do them. That also means using tools you want to use them, so lets not just think that having a DIY ethic means.. let’s do it on the cheap.
Once again.. thank you for reading, and thank you for commenting, but, please see that there is more than you on the internet. If you don’t agree with the blog, just skip to the next one. Simple !!
Lastly, I will, after your comments put a workflow together that is only using free programs, or at least very low cost ones.
Which programs do you use ? which ones would you suggest that I look into ?
I get all of that, and I understand that there is more than me to the internet, speaking in the first person was not perhaps the best way to make my point.
What I am trying to address here is a general problem of the internet and the information sources (be it news, blogs, education sites, etc) on the world wide web. Transitioning, and why that does not work online.
In the real world, changing a business name is relatively straight forward, and changing genre is a pie. Take a radio station, for example. Your call letters, and frequency, should not change, lest you loose your viewership. However, you can very easily change formats to suite your bigger demographics and the times.
“91.2 IUYI – Copenhegans rock alternative” may notice that their listeners are going pop, so, easy “91.2 IUYI – Copenhegans Pop alternative.” Done. Your frequency and call letters have nothing to do with your business, so you are afforded flexability.
However, on the internet, where only one entity can own any one domain, and they are running out, it is not as easy to change formats if your domain identifies what it is you do. If you are a gadget blog, and your name is “Engadget” you had better stick with gadgets, or you can do what Gizmodo does and cover celebs and food and movies and music WHAT? No…
If the domain was Photo World, or some thing to that affect, sure, the world is your oyster. But it isn’t, it is DIY Photography. Very specific and descriptive of the content that one should expect to find.
Every domain owner should do their civil duty and keep the internet away from all of the mess that it could very easily create. If you own a domain “Birds of the world,” don’t start covering Big Cats. If you own a domain DIY Photography, sure articles about big elaborate professional multi-thousand dollar 4 photo golden poop machines are cool, but please place that elsewhere. I can not Do That Myself, and you are doing a great disservice to those who are looking for how to Do It themselves in their garage.
I enjoyed your article, and agree those are great products and the results speak for themselves, but that is not why I read this blog. And, frankly, I am seeing less and less articles here that originally brought me (and I am sure, many others) here.
A Domain is a brand, and when you purchase it and make information available on it, you are, unfortunately (I know) locking yourself in to that brand. I am not trying to be mean, but that is the truth. Domains are cheap, WordPress Multi-User is easy, and you could easily expand and create a network that covers a wide range of photography related products, tailored to various target groups, expanding income, etc. But please be mindful of those transitioning events.
The articles here are informative and well written, but it scares me that all too often they are becoming more and more of a stretch to link to the originating theme of the site. I want to see this site prosper, and that is why I really wanted to express this deep concern.
Don’t hold back, do what you love. But please, do not loose sight of your original brand, and the readers that made this site what it is today…
Do you have a blog or website ?
I did, but I found that I could not keep relevant content moving at an acceptable rate, so I let it pass.
Cool article Dave, ver similar to my workflow and I just learnt about the focus tool in capture,, awesome
Thank you Rebecca !
What a great read! This workflow might not be for everybody but its nice to see how things are done by different people.
Agreed. it is complex, expensive but.. it is the best I can find !!
Dave this is amazing. I’ve been searching and searching for a workflow that wil work for me and this is it. I just recently got into Capture One after using Lightroom and although I loved the way it renders the images, I was struggling to find a workflow now that I had removed LR. I actually think this is the smartest way to use. Yes you are using different application but you’re using the application that works best at each point. E.G Lightroom for it’s catalogue and Export functions and Capture One for it’s capabilities with RAW files. THANK YOU!! I was about to stop using C1 and go back to LR but this is a perfect solution :)