


How To Take The Perfect Coffee Shot (With Multiple Exposures)
Nov 20, 2013
Laya Gerlock
Laya Gerlock is a Portrait and Product photographer based in the Philippines. His passion is teaching and sharing his knowledge in Photograpy and has been doing this for 6 years.
Share:
I was at starbucks the other day and saw this cool looking Mug, and was thinking that this was the perfect mug to practice my product shots. I already had the shot I wanted, but the problem was I didn’t have enough coffee beans to cover the table. So, what I did was take multiple shots and moved the coffee beans from one shot to the next, until I got the whole table full of coffee. Here is how you do it…

The Setup Shot
It is crucial to use a tripod and keep all the photos perfectly aligned. In my case, I was using a D7000 on a tripod and was shooting at f2 at ISO 250 using an 85mm lens for that shallow depth of field look. My main light was an sb-600 thru a softbox @ 1/16. Then a silver reflector at the right side to fill the shadows a bit.

The Shots
I pre-focused my camera on the logo and moved to manual focus to keep everything constant. I started with the beans in front of the cup and moved them until I reached the very end of the table, taking one picture foe each area covered. It took me 5 shots to fill the whole table with beans.

Photoshop
For the Photoshop work, I started with the bottom beans and put the image on top of each other. Then it was a simple job of erasing away the un-beaned areas from eahc layer. I used a soft brush with te earaser to create better transitions.

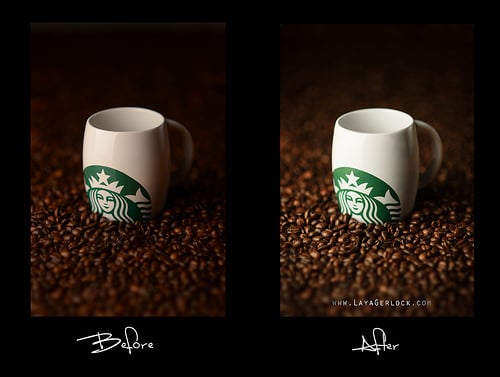
Before and After shot of the layers

For finishing touches, I added a little bit of vignette and adjusted the layers and a bit of burn and dodge for the post processing.
Final Shot

Laya Gerlock
Laya Gerlock is a Portrait and Product photographer based in the Philippines. His passion is teaching and sharing his knowledge in Photograpy and has been doing this for 6 years.


Join the Discussion
DIYP Comment Policy
Be nice, be on-topic, no personal information or flames.
6 responses to “How To Take The Perfect Coffee Shot (With Multiple Exposures)”
I like the idea and the process but why erase in Photoshop surely it’s better to work non destructively and use layer masks instead?
Either way I’ll be giving it a go, maybe using Lego block instead of coffee beans
I agree with you in principle, but in this case, it doesn’t matter. I can’t imagine a situation where you will need the pixels of the table (why would you put the table back in?). Erasing those pixels could dramatic speed up processing on a slow machine.
For me, it is like deleting unused shots. I have to weigh the likelihood I will use those images vs. how much space they take up. Most of the time I leave them on the hard drive in case I revisit the shoot, but there are some shots I just won’t ever need for any reason.
Two words… layer masks. Never erase in Photoshop, there’s absolutely no reason to.
Laya, thank you for… spilling the beans on how you did this.. ;)
Cheers! :)
Buy more beans.