


Graduated ND filters or multiple exposures: what is the best option for a landscape photographer?
Nov 13, 2018
Christian Hoiberg

We love it when our readers get in touch with us to share their stories. This article was contributed to DIYP by a member of our community. If you would like to contribute an article, please contact us here.
Share:

Using a Graduated Neutral Density filter is fairly easy and doesn’t require any advanced techniques in post-production but the easiest option isn’t always the best choice; due to the filter’s transition being horizontal, anything above the distinction will be darkened and anything below will be left alone.
This is a good solution when there’s a flat horizon but what do we do when there are mountains projecting above it? What do we do when there are large trees in the image? Using a GND filter means that they’ll be darkened as well. That’s something we want to avoid.
An efficient solution is to capture multiple images of different exposure and merging together by the use of a software such as Adobe Photoshop. This is a time-consuming alternative and quite frankly, it isn’t always necessary.
So, which one is the better choice? Is there always a correct answer? Before we jump into that, let’s take a closer look at the two options.
What is a Graduated Neutral Density Filter?
A Graduated Neutral density filter is a partially darkened filter whose purpose is to balance the exposure of an image by darkening the bright parts. Typically, it’s used to darken the sky as that’s the brightest part of an image.
The filter comes in many variations, including different degrees of darkness and different methods of transitions from the dark part to the transparent (i.e. some have a soft/long transition while others are hard/short).

I recommend reading our Introduction to Graduated Neutral Density Filters for more information about them.
What is “Multiple Exposure for Better Dynamic Range”?
Taking multiple exposures to capture the full dynamic range means that you take a series of images with different exposures. This often includes one base image, one underexposed image and one overexposed image.
With these exposures you’ve captured the full dynamic range, meaning you’ve got information in both the shadows and highlights and you’ve avoided clipping either of them.
The second step is to blend the images using a software such as Adobe Lightroom or Adobe Photoshop. This process leaves you with one flattened image which is a combination of those used; in other words, you’re left with a correctly exposed file made from the correct parts of the images use.

It’s possible to do this by using Lightroom’s automatic blending features but I strongly recommend learning how to do it manually in Photoshop with the use of Luminosity Masks.
Graduated ND Filters or Multiple Exposures?
So what is the best choice? Is there always a correct answer? No.
It depends entirely on the scene and situation you find yourself in. For some scenarios, a Graduated Neutral Density filter is the obvious choice while for others it will do more harm than good.
When to Use Graduated Neutral Density Filters
Graduated ND Filters do a great job in balancing an image when there’s a big contrast between the foreground and sky although they don’t always work perfectly.
I’ve long been a fan of these filters and I tend to use them whenever I can (partly because I’m a bit lazy and prefer to have as much as possible done in camera). Here are a couple of examples of when a Graduated Neutral Density Filter is an ideal choice.


Notice that both the images above have a relatively even horizon. The cliff in the first picture projects above the horizon which means that a Medium or Soft Edge Graduated ND Filter is preferred. A Hard Edge filter would darken the cliff too much.
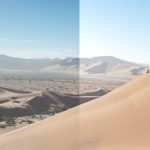
When to Use Multiple Exposures to Capture the Dynamic Range
In scenarios where there are elements projecting further above the horizon than in the two examples above, I recommend taking multiple exposures instead to capture the full dynamic range.

The two examples above of that situation. In the first image there’s no defined horizon and the mountains project at different altitudes; using a Graduated ND Filter here would successfully darken the sky but also further darken the mountains, meaning they’d become too dark.
In the second example, a Graduated ND Filter would successfully darken the sky but also the branches framing the mountain. The branches would become completely black and look unrealistic compared to the branches below the horizon, again resulting in an unbalanced exposure.
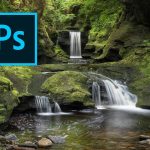
The second example is not an easy scene to work with in Photoshop. Blending multiple exposures can be time-consuming so, in this case, I strongly recommend using Luminosity Masks.
Summary
To sum it up, Graduated Neutral Density Filters are a good (and easy) option whenever there’s a relatively flat horizon. Once elements such as mountains, trees or buildings project far above the horizon, capturing multiple exposures is the better option.
About the Author
Christian Hoiberg is a full-time landscape photographer who helps aspiring photographers develop the skills needed to capture beautiful and impactful images. You can see more of his work on his website, Instagram, and Facebook page. You can download his free guide 30 Tips to Improve Your Landscape Photography here. This article was also published here and shared with permission.
We love it when our readers get in touch with us to share their stories. This article was contributed to DIYP by a member of our community. If you would like to contribute an article, please contact us here.


Join the Discussion
DIYP Comment Policy
Be nice, be on-topic, no personal information or flames.
5 responses to “Graduated ND filters or multiple exposures: what is the best option for a landscape photographer?”
It depends on my time and my mood. Most of the time I prefer to use Graduated ND Filters.
It would be interesting to compare the multiple exposures approach to taking a single exposure with a modern camera and generating the high and low exposures from it to blend together. I’m curious about whether that’s a legitimate alternative.
Another situation to use GND filters is when there’s a lot of motion in the scene and you’re using a fast(ish) shutter speed. For instance, if there’s a lot of wind moving branches or waves that you want to capture sharply. With multiple exposures, you may have problems as these objects will shift from shot to shot and won’t blend smoothly when you combine multiple exposures. Also, anytime you’re shooting hand held or from a moving object (like a boat).
Using GND filters is a PITA. And Lightroom and Photoshop are not the only programs for HDR. Aurora is so good I use it on both single and multiple exposures.
This is interesting because I have always considered using HDR as lazy. I use GND filters 99% of the time, mostly because I am increasingly wanting to get my shot right in-camera. I do not have anything against using HDR and it definitely has it’s place but I prefer using filters.