















Reblum Wants to Make Portrait Retouching Less of a Chore
Nov 18, 2026
Alysa Gavilan
Alysa Gavilan has spent years exploring photography through photojournalism and street scenes. She enjoys working with both film and mirrorless cameras, and her fascination with the craft has grown over the decades. Inspired by Vivian Maier, she is drawn to capturing everyday moments that often go unnoticed.
Share:
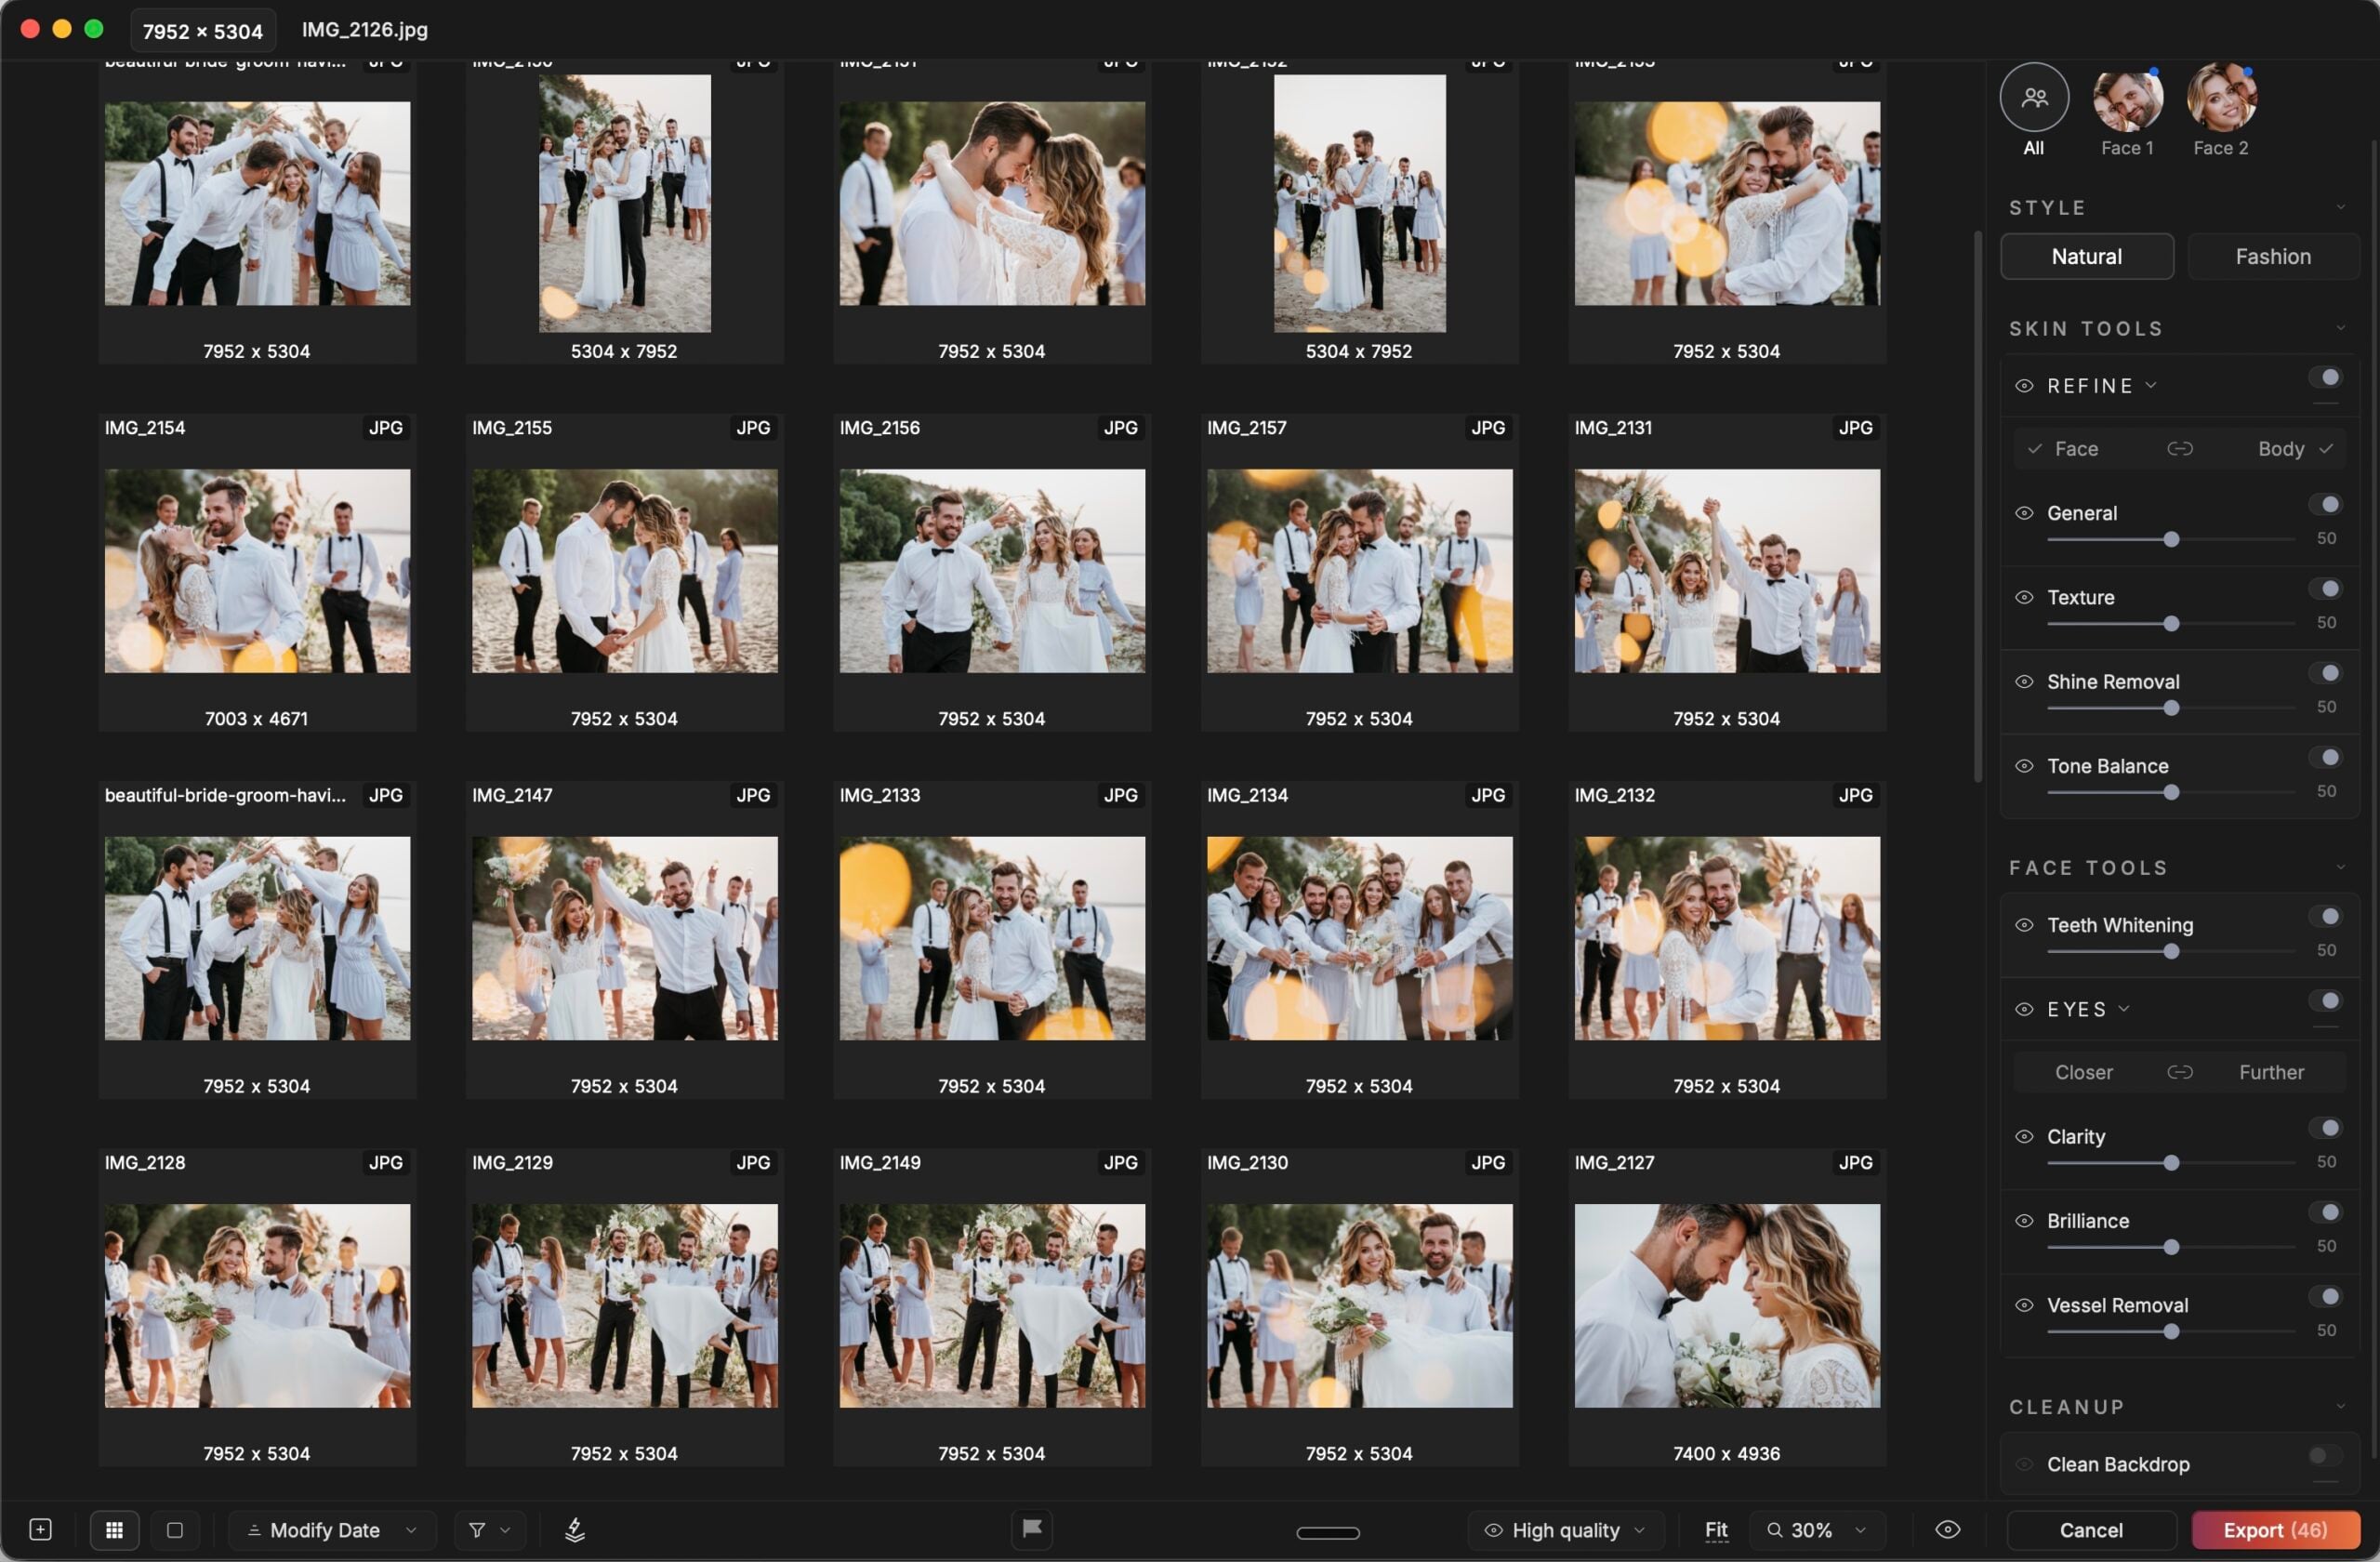
Portrait retouching can be strangely repetitive. You finish a shoot, open the gallery, and start going through the same checklist: remove a blemish here, tone down a shiny forehead there, even out a patch of redness, brighten the eyes, and clean up a smile. Do that across a handful of images and it’s manageable. Do it across 200 portraits, and suddenly you’ve spent a good part of your day doing the same thing.
That’s the problem Reblum wants to solve. It’s an AI-powered retouching app designed to handle the repetitive parts of portrait editing without leaving people looking like they’ve been dipped in plastic. We spent some time exploring its tools to see how well they work, how much control you get over the results, and whether they can actually save time in a photographer’s workflow.
There’s also a timely reason to take a closer look. From November 17 to 29, 2026, Reblum is offering 50% off Lifetime licenses ($124 instead of $249) and 27% off Annual subscriptions ($104 instead of $143) for its Black Friday sale. Monthly plans are excluded. The discounts are available at Reblum’s Black Friday page and are applied at checkout.
Skin retouching: Keeping the texture matters
Skin is where portrait retouching can go wrong very quickly. We’ve all seen those portraits where every pore has disappeared and the person’s face looks more like a porcelain doll than an actual human being. So, naturally, this was the first thing we wanted to examine in Reblum.
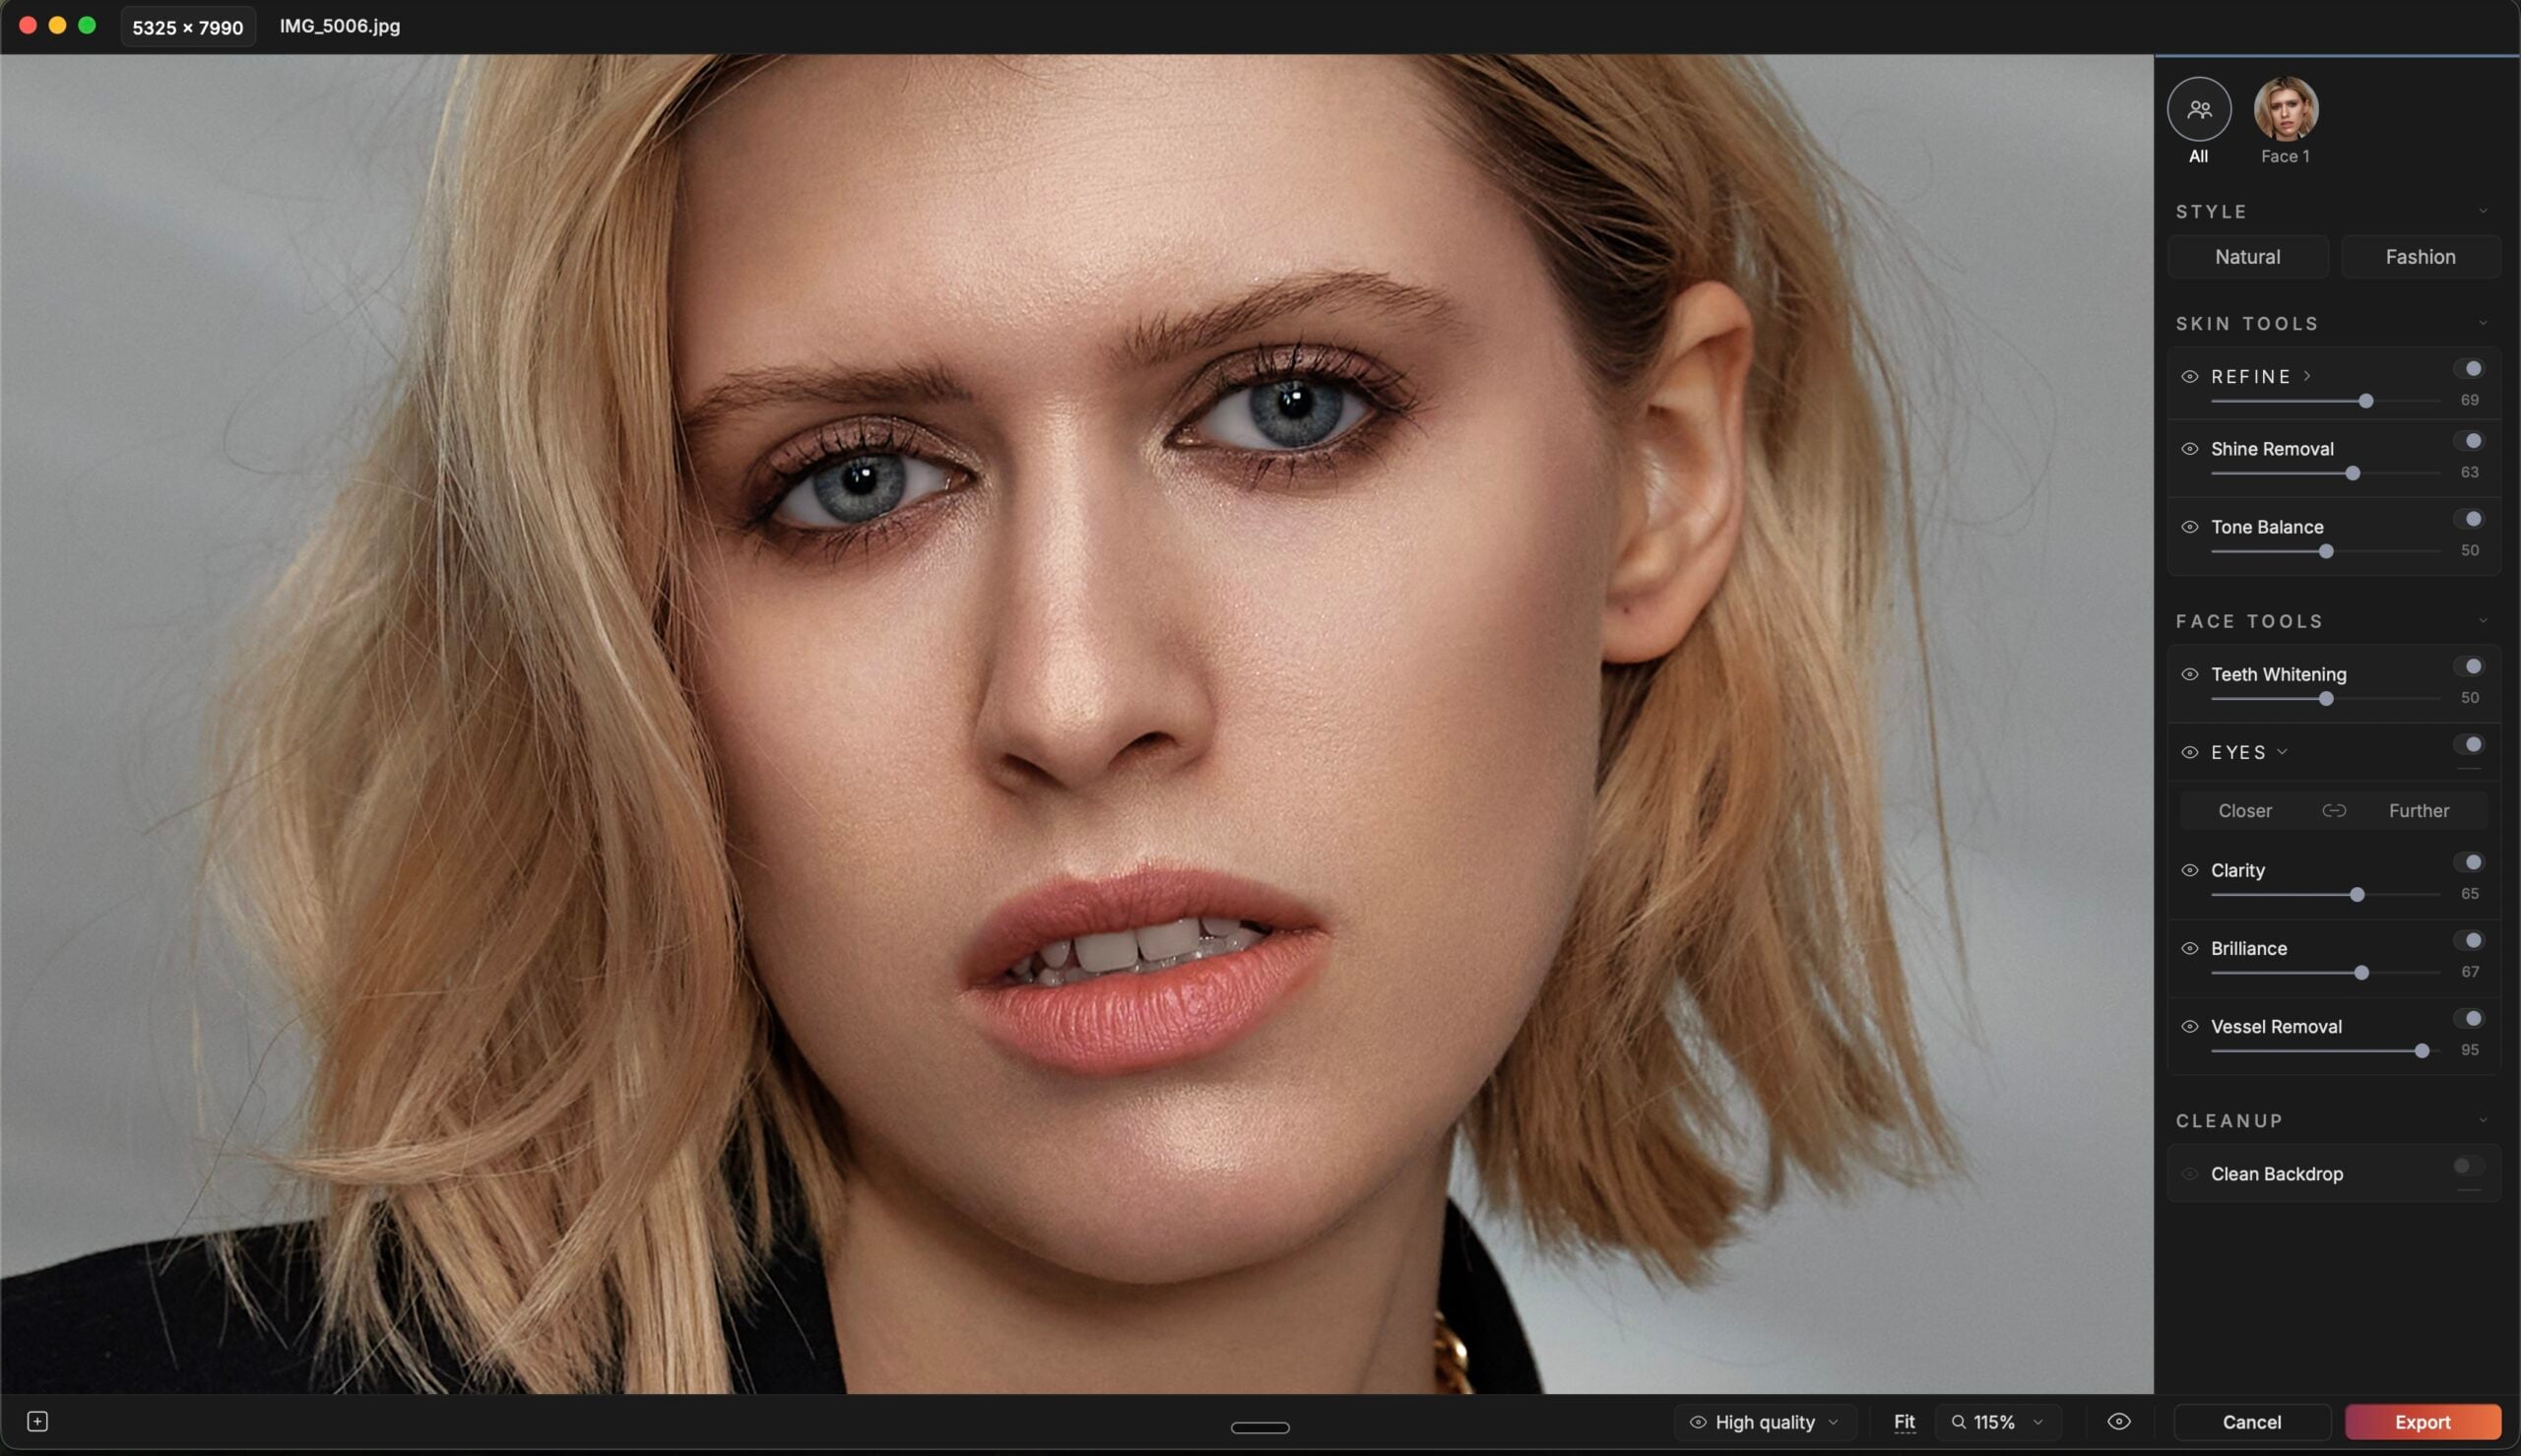
Refine
Refine is probably the tool you’ll use most often. Fortunately, there’s not much of a learning curve. You get two sliders: General and Texture.
General controls the strength of the retouching. Increase it, and blemishes, spots, and uneven patches gradually disappear. Texture, meanwhile, determines how much of the original skin detail remains visible.
One important detail though is that texture only works when General is enabled. That makes sense because the point is to preserve natural skin detail while the app works on imperfections.
If you’re used to spending time in Photoshop with healing brushes and multiple retouching layers, this is a considerably simpler approach. Instead of going through each imperfection individually, you can adjust the overall effect with two sliders and fine-tune it until you’re happy.
Face and body adjustments are linked by default. That’s convenient for close-up portraits, but a little less useful when working with full-body shots. Sometimes the face needs more attention while the arms, shoulders, and other visible areas are already fine. Fortunately, you can unlink the two and adjust them independently.
Shine Removal
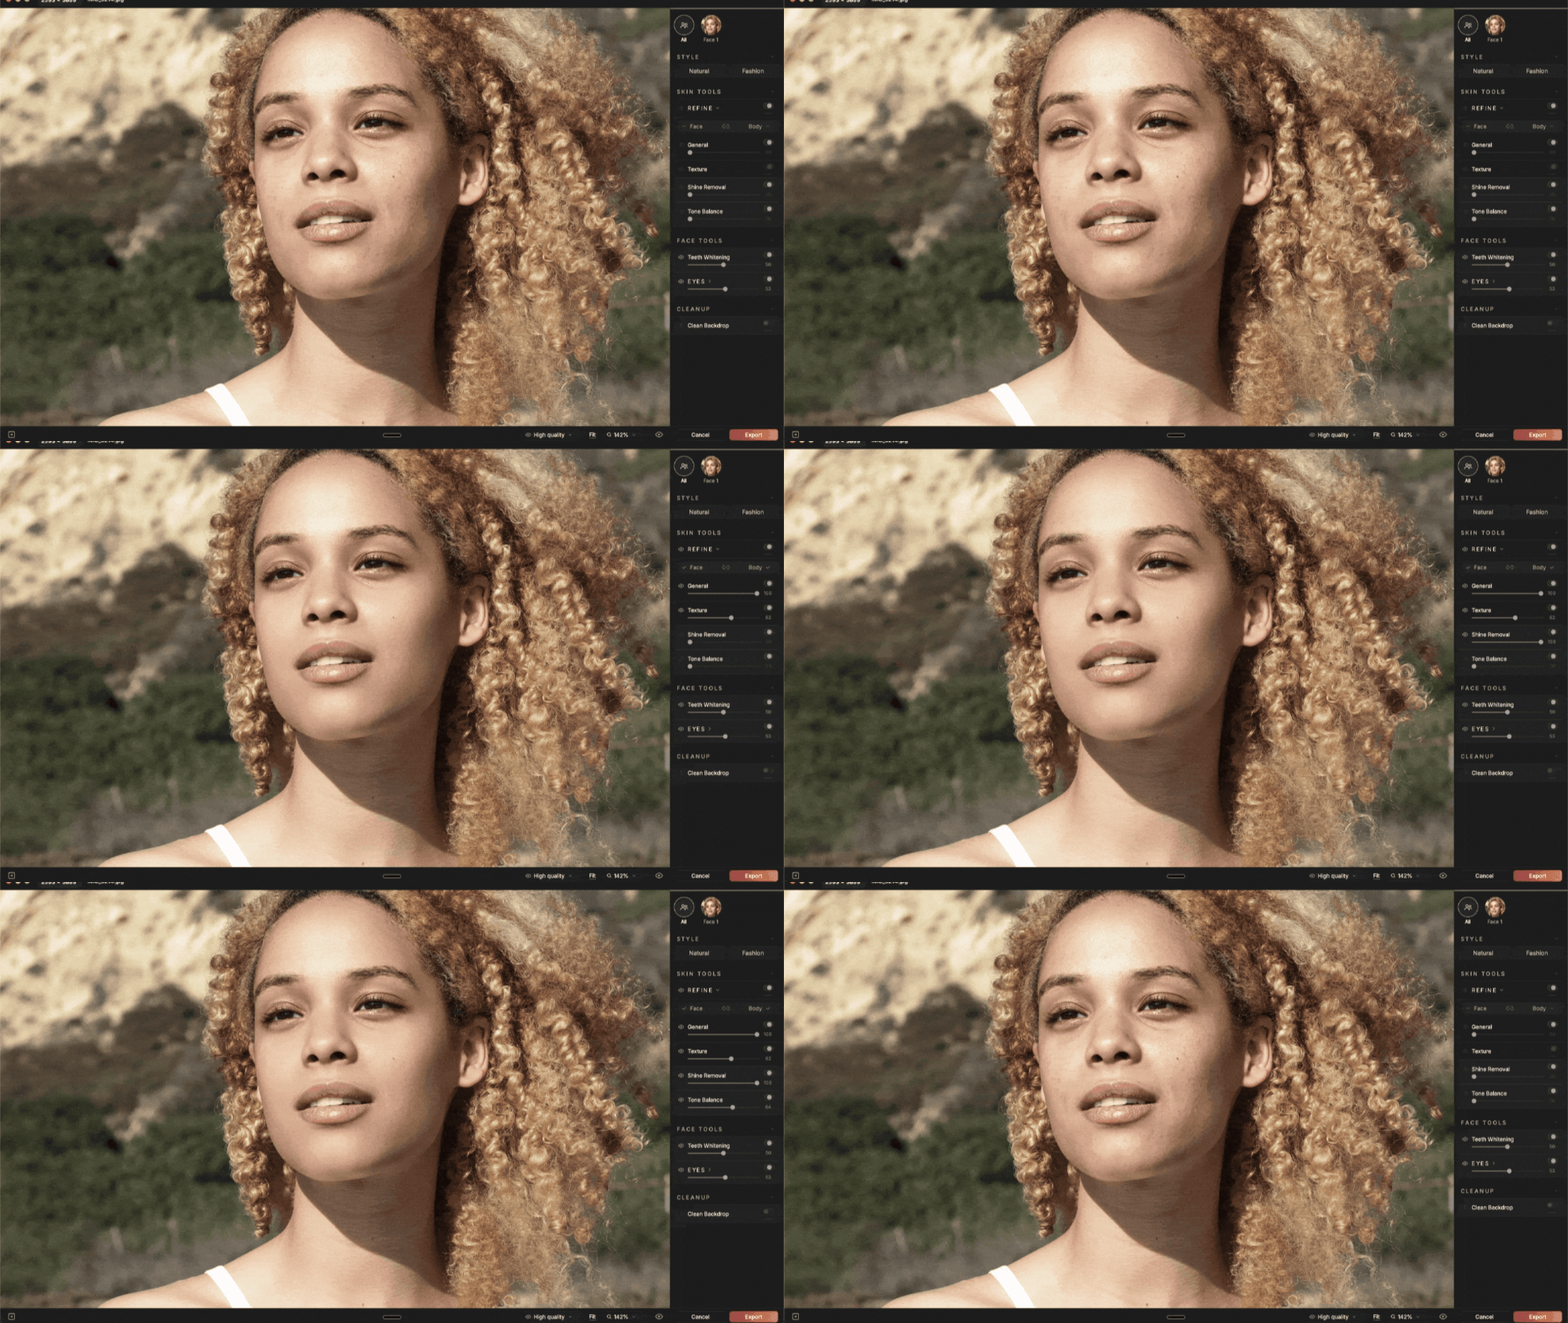
We’ve all had that one portrait where a forehead or nose catches just a little too much light. Shine Removal targets those distracting hot spots while leaving softer highlights intact.
What we particularly liked here was how the tool handles the transition between treated and untreated areas. It tones down the glare without leaving behind an obvious matte patch. The surrounding skin retains a natural appearance instead of looking like someone simply painted over the shine.
Very oily skin may need another pass, but the tool does a good job of reducing distracting reflections without flattening the entire face.
Tone Balance
Tone Balance is a little more interesting because it effectively combines two adjustments in one slider.
Below the 50% mark, it concentrates on redness. Think flushed cheeks, a red nose after an outdoor shoot, or those little patches of irritation that can stand out in an otherwise lovely portrait.
Move past 50%, and the tool starts working across the entire face and body, helping create a more consistent skin tone.
We like having both options in one place. Not every portrait needs a complete skin-tone adjustment. Sometimes all you want is to tone down a few red patches without changing the rest of someone’s complexion.
Eyes and teeth: Small details, noticeable differences
You can spend ages perfecting someone’s skin, but viewers will still gravitate toward the eyes and smile. These details can make a portrait feel polished, although they’re also easy to overdo.
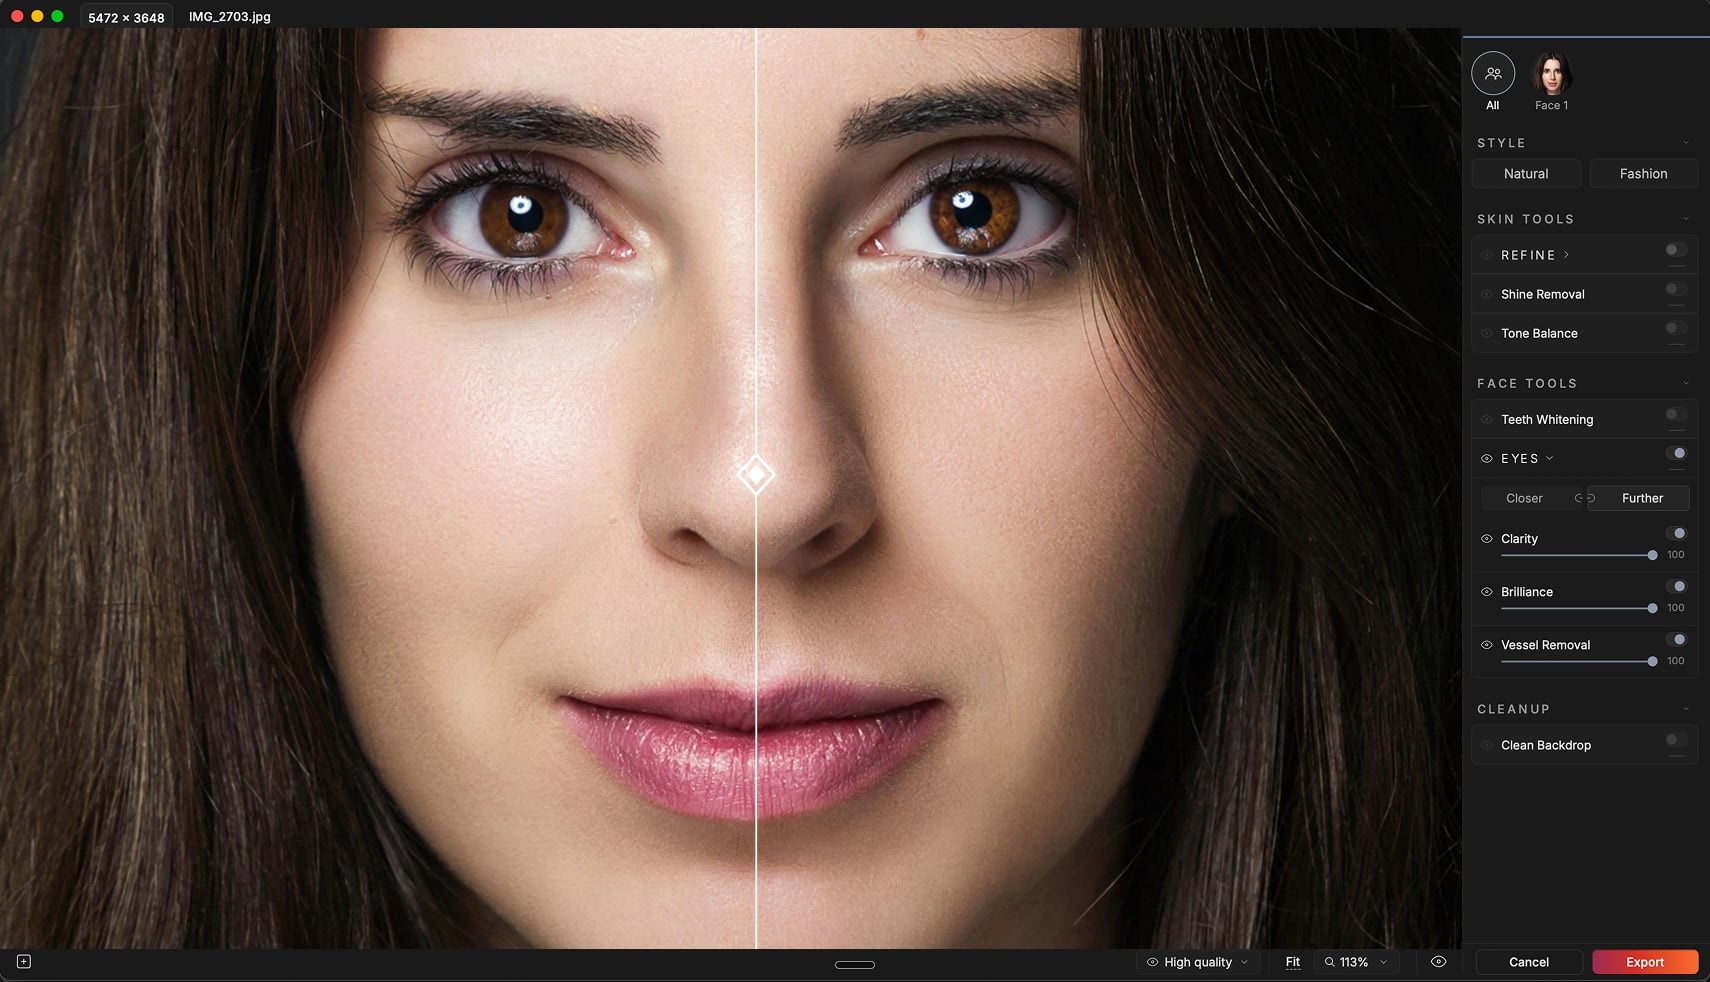
Clarity, Brilliance, and Vessel Removal
Reblum gives you three separate controls for the eyes, each addressing a different issue.
Clarity sharpens the iris, bringing out the fine details and patterns that give each person’s eyes their distinctive appearance.
Brilliance works a little differently. Rather than simply increasing brightness across the entire eye, it enhances the existing light and dark areas of the iris. The result is a little more depth without making the eyes look unnaturally bright.
Vessel Removal tackles redness in the whites of the eyes, including visible veins. The goal is to make the eyes look clearer while retaining their natural color. Nobody wants those unnaturally white eyes that immediately scream “I’ve been retouched.”
Another thoughtful feature is the option to adjust each eye independently. By default, both eyes receive identical settings, but that doesn’t always work for angled portraits. The eye farther from the camera may be softer or slightly out of focus, and applying the same sharpening to both can look a little strange.
Unlinking Closer and Further lets you give each eye its own treatment. It’s a small adjustment, but one that makes a difference when working with less straightforward compositions.
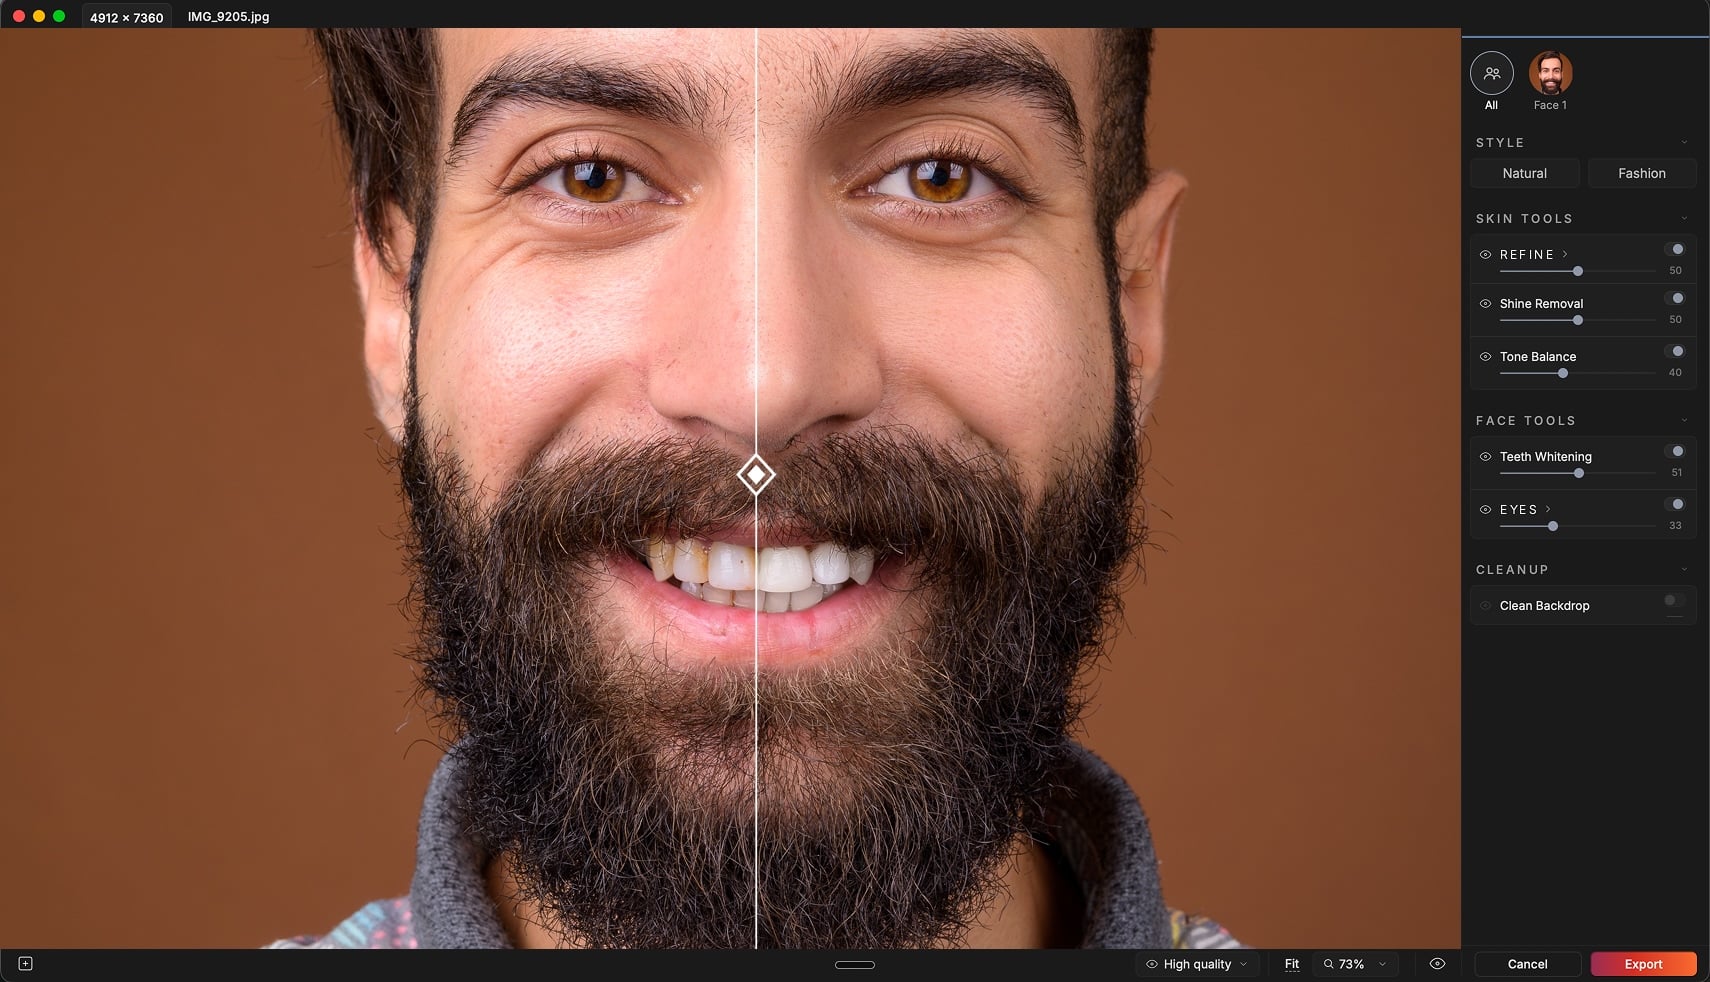
Teeth Whitening
Teeth whitening is another area where automated retouching can get carried away. A little adjustment can make a smile look cleaner, but push it too far and suddenly everyone’s teeth look like they’re glowing.
Reblum takes a gradual approach. As you move the slider, it first addresses smaller imperfections, such as uneven coloring, darker teeth, and areas affected by shadows. Stronger whitening comes in as you increase the adjustment.
For most portraits, we’d probably stay somewhere around the middle. It gives the smile a cleaner appearance without making the teeth look completely disconnected from the rest of the face.
Of course, there’s room to go brighter for beauty and commercial photography. The important thing is that you decide how far to take it.
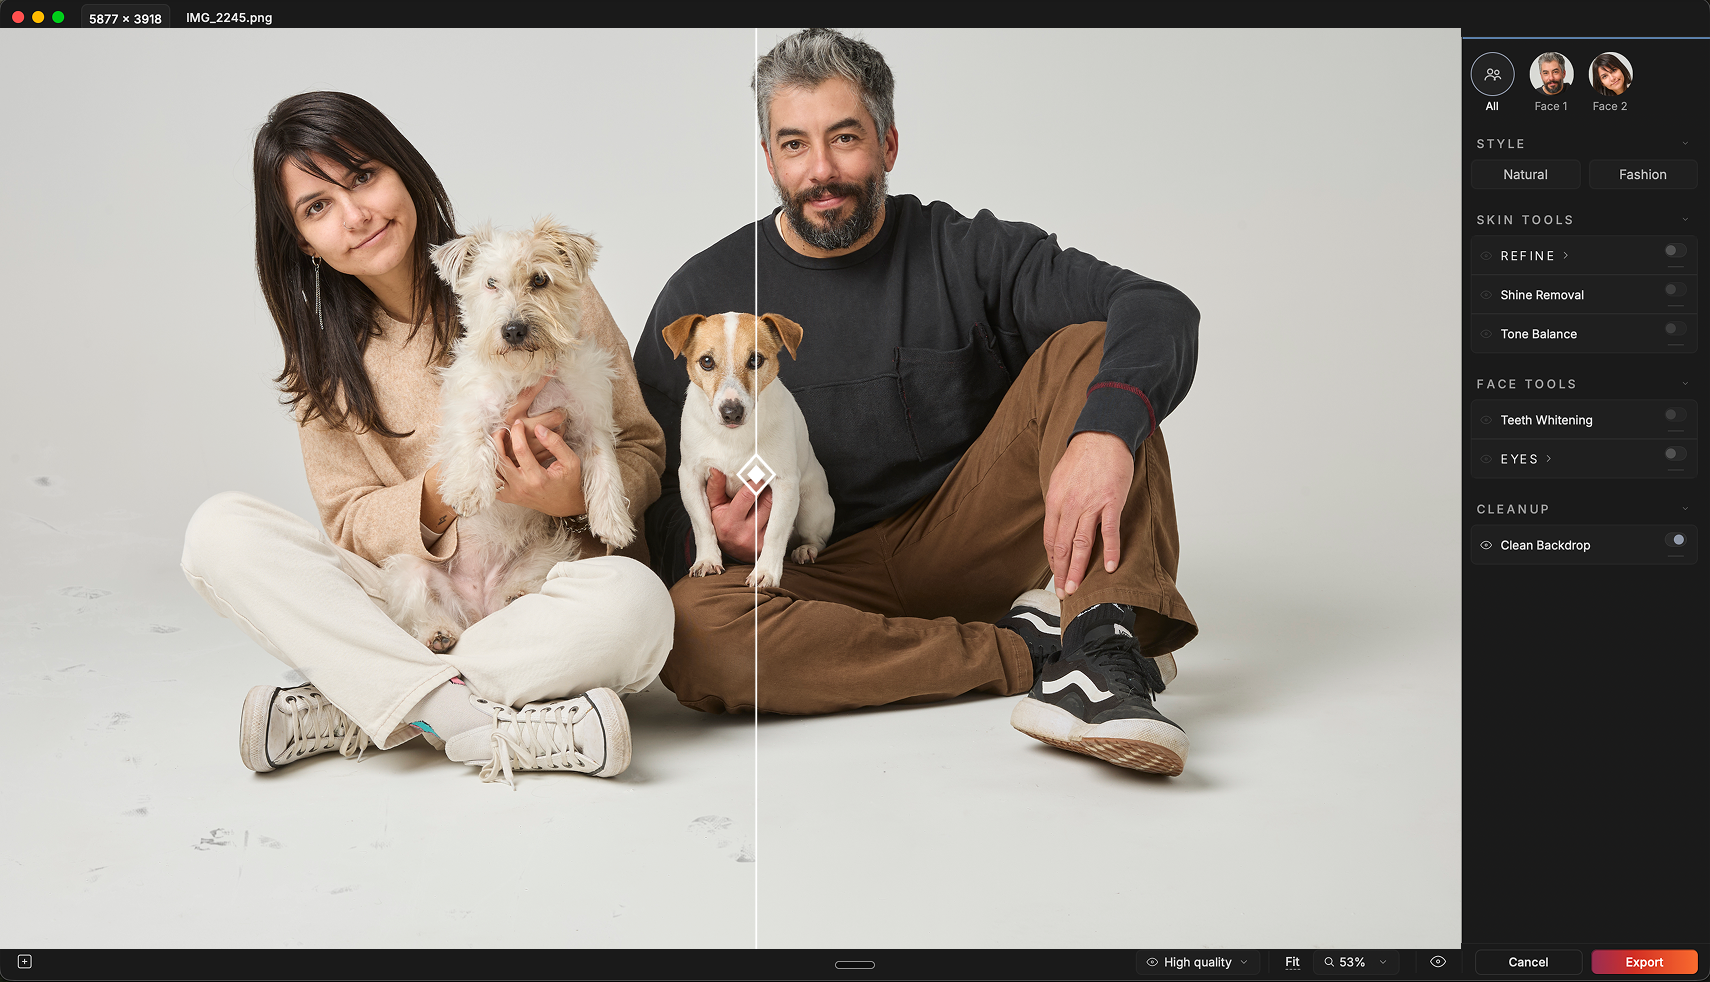
Clean Backdrop: No more fixing every little mark
If you’ve ever photographed someone against a paper backdrop, you know how quickly that pristine surface can get messy. A few hours into a session, there might be creases, scuff marks, footprints, and other little distractions that weren’t there when you started.
Normally, cleaning those up means reaching for Photoshop’s healing tools and working through each image individually.
We also found this particularly useful for cyclorama backgrounds, where even small scuffs can become noticeable in a finished portrait.
Reblum’s Clean Backdrop feature automates much of that process. It identifies the subject, lighting equipment, and other objects in the scene, leaving them untouched while looking for marks on the background.
It then uses the surrounding clean areas to patch those imperfections. The idea is to remove the distractions without making the backdrop look artificially smooth or inconsistent.

Group shots: Everyone gets their own adjustments
Retouching a group portrait can be a little more complicated. Different people have different skin textures, lighting conditions, and preferences, so applying identical adjustments across every face isn’t always ideal.
Reblum includes a face selector at the top of the editing panel. You can leave it on All to apply adjustments to everyone in the frame, or select individual faces for separate treatment.
It’s a manual selection process rather than an automatic system that decides how each person should be retouched. We actually prefer having that control. A group photo shouldn’t mean everyone ends up with exactly the same skin treatment.
Plugins for the editing apps you already use
One thing we appreciate about Reblum is that it doesn’t require photographers to abandon their existing editing setup.
In the standalone app, you can drop in an entire shoot and apply one set of adjustments to every photo. When a frame needs something different, you can adjust that photo on its own and leave the rest of the batch as it is.
The software works as a plugin for Lightroom Classic, Capture One, and Photoshop.
If you’re using Lightroom Classic or Capture One, you can send multiple selected images to Reblum for batch processing straight from your catalog. This is particularly useful when working through an entire portrait session and trying to maintain consistent adjustments across the gallery.
Photoshop works a little differently, with the plugin processing one image at a time. That makes it more suitable for individual portraits that need a final retouching pass.
For photographers who already have an established editing routine, this integration makes Reblum easier to incorporate without having to rebuild their workflow around another application.
So, is Reblum worth it for portrait photographers?
Reblum makes the most sense for photographers who regularly work with large portrait galleries and don’t want to spend hours repeating the same retouching tasks.
Its biggest strength is the range of adjustments available without requiring much manual work. Skin imperfections, shine, redness, eyes, teeth, and backdrop marks are all covered, while the individual controls give you room to decide how much retouching each image actually needs.
We also appreciate that it doesn’t force you into a completely different editing workflow. Batch processing through Lightroom Classic and Capture One is useful for larger shoots, while the Photoshop plugin gives you another option for individual images. Reblum also processes images locally, meaning client photos remain on your machine.
That said, we wouldn’t consider it a replacement for detailed, high-end manual retouching. There are no reshaping tools, and more complex commercial or editorial work will still benefit from the precision of Photoshop and an experienced retoucher.
But that’s not necessarily the point. Reblum is designed to take care of the repetitive first pass, leaving photographers with more time to concentrate on the images that need individual attention.
And if you’ve ever found yourself spending an entire afternoon removing the same tiny blemishes from an entire gallery, you probably understand the appeal.
Price and availability
Reblum is available for Mac and Windows through monthly and annual subscriptions, as well as a Lifetime license. There are no per-photo charges or limits on the number of images you can process.
A free seven-day trial is available without requiring a credit card. Annual and Lifetime licenses also come with a 30-day refund window.
For Black Friday, from November 17 to 29, Annual and Lifetime licenses will be discounted by up to 50%!
Not ready to commit? Reblum offers a free seven-day trial that requires no credit card, giving photographers time to test the software on their own images. Annual and Lifetime purchases also come with a 30-day refund window. With those options in mind, we take a closer look at what Reblum can do and whether it’s worth adding to your editing setup.
See more from DIYPhotography.net on Google
Add DIYPhotography.net as a trusted source. This makes
our stories more likely to appear in your Google Search results.
 Add as a preferred source on Google

Alysa Gavilan
Alysa Gavilan has spent years exploring photography through photojournalism and street scenes. She enjoys working with both film and mirrorless cameras, and her fascination with the craft has grown over the decades. Inspired by Vivian Maier, she is drawn to capturing everyday moments that often go unnoticed.



Join the Discussion
DIYP Comment Policy
Be nice, be on-topic, no personal information or flames.