


The 5 Minutes, $1.50 Reflector And How To Use It
Jul 4, 2015
Laya Gerlock
Laya Gerlock is a Portrait and Product photographer based in the Philippines. His passion is teaching and sharing his knowledge in Photograpy and has been doing this for 6 years.
Share:

I’ve already used those DIY reflectors in a couple of my articles but I’ve never actually did a full post explaining how they are built and used. I want to show you how easy it is to make this reflector and how useful it can be. Definitely a good use for $1.50. It actually takes around 5 minutes to make it and you can make it as big or small as you need.
What you will need
- Illustration board or foam board
- Tape and scissors
- Clamps or binder clips
- Aluminum foil or Silver Gift Wrapping Paper
- Optional: Gold wrapping paper

How to do it:
Step 1 – setting size
Cut a piece of the foam (or illustration) board the size you want. I make mine quite small because I mostly use them for my still life photography.

Step 2 – foil
Cut a bigger piece of aluminium foil or silver gift wrapping paper. I used aluminium foil before but have used silver gift wrapping paper when I had non available (don’t ask).

Step 3 – matching
There are two ways to do this. If you have double stick tape you can just put double stick tape on the board and stick the aluminum foil to it.
If you only have good old regular tape, fold the aluminium to the back of the board and tape it. Do this for all sides. If you have excess foil or wrapper on the sides, just cut it away.


Step 4 – placement
Use your clamp or binder clip to make your mini reflector stand.


After that your done! Gotta admit, well spent 5 minutes and several cents. Making a few of those will probably set ou back a buck fifty.
Testing out the 5 minutes reflector
First, have a look on how adding a few of this those little reflectors can impact your photo
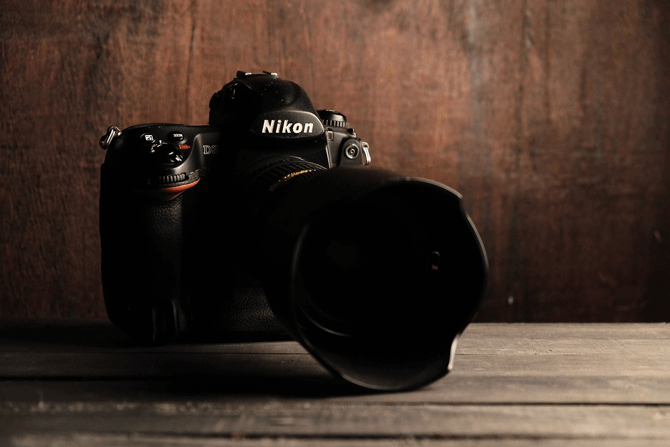
For this test I used one light thru a softbox on the right, facing the subject


I placed a DIY reflector on the opposite side of the softbox to fill in the shadows.


I placed another one just beside the camera to get some highlight near the shutter and and more fill on the grip.


To get some “catchlights” on the lens, I carefully placed a reflector in front of the camera and angled it so that I got some nice catchlights and a little bit fill light on the lens itself.


Lastly, my last reflector went on the left-back side of the camera to get some highlight on the side of the the camera and also some highlights on the left side of the lens hood.


Here are some examples of using this reflector on previous tutorials.
A really big diy reflector: Build A $300 Music Stand Triflector For $29

How To Shoot A Watch Using One Light And All The DIY Gear In The World


Tips On Getting Gradient Reflection On Reflective Surfaces Part 2


How To Perfectly Capture Steam In Food Photography


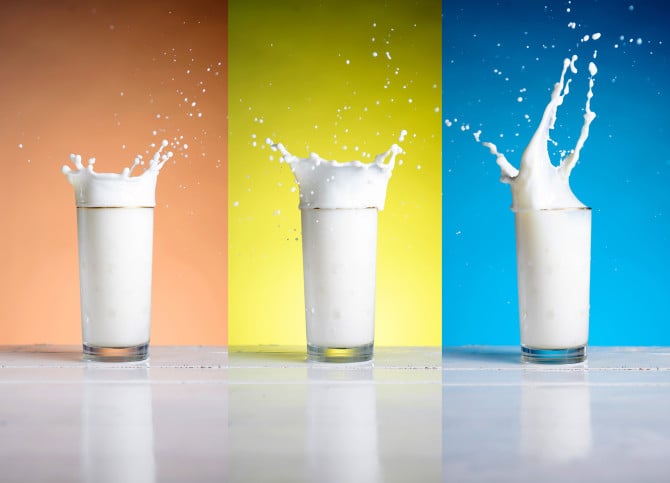
How To Create The Perfect Milk Splash In The Studio

You can also use this reflector to get some back light on your subject by reflecting the main light: How To Shoot The Perfect Perfume Shot Using El Bokeh Wall


Laya Gerlock
Laya Gerlock is a Portrait and Product photographer based in the Philippines. His passion is teaching and sharing his knowledge in Photograpy and has been doing this for 6 years.


Join the Discussion
DIYP Comment Policy
Be nice, be on-topic, no personal information or flames.
8 responses to “The 5 Minutes, $1.50 Reflector And How To Use It”
US dollars are written with 2 decimal places when using cents, ie, $1.50
Dude? Really? All that you can say about this awesome piece of shared lighting knowledge is an error in decimal places? You have to be kidding.. right?
I didn’t mean to hurt any feelings, just letting the author know.
none taken :) fixed.
I use a silver sunshade from the car. when I need a bigger one, I use the one from my motor home.
These are splendid photography tips that I’m going to share at my website/blog, The Creative Seller, this morning! Some good info in comments too. Thanks!
Great típ.
I use small reflector on left side of sunglasses.
https://eyewear-photography.com/collections/sunglasses/products/vo5165sf-2575-8h
Thank you for useful tips