


How to Make a Pro Looking ‘IceLight’ for less than $30
Jan 11, 2015
Justin Barr

We love it when our readers get in touch with us to share their stories. This article was contributed to DIYP by a member of our community. If you would like to contribute an article, please contact us here.
Share:

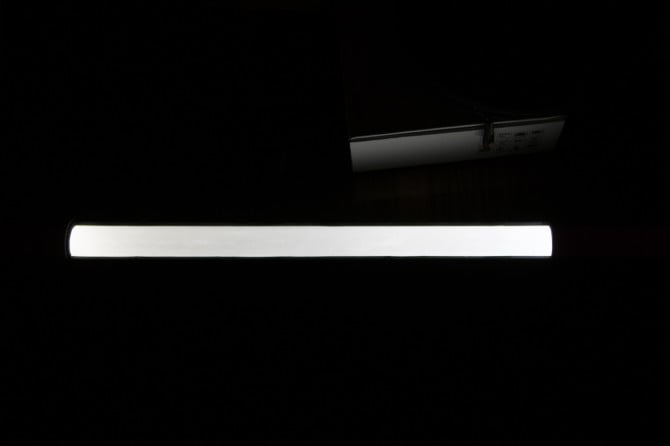
The Ice Light by Westcott is a $450 light source that many photographers swear by. It is a powerful, variable LED light that can be hand held and gives a nice directional strip-like spread.
Then again, it costs $450, which is no peanuts. If you are in the photography stage where you have more time than money, photographer Justin Barr made a DIY version that looks pretty nifty. Details, after the jump.
Parts Used
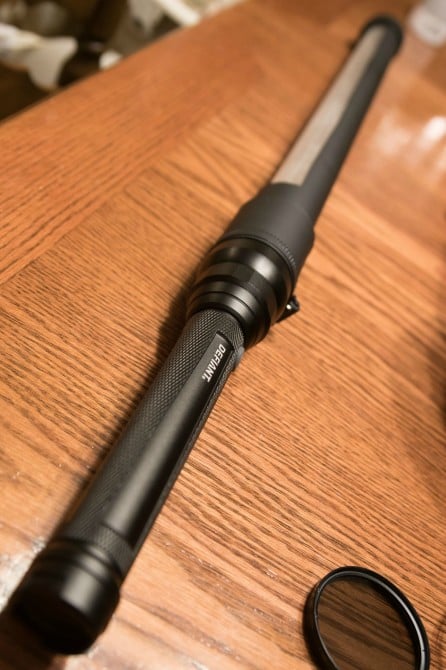
- Defiant 700 Lumen Focusing LED Flashlight from Home Depot ($19.88 Model #: HD14Q406)
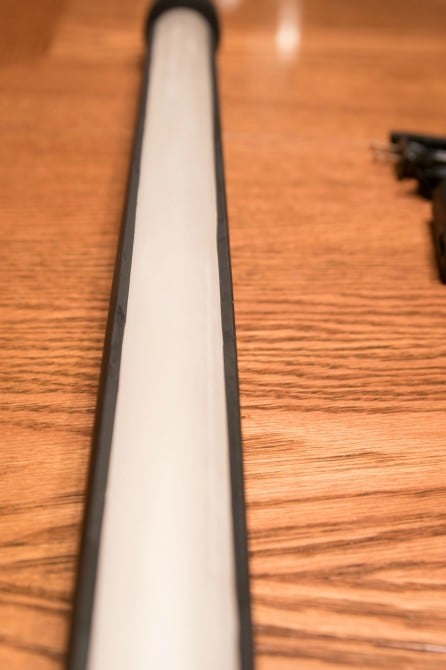
- 24″ PVC pipe, 1.5″ Diameter (~$3)
- 1.5″ PVC Coupler (~$1)
- 1.5″ PVC Cap (~$1)
- 48″ Fluorescent Bulb shield (Slides over a fluorescent bulb to prevent it from shattering) (~$3.50)
Small piece of aluminum foil. (Had it in the house, because we’re civilized)
1. Cut the opening in the PVC pipe. This can be whatever width you want. Mine is a little less than halfway through.

2. Cut the flourescent shield to the same length as the pipe. Then use a utility knife to cut it longways.
3. Sand the inside and outside of the fluorescent shield to create a “smoked glass” look. and set aside.
4. Remove the “crown” off of the bulb end of the flashlight. You will still have the reflector cone and clear focuser inside the light.
5. This takes a bit of sanding for adjustment but the 1.5″ coupler almost threads perfectly onto the end of the flashlight. Sand as needed and test fit.
6. Push 24″ PVC into the unsanded coupler end. PVC Cement can be used if desired.
7. Cut a piece of aluminum foil slightly bigger than then end of the PVC pipe, shiny side toward the flashlight. Fit it over the pipe and slide the PVC Cap about half way on. If there’s any foil sticking out, trim with utility knife. Then press Cap on fully.
8. (Optional if painting) Using the leftover flourescent shield, insert it into the PVC pipe. This will be the paint shield so black paint won’t get on the inside of the light pipe.
9. Place hose clamp around end of PVC coupler and snug tight. (this is only for paint purposes so it will be in place for paint and won’t scratch if you try to put it on after painting.
10. I used Krylon matte black spraypaint that was specific for plastics. It bonds well and only takes about 15 minutes to dry. Several thin coats will work better than one thick coat.

11. After its dried, its time to fit it onto the flashlight. Replace the painted fluorescent shield with the sanded white shield.

12. For the Coupler I used, I had to cut a small (2 cm) piece of PVC pipe to fill in the gap on the flashlight side of the coupler. The clear plastic for focusing the flashlight falls out if there’s nothing there. This is a trial and error step. It will take some trimming to get a good fit.
13. Once the coupler is fit and the focuser is in place, tighten the hose clamp.
14. That’s it. The focuser on the flashlight acts as a dimmer for the light. When its set to wide beam it is dimmer since less light is reflecting off the foil at the end. This light also has two brightness settings so it dims down pretty well.
Video Demo
Sample Shots


About the Author
Justin Barr is a photographer based in St. Louis, specializing in portraits, family photos, real estate, commercial, and outdoor photographyYou can see his site here, and follow him on Facebook or Twitter. This article was originally published here.
We love it when our readers get in touch with us to share their stories. This article was contributed to DIYP by a member of our community. If you would like to contribute an article, please contact us here.
Related Posts
 Frequent selfie posters are seen as less likable, less successful and more insecure, new study claims
 Seven tips for shooting a pro-looking product video on a tight budget
 Learn how to use DaVinci Resolve like a pro in 30 minutes or less
 Move over 8K – Blackmagic’s new URSA Mini Pro shoots 12K60p RAW video for less than $10,000
Join the Discussion
DIYP Comment Policy
Be nice, be on-topic, no personal information or flames.
21 responses to “How to Make a Pro Looking ‘IceLight’ for less than $30”
I work at the Depot and I’ll be making one of these today :-)
Share the details when you do Scott! And good luck!
I don’t work at Home Depot… but I saved money switching my car insurance.
German version for a flash striplight http://blog.bjoern-krull.de/2014/02/27/striplight-im-eigenbau/
I’m all for diy. There are plenty of completely useful DIY solutions that equate or get close to a manufacturer’s product, but this just doesn’t even compare.
The most appealing part of the ice light isn’t just it’s shape, it’s how much light it puts out in that shape. This is a flashlight with the equivalent output of a 60 watt incandescent— that’s about 1/3 the Icelight output before you put the pipe and diffuser in front of the diy version. You made a long, compact, weak strip light. That might be useful, but it really isn’t even close to the functionality of an Icelight… And, I’m not even a fan of them.
Maybe I’m just being grumpy on a cold, gray, wet day.
Actually not really. I’ve seen the Icelight in person and SLR Lounge did a review and said the light drops of extremely fast. Sure their solid aluminum construction is better but mine was $30. Grab a cup of hot cocoa, a blanket and a good movie. You can make it through this lousy day.
What did you use to cut the pvc?
This http://www.homedepot.com/p/RIDGID-JobMax-12-Volt-Multi-Tool-Starter-Kit-R82236/202222204
Thanks. I think I’m going to try using a dremel. Im going to go get a dremel & sand paper tomorrow. Excited to try this out
Here’s another great option for $20: http://bit.ly/1Dyso1C
What were your camera settings for the sample shots? Curious to see if these are able to be used for video as well.
ISO400 1/30 F2.8
The issue is Color Rendering Index. If that is not good, it does not matter. How it is with this vs Ice Light?
No clue. I haven’t compared it side by side.
Tungsten is 100 CRI. CRI is however designed for the human eye and does not directly translate to a camera sensor. In other words 100 CRI does not mean more accurate color representation on your sensor. Then when you color grade it becomes even less important especially when shooting Raw. There is a metric for television light quality being created for this reason.
I can definitely see the lack of certain colors when I used cheap LED lighting (with RAW). If the light source does not have certain light frequencies, no amount of RAW tinkering will bring that back.
http://lowel.tiffen.com/edu/color_temperature_and_rendering_demystified.html
Nice!
Kylee White
This is cool thanks Wyatt!!!!
just buy toy – jedi sword with white color :)
What about connecting it to a light stand? Did anyone try that yet?