


How To Build A White Background Home Video Studio
Apr 10, 2012
Udi Tirosh
Udi Tirosh is an entrepreneur, photography inventor, journalist, educator, and writer based in Israel. With over 25 years of experience in the photo-video industry, Udi has built and sold several photography-related brands. Udi has a double degree in mass media communications and computer science.
Share:
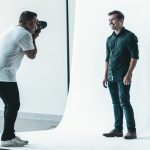
One of the cooler ways to create a clean looking video is to shoot it against a white background (if you don’t believe me check out our steel wool light painting tutorial).
It only took about $100 and an afternoon to build the studio
We got a ton of mails asking how we built this setup, so here is the breakdown:
The General Idea
I am using 3 banks of light – 2 “strips” on either side about 1 meter from the backdrop – those are used to burn the background – and 1 square bank as a key light. Usually you would also want a fill light, but I am shooting in a small white room and there is enough of a bounce so no fill. Also, I am not currently flagging the strips because I like the rims, that may change…
I am shooting against a seamless white backdrop, but only because there is an ugly window behind me, and it’s kinda low. This setup will work with any big enough white wall. The strips are clamped onto 2 stick-in-a-cans. The key light is mounted on a “Real” light stand and goes through an umbrella for a bit of softening.
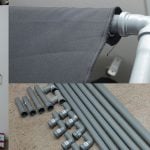
Materials
For the strip banks
- 8 X CFL 23+ Watts bulbs
- 4 X 40 by 10 centimeter ply wood pieces
- 8 X bulb Sockets
For the Key
- 1 X 35 by 15 centimeter ply wood piece
- 6 X CFL 23+ Watts bulbs
- 3 X Y splitter
- Small L-bracket
- 1/4 20 bolt & nuts
For both
- Some Electric Wire
- 2 X Electric plug with a switch
- Silicon paste
The Build
This is a fairly easy build if you know what you are doing. We are wiring “live bulbs” so if you haven’t done anything like this before, seek help with your neighborhood electrician. If you have done this kind of thing before, it should take no more than an afternoon.
For each of the 4 ply wood boards mark two spots 30cm apart for the sockets. Drill a pilot hole with a small drill.

Then use a cup drill to make place for the sockets.

Place the sockets in the holes and tighten with screws


Wire the bulbs together and connect the switch

Use silicon paste to fix the sockets into position.

The key light build is very similar – only drill three holes (and 3 bulbs and so on).
Place the small l-bracket in the middle of the wood and fix it with some silicon and screws. Then use the nuts to create a mounting point.

There you have it, a full setup in one afternoon.
If you like building stuff like this you may wanna take a peek at our Studio @ Home eBook – it has lots of projects for building a studio at home, and while originally aimed at the stills shooter, lots of the projects can be adopted to video.

Udi Tirosh
Udi Tirosh is an entrepreneur, photography inventor, journalist, educator, and writer based in Israel. With over 25 years of experience in the photo-video industry, Udi has built and sold several photography-related brands. Udi has a double degree in mass media communications and computer science.


Join the Discussion
DIYP Comment Policy
Be nice, be on-topic, no personal information or flames.
8 responses to “How To Build A White Background Home Video Studio”
Hi Beowulfnator,
would you have any suggestion wich bulbs to choose for lightning a white background?
I usually shoot still not video. Why do you shoot at iso 800 vs lower iso? Is it just so that you can do it with a reasonable amount of bulbs? and does iso 800 result in a noisy image in this setup?
Hi JJ,
You are dead on, the high ISO is there because of the amount of lights used. You can always use more lights or open aperture a bit more (just like stills) and use lower ISO.
In my case the shutter speed and depth of field needed called for ISO 800 which was not noisy at all.
היי אני מניחה מהחמצוים שאתה מדבר עברית..חח
אני עדי אני בת 16 אני רוצה לצלם את עצמי בצורה מקצועית על רקע לבן לתמונות מקצועיות אבל אצל צלם מקצועי זה טיפה יותר מהתקציב שלי עכשיו ( ששואף לאפס)
איך אני יכולה לצלם את עצמי מקצועי בחדר של? קניתי בד לבן לתלות על הקיר..
אבל איך מאירה את הקיר שהוא יהיה לבן לחלוטין בתמונה ו מאירה אותי טוב?
ממש אשמח ליעזרה… ניסתי הכול
הי עדי, אכן עברית :)
אין לי חדשות טובות, לתמונות מקצועיות את צריכה צלם מקצועי :) אם לא לשום דבר אחר, אז לכל התאורה שיש לו בסטודיו
Hi! I built this studio and I have your same camera settings except for the ISO which I dropped down to 100 because it was washing me out and sometimes even then depending on where I sit it will still sometimes wash me out so I have to be careful. Do you think it might be because my camera is too close to me? I’m about 4 ft. in front of the white paper backdrop and my camera is about 6 ft. in front of me.
could probably be due to the light spilling some light on you. have you tried flagging them, or standing further away from the backdrop?
If I had my own place I would definitely have a room kitted out like this.