


How To Build A PVC Full Body Background Stand For 20€
Apr 17, 2013
Udi Tirosh
Udi Tirosh is an entrepreneur, photography inventor, journalist, educator, and writer based in Israel. With over 25 years of experience in the photo-video industry, Udi has built and sold several photography-related brands. Udi has a double degree in mass media communications and computer science.
Share:
It has been a long time since we had a good solid studio PVC build (pun intended), so I was quite thrilled when David Schöppe sent in this full body backdrop stand made from PVC

I’ve read about quite a few photographers using a 35€ IKEA window shade as a “seamless” half body background. I decided to make my own full body background system with changeable colors for less money.
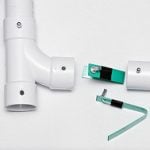
Materials
- PVC Pipes, I used 40mm diameter pipes because they are the cheapest at the hardware store next to me, while still providing enough support.
- here is the size list:
- 2x200cm
- 3x150cm
- 2x30cm
- 2x20cm
- 8x 90° angle
- 2x 90° branch
- Additionally, for each background color I bought a 50mm x 150cm pipe to mount the background fabric on.
- All the PVC pieces together were less than 20 €
- A fabric in the color of your choice, opaque, 150cm x 400cm (around 3 € per meter)
The Build
After you’re done, all the PVC pieces can be separated again portability and easy storage. (Easy storage = Storing them at any corner of the house, if you are willing to pay the rant from the significant other)
First, start with the stand: Use 4 of the 90 degrees angles, the two branches and the two 30cm long pipes to build the “legs” of the stand.


Connect the two 150cm pipes to create a rectangle as the bottom part of the stand. then add the long 200cm and 20cm vertical pipes.


Now at the last of the 150cm pipes, the thick end need to be cut off to make it fit between the two angles which hold the horizontal pipes. (if you are using schedule 40 pipes, this is probably not relevant, it is just a weird thing on European pipes).


Cut the thick end at 50mm x 150mm pipe (the one holding the fabric) so it can rotate around the thinner 40mm pipe. (yes, only for European pipes)
To mount the fabric to the pipe do a small side cut to the pipe, where the end of the fabric will be inserted.


I’ve fixed the end of the pipes with two hose clamps. The background can be rolled down from the pipe and rolled back up again once the shooting is done.


For now I’ve only done black and white rolls, but new ones are easy to make and install.
The Background stand is done now and it will be mounted in less than two minutes.


Samples Shots


About The Author
David Schöppe (facebook) is an amateur photographer based from Germany, he is 25 25 years old, and into Photography since 2011

Udi Tirosh
Udi Tirosh is an entrepreneur, photography inventor, journalist, educator, and writer based in Israel. With over 25 years of experience in the photo-video industry, Udi has built and sold several photography-related brands. Udi has a double degree in mass media communications and computer science.


Join the Discussion
DIYP Comment Policy
Be nice, be on-topic, no personal information or flames.
16 responses to “How To Build A PVC Full Body Background Stand For 20€”
looks more like headshots and 3/4, not full body?
You could easily run a longer piece of fabric that the model stands on and voila, full body. Personally, I made a 10ft wide version of a similar style to do my video interviews with. There are basically no size constraints beyond how wide you can get fabric, as you can extned the PVC endlessly
yes, point being-10ft wide. anyone else ever try shooting full length portraits on a 4ft backdrop without spending the evening cloning any background other than pure white or black? not fun.
4m is more then enought for full body shots :) here is a picture you can exspect then full lenght:
http://www.flickr.com/photos/kabauterman/8581982653/in/set-72157633065786383
Is that a bunny?
I don’t think so, we have a strict no bunny policy on the blog.
Rascally rabbit I think.
yes, our little Klopfer :)
He’s so cute! :)
I had same idea about background stand, this will help me out a bit in design.
Thanks for the article: very helpful. Does the cut on the pipe holding the fabric extend the entire length or just a few cm on each end?
The cut holds the fabric over the entier lenght :)
Thanks for the post! I should have read this before I went out to buy a manfrotto set! ugh… http://www.kentanphoto.com
I also have a Facebook-Blog about my projects :)
https://www.facebook.com/YOURWayPhotography
Hi folks, I do wonder how sturdy the connection at the T-joints for you is, as I just built mine today and the vertical tubes were too wobbly to stand upright… Not sure if perhaps the T-joints have too-a-short connection with the vertical tubes, or if those 20cm vertical tubes inserted below the 200cm ones do help alleviate this problem (I only inserted the 200cm ones into the T-joints straight)?
I am currently looking for a solution (and another hardware store if they might have a different brand, i.e. slightly different T-joints), or if i need to make an additional “leg” for each vertical tube to strenghten it.
pity that the stand is too thin and does not stand even the lightest of the background