


PVC Backdrop/Light Stand
Nov 9, 2008
Udi Tirosh
Udi Tirosh is an entrepreneur, photography inventor, journalist, educator, and writer based in Israel. With over 25 years of experience in the photo-video industry, Udi has built and sold several photography-related brands. Udi has a double degree in mass media communications and computer science.
Share:
 I love nothing better than a good PVC construction. This is why I was so happy when David Turman sent in this great PVC stand. As any stand it can double as a light stand or a backdrop stand. You can use the stand to mount the cool backdrop you already made, or “just” your store bought backdrop. David is doesn’t talk much, but his picture by picture tutorial is priceless. David, the floor is yours.
Here is my version of a simple and durable PVC backdrop or Lighting Stand. All the pieces are cheap and readily available and assembly is easy. I bought all the pieces at my local Lowe’s for about $11.00, so you can do 2 for about 20 bucks not counting the uprights. You might save even more if you buy a multi-pack of the PVC fittings.
PVC Cutting List:
- 10- 3/4” x 8” long PVC
- 2- 3/4” x 6 1/2” long PVC
- 2- ¾ x 3” long PVC
Materials List:
- 10′- 3/4” schedule 40 PVC pipe
- 1- 3/4” PVC cross tee
- 2- 3/4” 45deg. PVC Elbow
- 5- 3/4” PVC tee
- 4- 3/4” 90deg PVC elbow
- 1- small can PVC Cement
Tool List:
- tape measure
- Sharpie marker
- PVC pipe cutter or hacksaw
- Dremel tool w/ sanding drum
- Safety Glasses and maybe some gloves
Just before we start, a word of caution: PVC cement is some very noxious stuff and even flammable. Make sure you use plenty of ventilation and maybe even take a break every so often. And no smoking around this stuff. Safety eyewear is also a good idea

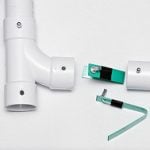
All the items you will need.

Layout the 3”, 6 1/2” pipe, cross tee and 2- 45 deg elbows like this.

To make it easier, join the short pieces to the cross tee and the long pieces to the 45 deg. Elbows like this.

…and then glue them all together like so. Set this aside to dry.

Next lay out the 10 PVC pieces of pipe, 4- 90 elbows and 2 of the tees like this.


…glue them together so you look like this. Make sure all the pieces are fully inserted and the tee in the middle is perfectly vertical.


Next, going back to the crossmember, glue on the 2 remaining tees. Make sure they are nice and square.

Now you should have 3 pieces that look like this.


Now, join the 3 pieces together. A mallet or block of wood might be helpful to make sure everything is fully seated.


One last thing. You will need to grind down the little lip inside the cross tee. The pole I use is exactly 1” in diameter and wouldn’t slide through. A Dremel makes light work of this. I neglected to mention that this is much easier to do before you started gluing it together.


Udi Tirosh
Udi Tirosh is an entrepreneur, photography inventor, journalist, educator, and writer based in Israel. With over 25 years of experience in the photo-video industry, Udi has built and sold several photography-related brands. Udi has a double degree in mass media communications and computer science.


Join the Discussion
DIYP Comment Policy
Be nice, be on-topic, no personal information or flames.