


Double Your Light Stand As A Portable Backdrop Mount System
Dec 4, 2008
Udi Tirosh
Udi Tirosh is an entrepreneur, photography inventor, journalist, educator, and writer based in Israel. With over 25 years of experience in the photo-video industry, Udi has built and sold several photography-related brands. Udi has a double degree in mass media communications and computer science.
Share:
 In the following article, Martin Kimeldorf will show us how to make a backdrop stand that can be mounted on your I-carry-it-anyway lightstand.
I don’t like to carry a ton of photo stuff. The notion of trucking around 2 lights stands and a cross bar, with backgrounds, plus tripod and additional light stands for off-camera flash…well, it just ain’t me, not at my age. I went into my head-shed and tried to work with an existing light stand (costing $20 $45) and materials found at my local hardware and fabric outlet. I now have a lightweight, portable set up for less than 1/3 the cost of the commercial ones. Plus it is smaller than most being only 6 feet across. I can remain mobile.
Materials
First, I purchased 3 backgrounds black, white and gray from Joanne’s Fabric and Craft outlet. They are 6 feet across and 9 feet long for about $45+tax total. I purchased a second light stand from B&H for $45, plus a case $45, and a sand bag $14.
Udi’s favorite material included PVC, glue, and a few small spring clamps for about $25. And my favorite material was added: black duct tape. Thought it was first time with PVC, I only spilled the glue once…
The steps and sequence is roughly captured with my small Sony point and shoot, which has a decent macro capability. So don’t judge the lighting on this one. Actual time to assemble the PVC kit was about 20 minutes.
In the image below you will find The Portable Background Stand broken down and ready to go. Colored items are small plastic clamps ($1.50-ish) for holding fabric to the cross member of the T bar. Total length is 6 when assembled, in this position the longest side is 4 feet, so it fits easily in the car.

The Build
1. Most critical first step is to find a T-stem which fits snugly over your light stand tip.
Later, file down flanges, see finger where points. Then I fit a larger, reinforce PVC tube over the down-part of the T joint.

2. The parts: A larger PVC fits over bottom of T joint B. Then slip A over the upper part of the light stand, pressing B down over the metal tip.
C Extension is 1 foot long and is not glued. D is glued into E Long Pipe. E is 4 feet long and glued into the cross part of the T-stem.

3. After each gluing, I wiped out inside so it would not interfere with removal of side extensions C Extension from E Long Pipe.

4. Main parts shown glued up.

5. Strengthen intersection of cross bar and stem with tape. Improves rigidity, and safety.

6. Small cheapo clamps work great

7. Final assembly mounted on light stand. I taped ends of removable extensions, so I’d quickly know which end to insert in the main T. And it gives a more finished look.

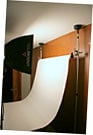
8. Here the portable background holder is paired with a gray cloth purchased for $15 from local fabric store.

Conclusion
Partner eyes glaze over whenever I mention pixels, photographs, or strobes. Now the junky background is finally covered up. Perhaps I’ll try for a DIY model next…

Get Yourself a Strobe:
More Backdrop Stands:
– Home Made Cheap DIY Backdrop Stand
– Super easy hardware store light-backdrop stand
– PVC Backdrop/Light Stand
– DIY Ghetto-Fab Portable Backdrop Stand

Udi Tirosh
Udi Tirosh is an entrepreneur, photography inventor, journalist, educator, and writer based in Israel. With over 25 years of experience in the photo-video industry, Udi has built and sold several photography-related brands. Udi has a double degree in mass media communications and computer science.


Join the Discussion
DIYP Comment Policy
Be nice, be on-topic, no personal information or flames.