


Using Cheap Wallpaper As Backgrounds For Professional Looking Product Shots
May 21, 2014
Laya Gerlock
Laya Gerlock is a Portrait and Product photographer based in the Philippines. His passion is teaching and sharing his knowledge in Photograpy and has been doing this for 6 years.
Share:

The backgrounds we use for our shots make a big difference in the final photo. I have covered quite a few options before, all are pretty accessible and today I want to share another quick and budget minded technique – using wall paper or colored paper for your background. (See these if you need some backdrop inspiration: illustration board, white background & gel & DIY wooden table).
I first saw this being done on flickr and wanted to give it a try. Here are a few ideas on using different paper backgrounds plus few tricks on lighting.
Yellow Colored Background
For te first demo I am showing my girlfriends sunglasses. I got some yellow construction paper as it provides some great contrast with the shades. Plus yellow means summer, right?
1. I knew that I wanted the shades to be floating so the first thing I did was hang the sunglasses between two lightstands using tape.

2. For the gradient look in the background, I placed a speedlight below the sunglasses with a DIY Honeycomb pointing at the yellow background.

3. The hard part (as with any reflective surface) is getting the reflection on the sunglasses just right. I first tried using a softbox pointing directly at the sunglasses so it reflected the softbox, but I didn’t quite like the results.

4. For a more gradient effect on the glass I moved my whole setup to a place wherer the shades reflected a much bigger surface – my white seamless background (lucky, amazon did not patent using a seamless white as a reflector yet). I then pointed a studio strobe towards the white seamless paper to get the gradient reflection on the sunglasses. (I am going to talk about this technique in an article coming up).

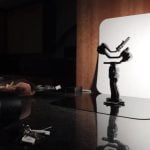
5. Here is the final Setup Shot

6. After getting the shot that I wanted, I edited out the tape and fixed the tones in post.

Light blue Background
1. I wanted a really light colored shot for this so I went with a light blue colored background.
2. I used two strings to hang a watch under a boom stand and I placed an additional string below the watch so that I can control its position and rotation.

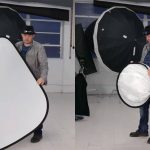
3. I placed the main light camera left thru a softbox and a speedlight with a DIY honeycomb on the bottom of the watch pointing towards the background for a highlight effect.

4. To get some reflection on the face of the watch I placed a silver reflector on the right side and controlled it using my hand until I got the reflection that I wanted.


5. Then just a little bit of cleaning in photoshop then walla!

Wood Wallpaper background
1.This is another technique I saw on flickr a long time ago (can’t find the photo now) and I wanted to give it a try.
2. I used a wood patterned wallpaper for the background and created a mini seamless setup.

3. I first placed a studio strobe with a snoot on top of the lenses and placed it really close to get a really narrow spot on the lens.

4. Then I placed another light pointing at the background for some highlight on the wood wallpaper.

5. For the main light I placed a softbox camera right to get some lights on the lens and also fill some light on the background.

6. I shot 4 lenses in total and cleaned and and stitched them in photoshop.

There you have it, working with $2 of paper to create great product shots.

Laya Gerlock
Laya Gerlock is a Portrait and Product photographer based in the Philippines. His passion is teaching and sharing his knowledge in Photograpy and has been doing this for 6 years.


Join the Discussion
DIYP Comment Policy
Be nice, be on-topic, no personal information or flames.
19 responses to “Using Cheap Wallpaper As Backgrounds For Professional Looking Product Shots”
This doesn’t look professional at all imo… It looks like if an enthusiastic hobbyist did an attempt to make cool looking productshots.
The final sun-glasses-shot and the final watch-shot have minimal problems with them that are easily tweaked/fixed. Mostly problems with the lighting I think. (unwanted shadows/reflection)
I see nothing wrong with the information this article is trying to share. It demonstrates well enough that wallpaper can be used effectively for professional looking shots.
You are right.
I agree with Pim, you can get much better results, even with a DIY set up.
http://www.danieltjester.com/blog/2014/4/24/losing-my-reflection-shooting-sunglasses-for-minimal-post-processing
Did I miss the part in the article where it claims to be better than or the best way to get such shots?
The title? Professional looking product shots implies a level of quality that I don’t think this achieved here.
It implies the technique can achieve the quality, not necessarily the examples provided.
Pim and Daniel if you dont mind can we see your product shots please.
My pleasure: http://www.danieltjester.com/blog/2014/4/24/losing-my-reflection-shooting-sunglasses-for-minimal-post-processing
use fishing line.
Only caveat I would offer is that folks need to be aware of potential copyright issues with patterned paper, depending on how you intend to use it. For example, I wouldn’t go buy identifiable patterned paper and try to use that for backdrops in your stock photograph as that is not the level of rights you are afforded by simply purchasing the finished product. Likeliness of getting caught aside, it is something to consider.
Not to parse words but….it’s voilà…not walla
I see I’m not the only one bugged by “walla” (my spell correcter won’t even let me type it).
It’s “voila”, a French word for “there it is” or “there you are”.
Right usage, wrong word.
Great stuff ! here is behind the scene of product photo shoot. Explore more about product photo editing service.
Image clipping path | Photo retouching services | Removal image background | Ghost mannequin effect
Just awesome!! I’ve shared this great tutorial, this tutorial very helpful for our clients, because we worked with product photographers, thanks Laya for your awesome tutorial.
Nasrin
Clipping Partner India
That’s an awesome idea!! Great man!!
Great photography idea that can minimize the labor of post production work. It can also save the time of creating clipping path to set the image against a good background.
You are right dear
A smart photographer doesn’t need a costly studio setup — as DIYPhotography shows, even a cheap wallpaper or colored paper can produce striking product shots with a bit of imagination and thoughtful lighting.
DIY Photography
But raw images are just the beginning. What truly separates a “nice shot” from a “brand-worthy image” is the post-production polishing.
Visit Here: Photo Retouching LDT, based in Rangpur, Bangladesh, we turn your DIY-style or amateur product photographs into polished, professional visuals.
photoretouchingltd.com
Whether you shot your product on a budget wallpaper backdrop or a simple studio paper roll, our expert editors