


This photographer 3D printed his own “photo sniper” grip for his macro photography setup
Nov 14, 2019
Dunja Đuđić
Dunja Djudjic is a multi-talented artist based in Novi Sad, Serbia. With 15 years of experience as a photographer, she specializes in capturing the beauty of nature, travel, concerts, and fine art. In addition to her photography, Dunja also expresses her creativity through writing, embroidery, and jewelry making.
Share:

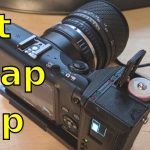
A few months ago, photographer Nick Sherlock shared with us his epic 3D printed 300mm long extension tube. Then he needed something to hold this beast and provide him with more stability, and he once again put his 3D printer to work. Inspired by the legendary Zenit Fotosniper, Nick designed and printed his own rifle-style grip. It doesn’t only look cool, but it gives him way more stability when using his macro setup.
Nick previously created the 3D printed extension tube to push his macro to 5:1 magnification. With the 300mm long tube and a Sigma 180mm f/3.5 macro lens, this turned out to be quite a bulky setup. The assembly is 500mm long in total, and almost all of the weight is located right at the lens end. “I found that my left hand had to carry most of the load, and my right hand was just operating the camera and doing little else,” Nick explained in a Reddit post.
So, he came up with an idea. As I mentioned, he was inspired by Zenit Fotosniper, which can be a handy solution for this problem. However, Nick wanted something that would fit his unique, DIY setup. It was also necessary for the grip to be fully customizable, but the Fotosniper is built for specific lenses and camera bodies.
This is why Nick decided to make his own rifle-style grip. It’s 3D printed, designed especially for his setup, and it even looks cool. There are two microswitches in the trigger assembly. They support a two-stage half-press and full-press action for the camera’s shutter release.
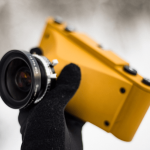
“With my design, my right hand can now take up its fair share of the weight load. That combined with being able to brace the setup against my shoulder using the stock reduces camera shake and makes it easier to keep my tiny subjects in the frame. I’m seeing a definite increase in both the percentage of keepers I’m coming home with, and how long I can keep shooting before my arm feels like it’s going to fall off.”

Nick has posted his design to Thingiverse if you’re willing to try it out for yourself. He advises everyone to make the grip look as little as possible like a gun, and consider a bright-orange filament for the tip mandatory. He was kind enough to share a few more photos of his DIY “photo sniper” with us, as well as a few photos he made with his setup mounted onto it. Check them out below, and make sure to follow Nick’s work on his website.


Dunja Đuđić
Dunja Djudjic is a multi-talented artist based in Novi Sad, Serbia. With 15 years of experience as a photographer, she specializes in capturing the beauty of nature, travel, concerts, and fine art. In addition to her photography, Dunja also expresses her creativity through writing, embroidery, and jewelry making.


Join the Discussion
DIYP Comment Policy
Be nice, be on-topic, no personal information or flames.
8 responses to “This photographer 3D printed his own “photo sniper” grip for his macro photography setup”
In tomorrow’s news: photographer gets shot for carrying a camera that looks like a gun.
I get similar results by using the same Sigma lens but with a crop camera. This definitely doesn’t look like 5:1 magnification – probably he is not shooting from the closest possible focus distance? But then what is the purpose of having all this plastic? Also I wouldn’t leave the lens hanging like that! It quite heavy and that is why usually it has a tripod mounting bracket on it that you can use.
That green spider was definitely at 5x magnification, that little bugger was tiny!
I can agree on the spyder as they are really small sometimes. Is it possible to have such big visual difference between 5:1 full frame and 1:1 crop sensor? My calculations shows that 5:1 on FF vs 1:1 on crop should be 3x bigger. But it doesn’t looks like that. I was thinking about upgrading to FF this Christmas but now you’ve got me thinking if I should do it. This is the same bug as one of yours with my 600D and 180mm Sigma lens at 1:1 : https://www.flickr.com/photos/borisgeorgiev/14021305742/
5x magnification on full-frame gives a frame 7.2mm wide, 1x mag on a Canon crop sensor gives a frame 22.3mm wide, so yeah my smallest field-of-view is 3x narrower than your setup.
According to the EXIF data, that weevil shot of mine has a “focus distance lower” of 82 metres, so it sounds like my lens was basically focused at infinity. Focusing my lens at infinity gives me about a 1.6x magnification on my setup, so should look almost exactly the same as your 1x mag.
Oh I forgot to mention, by far the biggest upgrade that Full Frame offers for macro is the size of the viewfinder. I’m not sure if you’ve tried one out or not, but I upgraded from the Canon 450D to the 5D III and I was bloody blown away! So much easier to see what you’re doing with that bigger finder.
The viewfinder is one of my main drivers as well. I had as Sigma SD14 and it was way better than the 600D regardless the fact that it was with even smaller sensor than the Canon. I am also considering upgrading to 90D but I have to check it first.
Just don’t take that rig out on the street where someone can mistake it for a shoulder mounted weapon and then someone else shoots you dead. I’m serious; photographers have paid for that mistake with their lives.