


This is a smart way to enhance saturation in Photoshop without overdoing it
Dec 30, 2024
Dunja Đuđić Kalinin
Dunja Djudjic is a multi-talented artist based in Novi Sad, Serbia. With 15 years of experience as a photographer, she specializes in capturing the beauty of nature, travel, concerts, and fine art. In addition to her photography, Dunja also expresses her creativity through writing, embroidery, and jewelry making.
Share:
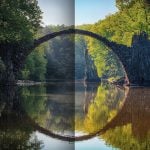
Increasing saturation is one of the basic things we do when editing photos. While, sure, you can just drag the saturation slider, Nino Batista of NBP Retouch Tools+ shares a better way. It will increase saturation and intensify colors without compromising image quality or realism.
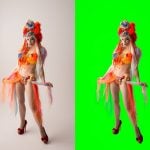
Nino emphasizes the importance of understanding when and where to boost saturation. In his example , the neutral white gypsum sand contrasts sharply with the blue sky, the tan of his model’s skin, and her black outfit. This creates what he calls a “high contrast color saturation situation,” where selective adjustments can make or break the final image.
Boosting saturation universally, such as increasing it across all areas of an image, often leads to undesirable artifacts. Neutral tones can shift in unexpected ways, creating problems in both digital and printed formats. For instance, oversaturating the white gypsum sand might add an unnatural yellow hue that disrupts the scene’s authenticity.
Enhancing saturation more effectively
To control saturation more effectively, especially in tricky images like this, Nino shares a few of his go-to techniques:
1. Hue/Saturation adjustment layer
This is a standard tool for increasing saturation. While powerful, it can inadvertently affect neutral areas, such as whites and blacks, and introduce color artifacts. Nino suggests experimenting with the Color Blend Mode on this layer, which targets saturated areas while preserving neutrals.
2. Vibrance adjustment layer
Unlike the Hue/Saturation layer, Vibrance boosts saturation selectively, prioritizing already saturated areas while being gentler on neutral tones and skin tones. Nino highlights two sliders within this layer:
- Vibrance slider adds subtle saturation, ideal for preserving a natural look.
- Saturation slider offers a more targeted saturation boost, particularly useful for enhancing skin tones without pushing them into unnatural territory.
For the best results, Nino recommends applying the Color Blend Mode here as well.
Practical advice for photographers
Nino’s tips are practical and beginner-friendly. When enhancing saturation, you can experiment with these techniques as well:
- Combine tools: Use Hue/Saturation and Vibrance adjustment layers together to fine-tune saturation across different areas of an image.
- Avoid hard masks: When working with high-contrast saturation, overly rigid masks can create an unnatural look. Let the tools do the heavy lifting with subtle adjustments.
- Test and refine: Each image is unique. Play with saturation sliders and blending modes to see what works best for your specific shot.
Nino closes by encouraging you to experiment with these techniques. Whether you’re enhancing bold colors or working with more neutral tones, tools like Vibrance and Hue/Saturation layers provide flexible ways to achieve your creative vision. You can learn more about the difference between Saturation and Vibrance here.
[Boost saturation smarter in Photoshop (#2) | Nino Batista via Shutterbug]

Dunja Đuđić Kalinin
Dunja Djudjic is a multi-talented artist based in Novi Sad, Serbia. With 15 years of experience as a photographer, she specializes in capturing the beauty of nature, travel, concerts, and fine art. In addition to her photography, Dunja also expresses her creativity through writing, embroidery, and jewelry making.

Join the Discussion
DIYP Comment Policy
Be nice, be on-topic, no personal information or flames.