


This DIY slider pans, slides and tilts in the most peculiar way
Dec 20, 2020
Udi Tirosh
Udi Tirosh is an entrepreneur, photography inventor, journalist, educator, and writer based in Israel. With over 25 years of experience in the photo-video industry, Udi has built and sold several photography-related brands. Udi has a double degree in mass media communications and computer science.
Share:
We’ve featured our share of DIY sliders. Heck, I met Stefan through his DIY slider about 10 years ago. Some are more complex than others, and some are stupidly fun and simple.
This DIY slider project from Jan Derogee is a nice combination that is (kinda) simple yet feature-packed. The project will require a bit of electronics know-how, but it goes in the weekend project bin.
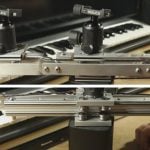
One of the clever aspects of this slider is the motor system. It is very similar to a core XY 3d printing system, with some slight tweaks.
First, there are no motors on the carriage, and it runs with 217 timing belts. Two of the motors control the slide and pan. And they do so in a very clever way. The belts and pullies are positioned cleverly. Rotating the motors in the same direction slides the cartridge while rotating them in opposite directions creates a panning motion. This is clever because it gives the slider double the power of a single motor. It means that you can use cheap motors or get better performance when sliding vertically. It’s also clever because no motor on the cartridge means no cables and less weight.
For control, you get a numbered pad along with a small LCD. It allows you to set waypoints, durations, and loops without the need for an app or a remote.
Jan really is humble about the build:
Regarding the build, in essence it’s nothing more then some tubing, 3D printed parts, 3 stepper motors (of which two come from a 1980’s diskdrive). Some MDF to give it a solid base. The wheels are also 3D printed, but were covered by rubber coming from an inner-tube of a bicycle tire. No PCB was designed, the whole thing was build on protoboard, the firmware runs on a Sparkfun Pro Micro.
[DIY#10 differential camera slider via hack a day]

Udi Tirosh
Udi Tirosh is an entrepreneur, photography inventor, journalist, educator, and writer based in Israel. With over 25 years of experience in the photo-video industry, Udi has built and sold several photography-related brands. Udi has a double degree in mass media communications and computer science.


Join the Discussion
DIYP Comment Policy
Be nice, be on-topic, no personal information or flames.
3 responses to “This DIY slider pans, slides and tilts in the most peculiar way”
Exactly the kinda stuff I love reading about on this blog! Thanks!
Are there any instructions on how to build this?
Chris
https://www.christopherjameshall.co.uk
wlzB.Org