


This 3D printed adapter for microscope objectives produces amazing macro shots for less than $25
Nov 17, 2021
John Aldred
John Aldred is a photographer with over 25 years of experience in the portrait and commercial worlds. He is based in Scotland and has been an early adopter – and occasional beta tester – of almost every digital imaging technology in that time. As well as his creative visual work, John uses 3D printing, electronics and programming to create his own photography and filmmaking tools and consults for a number of brands across the industry.
Share:

Macro is one of those subjects that kind of has two extremes. Either you can go way over the top expensive, with decent macro lenses starting at quite a few hundred dollars or you can go super cheap, utilising tools such as extension tubes with your “normal” lenses. But there is a third alternative, a mix of inexpensive and DIY. And this project from Nick Sherlock takes that DIY route to a low budget extreme with some pretty amazing results.
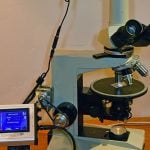
He designed an adapter for Sony E and Canon EF mount cameras that can be easily 3D printed and allows him to connect an inexpensive $23 4x microscope objective and essentially use it as a macro photography setup. And while it’s no Laowa probe lens, the objective being so small also means you can poke it through things to get much closer to your subject without too much interference.
The adapter allows you to mount any 160mm microscope objective onto your Sony E or Canon EF mount camera, letting you view the scene through the tiny $23 optic allowing for some pretty extreme magnifications. You do get a fairly short working distance, though. Of course, with a lens this extreme with tiny subjects, you’re going to want to be pretty close anyway.
Two different designs of the adapter have been made available to download and print – one for APS-C and one for full-frame – which allow you to maximise the viewing area of the lens on either system. The APS-C version has a removable centre tube that you can remove to shorten the distance between the objective and the sensor. This reduces the magnification, but gives you a slightly increased working distance, allowing you to more easily get light into your subject without the lens getting in the way.


As is often the case with more practical items, Nick suggests printing with either PETG or ABS. He also suggests using a 0.1mm layer height, which makes sense given the detail and tolerances needed for the lens mount. Print orientation is also vital, he says, with the mount side facing upwards. Various other printing notes and construction tips are included on the Thingiverse page for the adapters – including going so far as to remove the housing from the objective. As you can see, it really is a full DIY solution.
The objective has a nominal fixed non-adjustable aperture of f/4, which becomes an effective aperture of about f/20 at 4x magnification. This means you’re going to need a decent amount of light to shoot. And if you’re using this on a Canon DSLR, you’re going to need a decent amount of light just to view it, too, as your view through the viewfinder will be severely darkened. On mirrorless cameras, it’s not an issue as the EVF will dial itself up to compensate.
You do get a super shallow depth of field with this setup, so you’re inevitably going to be relying on focus stacking to get any kind of real depth of sharpness in your image. But that shallow depth of field does mean that things that are out of focus are basically mush – as you can see in some of the example images Nick shot using the adapter and then stacked in post.


If you already own a 3D printer – or know somebody who has that’s willing to print this for you – it’s certainly a lot cheaper than going out and buying a dedicated macro lens and a lot more readily available if you’re just starting out and don’t want to spend a whole lot of money. and if you do want to download the adapters and print them for yourself, head on over to Thingiverse. Be sure to check out Nick’s profile while you’re there to see some of his other macro photography and video-related designs you can print.

John Aldred
John Aldred is a photographer with over 25 years of experience in the portrait and commercial worlds. He is based in Scotland and has been an early adopter – and occasional beta tester – of almost every digital imaging technology in that time. As well as his creative visual work, John uses 3D printing, electronics and programming to create his own photography and filmmaking tools and consults for a number of brands across the industry.


Join the Discussion
DIYP Comment Policy
Be nice, be on-topic, no personal information or flames.