


Take extreme macro photos by adapting a microscope
Dec 9, 2017
James Wallace

Udi Tirosh is an entrepreneur, photography inventor, journalist, educator, and writer based in Israel. With over 25 years of experience in the photo-video industry, Udi has built and sold several photography-related brands. Udi has a double degree in mass media communications and computer science.
Share:

It’s not that difficult to add computer control to a microscope. Now I realize this is not a huge need for the general photographer, however, some of us use photography in our profession, not weddings or models but in my case, I’m a geologist. We tend to take lots of pictures in the course of our work. We also need to look at samples utilizing a microscope.
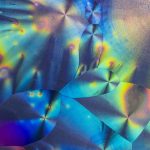
Usually, we examine rock samples by slicing them into very thin sections, grinding them down to a few microns, and then passing polarized light through them in our weird geological microscopes. Now sometimes, we need to look at items in three dimensions. Especially with very small fossils. The problem with photographing them is that the depth of field for most microscopes is extremely narrow, so you end up with only a small slice of the fossil in focus. The ability to do focus stacking has revolutionized our visualization of fossils. The problem is that most macro rigs don’t offer the magnification needed without going through a lot of bother.

I have fabricated a couple of ‘gizmos’ for focus stacking and time-lapse photography utilizing computer control designed around the Arduino platform. However, I ended up buying the Cognisys StackShot 3X controller. This unit can work with any stepper actuated device that does linear, rotary or rail operations. Rather than continue to work with my rather pathetic little Arduino controller, it has proven to be better, and far easier, to work with the StackShot controller, which works most with 4 wire stepper motors.
The motors are not very expensive, usually about $5-$15, and are available from several electronics supply sources. To make it work with the StackShot controller, obtain one of the Cognisys special plugs directly from them. The plugs are not expensive, around $10 + shipping. That leaves you with a little bit of soldering to attach the 4 wires to the plug. Alternatively, you can buy a ‘naked’ stepper motor with a plug directly from them.

Mechanically, attaching the stepper motor to the fine focus knob of your microscope is the real challenge. So, in an effort not to permanently alter my somewhat expensive Petrographic Polarizing Microscope, I embarked on a search on eBay to look for bits and pieces. Okay I couldn’t find any pieces, but I did find a completely junk microscope that used the same base mechanics as mine, for $40!
All I really needed was a fine focus knob, and the rear cover dust guard. I actually was able to sell the unneeded remains of the microscope body, in bits and pieces for more than I paid for it initially. So armed with these two salvaged pieces, I looked through my pile of scrap material and found a couple pieces of aluminum that could be reworked in order to allow me to adapt the stepper motor to the microscope. I needed three other parts from eBay, a small 18 tooth MXL pulley and a large 60 tooth MXL pulley, along with the MXL belt to connect the two. Each of them cost about $4 each including shipping. The downside was each of them required approximately 3-6 weeks to ‘walk to the United States from China’. So don’t be in a big hurry about this, unless you want to buy these same items from the United Kingdom. There’s a company there called MotionCo, and they sell them for about five times the price but you get them before you’re eligible for Social Security.

The first thing you need to modify is the fine focus knob. You start by putting a drill into the hole, which is 3 mm in diameter (#32 drill bit), and drill out through the end of the knob. Now you end up with a hole that’s directly in the center of the outside of the fine focus knob. Clamp the fine focus knob and drill from the outside with a 5mm drill (#9) to about 3 to 4 mm into the knob. This is so you can insert a short piece of 5mm rod into the end. This rod allows the 60 toothed pulley to be affixed to the knob. The short end of the rod that goes into the knob needs to be roughed up just a teensy bit and secured into the end of the knob with a bit of JB Weld (roughing helps the JB Weld grip the rod). I actually obtained the rod sections from a junk printer, which also has MXL pulleys and belts as well, (just never the bits and pieces you end up needing for your project). Set that aside to cure for 24 hours. When it is done remove your fine focus knob and put your new ‘cyborg knob’ in place. You will need it to reference your stepper motor position in respect to the back of the microscope.
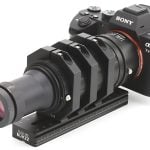
The stepper needs to be mounted to some type of holding fixture, exactly how is kind of dependent on which one you get and what kind of scope you have. If you use the Cognisys naked stepper, it is not quite like mine. I simply, as you can see, mounted mine on a piece of aluminum angle with two screws. This angle was in turn, mounted to a piece of square section aluminum tubing. This was in turn mounted to a small flat piece of aluminum, it is held onto the rear of the microscope dust cover plate via two screws through the dust plate. Now you may not be upset with two holes in the rear of your microscope, or your microscope may not have a dust cover like this. So in this case, some other mounting options can be applied. You can use a larger piece of plate and attach it to the rear of the scope with some outdoor double backed tape (really grips!). This way you do not need to modify anything but a knob. My Nikon Labophot POL is common mechanically to some fairly common research scopes, but older now in the great scheme of microscopes, so universities are dumping them in favor of newer cooler scopes. This is why I could find the entire body cheap (after a lifetime of abuse by undergrads). You will need to estimate the belt length based on your particular stepper motor and how you plan to mount it to the scope. So you should order a few in various lengths and pick the one that works the best for your installation. Considering the low cost and long lead time, it is best to have several extras rather than just the exact one you may think you may need, but were wrong.

Back to the mod. I drilled two holes in the back of the plate through a small doubler of aluminum. I then glued this doubler, using JB Weld, to the inside of the plate. I then counter sunk the doubler and tapped it for two (10×32) screws. One screw is 3/4 of an inch and the other is 1 1/2 inches long. These are screwed into the doubler and project out the back of the plate. The studs that projected out can use the threaded knobs to attach the stepper motor bracket to the back the scope.

Now positioning this assembly to locate the two holes and the extension of the motor, and its bracket, you need to move it around unassembled and un-drilled. You will need to position this so the belt is square to the two pulleys and has enough tension to operate accurately. Then you can index the holes. A skilled patient assistant is really helpful to mark positions with a pencil while you hold this ‘kludge’ in position.

Once the drilling is done, you have what you need to do focus stacking with your scope. I like to Cognysis 3-D stack shot because you simply have to move the focus with the controller to the start position, then use the controller to move to the end position. You have only to enter how many images you want to take between those two points. Hit start and off it goes.

There are a lot of different scopes out there, some may be adaptable with a variation of this theme. This works on Nikon’s line of Labophot, Labophot 2 and Optiphots. Olympus scopes are similar as well. I have used this same setup on my other scope, also a Labophot, but it is a phase contrast scope with the same mechanics. Some of us don’t get to take pics of pretty people, just fossils, crystals and formations of rocks from the air. Doesn’t seem as glamorous, but it does make a lot more money. Besides, I get to trudge through places like the jungle in Borneo, pick leaches off my legs and scratch the incessant insect bites and eat lousy food. On the plus side there are Cloud Leopards and Orangutans to keep you company. All in the pursuit of samples and photos.
About the Author
James Wallace, Geologist, former Navy Pilot and NOAA research pilot. Worked abroad for many years doing marine mammal studies from aerial platforms. Spent 10 years in Africa with the UN and European Union Humanitarian Organization in African conflict zones. Semi-Professional photographer on the side. Photography was important in all aspects of his employment. Extensive library of photographs of oceanic settings and conflicts in Africa. Photo credits include the New York Times, CNN, USA Today and several UN publications
We love it when our readers get in touch with us to share their stories. This article was contributed to DIYP by a member of our community. If you would like to contribute an article, please contact us here.
Join the Discussion
DIYP Comment Policy
Be nice, be on-topic, no personal information or flames.
2 responses to “Take extreme macro photos by adapting a microscope”
Nice article on an automatic focus stacker for the microscope. Would like to have seen more pictures of the mineral specimens, I may give this a try some time, I generally focus stack the image by focusing by hand, but I am doing more of it so might try an automated method.
Where are the photos?