


How to convert a table top dolly into a computerized time lapse monster
Dec 13, 2016
James Wallace

We love it when our readers get in touch with us to share their stories. This article was contributed to DIYP by a member of our community. If you would like to contribute an article, please contact us here.
Share:

I have a really wonderful Cognisys Slider controlled by a Stackshot 3D. The Stackshot 3D is a very easy system to set up, program and run. It has one tiny little defect, one that is common in pretty much all sliders. They are bulky, take a while to set up, and typically need two tripods to support them. You really can’t have all that in your backpack ready for that “ah-ha” moment.
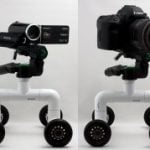
I also have a Pico Dolly and I love it. It is small and fits into a tiny case that carries easily in your backpack. It’s well made and seemed to be an ideal candidate for conversion. Sometime back I had built a Arduino based motorized skater based on a much older article presented here on DIYP. I wasn’t really enamored with the design and made a carriage of my own design, but it needed a fixed track to work. I never really used it much, so I still had the electronics and hardware lying around and the Pico Dolly.
It turned out to be quite simple to adapt the Pico Dolly to be stepper motor driven. All it needs is a small modification to attach an MXL pulley to one of the wheels. It then needed a platform for the stepper motor to sit above the wheel and another to hold the electronics.


So, the first step is to gather up the items you will need to construct the project:
- Nema 17 sized 12V stepper motor
- Arduino based Mini E motion controller (software for it is available here)
- MXL Pulley, 60 T, 8mm Bore
- MXL Pulley, 20 T
- MXL Rubber Timing Belt, 100 T
- 12V Rechargeable Battery ~ 1800-25 00 mAh
- A 2.5” length of 3/4” Square Section of Aluminum Tubing as a holder for the Stepper Motor Angle and a partial spacer
- Some ABS Sheet to glue together into a 2.5”x3/4” of sufficient height to make the belt fit tightly to the pulleys
- 2” of 1 ½” Aluminum Angle to hold the stepper motor
- 3 M2 x 25mm Screws to fix the pulley to the (to what??)
- 2 M2 x 10 Screws to hold the Stepper Motor to the angle
- 1 M5 x 60mm bolt to replace the Pico Dolly’s axel fixing cap head bolt.
- LCD Button Shield
Instructions
The MXL parts can be sourced on eBay, but come out of China, and the wait is about 30-40 days at least for the belts. Your experience may vary, but they are cheap, really cheap. If you want the parts quickly then you may go to Motionco.
You can source the other electronic parts from Sparkfun, including the Stepper Motor, the Arduino, LCD Button Shield and the EasyDriver Stepper Motor Driver for the miniE. Probably some other connectors and such as you may want for your own tastes.
The first step is to attach the 60T pulley to one of the Pico Dolly’s wheels. A small section of 8mm rod scrap was used to center the pulley on the wheel. You then drill three holes, (1.6mm) through three of the spoke gaps into the pulley. They will not be equally spaced around the circle, but form rather an isosceles triangle due to spoke spacing. There is no tension on this, just some shear force from the pulley so it is fine.
The holes in the pulley are then tapped to match the M2 threads, matching the screws you bought (there are two pitches). After you finish up with the drilling (hint, use a drill press if you can) and tapping, you need to bore out the center of the pulley with a ½” drill to allow access to allow you to screw the wheel to the axel. You can now secure the pulley to the wheel and set it aside.

You can now make the stepper motor mount. Use the 1½” aluminum angle for this. Start by cutting one side down to 1”. I then needed to cut a 1” semicircle (done with a Dremel with the sanding cylinder on it) to accommodate the stepper motor I bought.
The steppers vary, some may mount flush others need this cut out. You then need to drill the two mounting holes for the motor attach screws. Remember to space the motor about 1~2 mm above the angle to keep the motor from being forced against the radius corner in the inside of the angle (otherwise it would sit cockeyed). Attach the 20T pulley to the stepper motor. Now cut 3” from the 3/4″ x 3/4″ square tube. I used some JB Weld to center the angle and temporarily fix the angle mount of the stepper motor on the tube at roughly the right position to get the 20T pulley over the wheel pulley. Then I clamped this and let it set overnight. Lastly, I drilled and countersunk one screw through the angle and square tube and secured it with a nut inside the tubing to hold the angle securely.
In my installation, with the 100T belt, I needed 10mm of ABS sheet stacked to give me a reasonable fit. Your fit may vary depending on the stepper motor you use. Drill a hole through the square tube and your ABS spacer, again to get the best positioning of the 20T pulley over the 60T wheel pulley. You can make the fine adjustment on the pulley by loosening the fixing screws and sliding the pulley back and forth on the stepper axel.

Powering the rig takes a bit of thought. The system needs 12V to run the stepper controller through the Arduino. Most 12V battery packs are kind of big. I had some flat pack 2000 Mah LiPo packs. They are 3.7 volts, so you need to put four(4) of them in series. This required a small board to hold the 4 JST jacks and needed some soldering to hook them up in series. It was somewhat unwieldy, especially when it came to charging. It necessitated unplugging the LiPo packs and charging each pack individually with a LiPo battery charger.
So eBay to the rescue. I found a small 1800 Mah 12v pack with a charger for cheap. It was perfect, small and had a switch with connectors built in. There was one flaw in its selection, it took 8 weeks to swim the Pacific and drag itself to my mailbox. It was worth the wait, and perhaps I shouldn’t have ordered from the absolutely cheapest provider. Well I have it now and it works great, powering the dolly for several hours.

I put a big strip of Velcro on the 3/4″ square tube and some velcro on the Arduino to hold it on the back of the dolly. The battery can also be Velcro’d to the front part of the dolly. This all can be assembled and disassembled in a couple of minutes without permanently altering your Pico Dolly.
It all fits into the Pico Dolly case which , again, fits nicely into your backpack. One of the problems with skater rigs like this is that they need a smooth surface, like a table top, smooth cement or marble to work. I found some 3mm thick vinyl floor sheet that measures 8” wide x whatever length you want, and can be laid down on dirt to make a small road for the skater to move across.
I use a ruler to smooth the dirt/sand down and lay the vinyl on it and smooth it out a bit more. When you have finished, the vinyl rolls up compactly into your backpack as well. Another material that works nicely, and also very cheap, is ABS sheet. It also rolls up and is quite light. In a pinch, you can use some 1/8” (3mm) masonite. It is cheap, easy to cut, somewhat light, but does break if bent.

Naturally, I used the Arduino and the miniE controller to power this as I had the parts and it seemed logical. That was until I realized I could have just used my StackShot 3D controller to do the same thing. If you have some kind of computer controlled slider, your controller may work to control the stepper as well.
I am rather fond of the StackShot 3D, as it controls my slider, pan head and does my StackShot Macro rail for macro photography work as well. One item that makes the StackShot kind of cool, is that it has an RF controller that allows you to start and stop the controller from quite a distance. So you do not have to be right up next to your rig to control it in the event you find the need to take a time lapse of cobras coming out of the ground, IED’s exploding or alien abductions. Or maybe you just don’t want your shadow in your photos. In any case, you can do it from a safe and comfortable distance, preferably sitting in a comfy chair sipping a ‘cool one’.

Other tricks this little rig can do is circles. You do this by turning the axles and tightening them to make the rig run in circles, giving a slightly different panning effect. You can adjust it from big lazy circles to tight ones, depending on how you angle the axles. I used some ABS sheet and cut a 19” disk, which is about as tight a circle the rig can turn, weighs nothing and I attach it to my day pack. I like this little system, like I said, it fits in a backpack and is very light.
You can take it on trips. I have only managed to con my wife into carrying my excess photo gear once, on a hike to a sinkhole to photograph some owls. She will not be so easily deceived again. This system can be slipped into your partner’s backpack without too much protest, as long as you have maxed yours out with your junk. I am taking this with me to India on my next installment of a recurring nightmare project that I have been working on all summer in Bombay. This rig shouldn’t alarm the customs officials as it is too small. Larger items, such as the vinyl, I can get locally.

If you take this project on, you may see several places to accomplish the same objective, with a bit more elegance. Materials and methods were based on what I had lying about. You could just as easily used wood for spacers and bits of scrap plastic from switch boxes instead of aluminum angle and so on. Be creative, the Pico Dolly is a great starting point. You may have a controller that only needs the stepper motor to have the proper plug grafted on to use. Or you may take the, “I can build that” approach and use the Arduino based version. Being small, it does not attract too much attention in urban settings. One accessory you may want is some sort of small folding stool. Nice to have something to sit on and read while your dolly chugs away taking pics.

About the Author
James Wallace, Geologist former Navy Pilot and NOAA research pilot. Worked abroad for many years doing marine mammal studies from aerial platforms. Spent 10 years in Africa with the UN and European Union Humanitarian Organization in African conflict zones. Semi-Professional photographer on the side. Photography was important in all aspects of his employment. Extensive library of photographs of oceanic settings and conflicts in Africa. Photo credits include the New York Times, CNN, USA Today and several UN publications
We love it when our readers get in touch with us to share their stories. This article was contributed to DIYP by a member of our community. If you would like to contribute an article, please contact us here.


Join the Discussion
DIYP Comment Policy
Be nice, be on-topic, no personal information or flames.
One response to “How to convert a table top dolly into a computerized time lapse monster”
BTW the pico dolly is just a cheap Chinese dolly that’s been rebranded.. You can buy them for £8