


The 7$ Huge (Huge!) DIY Beauty Dish
Nov 22, 2010
Udi Tirosh
Udi Tirosh is an entrepreneur, photography inventor, journalist, educator, and writer based in Israel. With over 25 years of experience in the photo-video industry, Udi has built and sold several photography-related brands. Udi has a double degree in mass media communications and computer science.
Share:
 Beauty Dish") The $7 beauty dish emerged out of a desire to experiment on the cheap, to see if I could duplicate the effect of a real beauty dish and see if it was worth buying one. Here’s my disclaimer: These are no substitute for real beauty dishes and the details involve more brute force than calculated physics.
The $7 beauty dish emerged out of a desire to experiment on the cheap, to see if I could duplicate the effect of a real beauty dish and see if it was worth buying one. Here’s my disclaimer: These are no substitute for real beauty dishes and the details involve more brute force than calculated physics.
My project followed a surprising amount of noodling around in Ikea, Home Depot and Target looking for the essentials — something that would let me fire my Nikon SB800 flash into a reflective bowl and direct it toward a subject. I don’t know if the final solution is brilliance or BS — I’m sure you’ll all let me know.
There are four pieces to this project

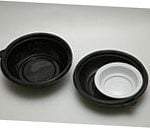
- A disposable clear plastic salad bowl ($2 at Smart & Final, our local warehouse grocery chain, but you should be able to find them anywhere that sells picnic or catering supplies). A wider and shallower bowl will give you a broader light source and potentially smoother highlights on your subject, but you don’t want a bowl so big it will interfere with mounting the dish on a flash unit.
- Silver (or white) spray paint ($5 a can at Home Depot; will cover many bowls if you have the need)
- Heavyweight paper, preferably glossy, or some other reflective material (potentially free)
- Clear package-sealing tape
Step 1: Spray the bowl

This is pretty straightforward, but a light touch will help here. You want a thin, continuous coat of paint on the interior of the bowl. If you add a second coat before the first has dried (like I did), the paint will drip. (Paint pooled in the base of my first dish and took two days to dry.)
Silver paint is more efficient than white, but you may get shinier highlights. (I lose about 2 stops off my flash power using the dish.) You could opt for other metallic shades — gold or bronze — but they’re probably better for photographing jewelry than people.
Step 2: Measure and cut

This is a key part of the project and the easiest to mess up. You most likely want the light source in the dead center of the dish, so you need to measure and mark the point if there’s not a plastic dot there already. What you want to do is cut an H-shape in the bowl big enough to fit the head of your flash unit through if the flaps are folded into the bowl. If you do this right and the plastic of the bowl is flexible enough, the flaps themselves will provide enough friction to hold the bowl on the flash. (If not, you can secure the bowl by wrapping a rubber band or tape around the flaps to hold them against the flash unit. You can get fancier by using Velcro, or you can just tape the body of your flash against the bowl to hold it on.)
Step 3: Making the Reflector
All you have now is a leaky bowl strapped to your flash unit. What you need is something to bounce the light of your flash back into the bowl, which will then reflect it forward. Early on I had envisioned using a clear plastic cup as both the reflector and mount — either spraying the bottom of the cup silver or gluing on a mirror. My final approach to this was partially driven by my solution to mounting the reflector — clear package-sealing tape — which meant that the reflector had to be lightweight. On my first dish, this reflector was a thin plastic water dish sprayed silver; on the second, it’s just a circle cut out of white poster board. If your salad bowl comes with a lid, just cut out a circle and spray that.
A couple of things to consider before cutting your reflector: The wider it is, the better it keeps the light from your flash head from splashing around your shooting environment. When the reflector is small, it can let light from the flash head hit the body or shoulders of your subject. But the wider the central reflector is the less space there is around the reflector for the dish to throw light forward. You might want to sketch the dimensions of your dish and calculate the minimum width with a ruler or just eyeball it.
One option: Cut the hole in the base of the dish big enough to hold the body of your flash rather than the head so you can put the flash head as close to the reflector as possible — assuming you’re handholding your flash or mounting it on either a light stand with a swivel mount or an extension arm.


Step 4: Attaching the reflector
The simplest solution — and one in keeping with the disposable nature of the bowl — was to just run a strip of clear strapping tape across the mouth of the bowl and sticking the reflector on the inside of it. No worries about gluing or taping a mount to the base of the dish, no light lost to another set of surfaces. (look closely for the tape running from top to bottom).

What do you get when you put it all together? My smaller dish is 12″ across, weighs just less than 4 ounces and will fit on a flash mounted on a camera if you’re so inclined. My larger dish is 15.5″ across, weighs 7 ounces and is a bit harder to manage. If they blow away or get stepped on, no great loss — and if you decide the resulting look isn’t for you, you can still use the silver spray paint to turn last summer’s Super Soaker into a prop disintegrator.
Results
A self-portrait done using the dishes

This guest post was written by Jeff Dillon. Jeff is an advanced amateur photographer in San Diego, California who alternates between spending far too much and far too little on photography equipment.

Udi Tirosh
Udi Tirosh is an entrepreneur, photography inventor, journalist, educator, and writer based in Israel. With over 25 years of experience in the photo-video industry, Udi has built and sold several photography-related brands. Udi has a double degree in mass media communications and computer science.


Join the Discussion
DIYP Comment Policy
Be nice, be on-topic, no personal information or flames.