


Spyder4 Elite – Monitor Calibration Hardware Review
May 19, 2013
Udi Tirosh
Udi Tirosh is an entrepreneur, photography inventor, journalist, educator, and writer based in Israel. With over 25 years of experience in the photo-video industry, Udi has built and sold several photography-related brands. Udi has a double degree in mass media communications and computer science.
Share:
Recently I started adding monitor calibration to my workflow and I am grateful that I did. I am using the Spyder4 Elite to do my calibration and I am going explain what it is and how it can help save your butt.

What Is Monitor Calibration?
Just like people, there are no two monitors alike. This extremely true for monitors of different models using different panels from different companies, but it is also true for a single monitor aging out, changing settings, or getting input from different graphic cards. This means that similar colors will be displayed differently by different monitors. Take your blue for example, it may be sky blue on one monitor, a purplish blue on another and slightly greenish blue on a third.
This is typically no issue if all you do is browse the web, but we are not just browsing the web, we are dealing with pictures. The calibration process ensures that a specific color will be seen as similar as possible on all calibrated monitors, and on all calibrated printers (which is important is your photographs are going to be featured in a catalog).
Imagine that you were hired by a towel company to shoot their new spring line. You hand them the files and their graphic designer sends them back and says that they are off. He says that blue is greenish, the red is too purple and the colors are off in general.
You pick up one of the towels and compare it to what you see on your screen. it’s spot on, so you send the files again. Now you get a call from Marketing telling you that you’d better get your files straight or you would lose the job.
This is where calibration comes into play. If your monitor is calibrated (and assuming the graphics dept. has their monitor calibrated) you would be able to match what you see with what they are seeing and printing.
The Spyder4 Elite
There are a few solutions in the market for monitor calibration and Datacolor’s Sypder 4 Elite is a great one to use because it is simple and easy to use and it gives dead on results.
It works by placing the Spyder on the screen and running a calibration process, at the end of which your monitor is supposed to be calibrated.

What’s In The Box?
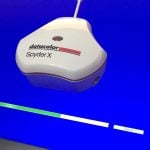
- Datacolor Spyder4Elite Colorimeter – I got to say, it only has three legs, not really sure why they call it a Spyder. It is a pretty small device.
- Desktop Cradle/Tripod Mount – This would come in useful if you do a lot of calibrations. you can keep the little Spyder right next to the monitor.
- Spyder4Elite Software CD – well, it is a CD, nothing much to say about it. I downloaded the software anyhow.
- Quick Start Guide – This was much better than the “regular” manual. and unlike many Quick Starts that I have seen before – it is actually quick, and very accurate and informative.
- Small vacuum plate – you can use this to stick the Spyder on a CRT monitor.
Installation
As far as installation goes, it is very simple to install: You go through a few screens of the installation disc and you are done. I was not sure if my disc had the latest software so I went right ahead and downloaded the latest software from Datacolor’s site. (They get a smiley for how easy it was to find the relevant download).
On the other hand, they asked for the activation number that came with the disc. I am not a big fan of activation in general, it is cumbersome, error prone and time consuming. Specifically, who would pirate the Spyder’s software? It is useless without the actual device. anyhow, no biggie, moving on.
Calibration Was A Breeze
The calibration process is made of several steps, and was really easy to complete. I timed it at 12:15:32.54 seconds.
1. You start by plugging in the Spyder to a USB port and starting the software. The Software will 1 – ask you to reset the monitor, 2 – make sure you have good monitor viewing conditions (it asked me to turn off the lights) and 3 – start the calibration process.

2. You are then asked a few questions about your monitor and what can be calibrated about it. Mine, a good old Dell 2209WA 22 incher had brightness and contrast.
3. There is a step where you should place the Spyder and make sure it lays flat against the screen.

There is a counter weight that helps ensuring it stays in place.

As for the laying flat part, I found that “training” the cable with an easy pinch helps ensure the device lays flat against the monitor.

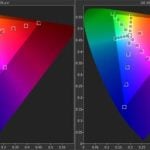
5. Your screen will display varying colored squares and check to make sure it is calibrated. At the end of each part, you will be asked to tune you monitor using its external controls (I guess this is why they asked you about it in step 2).

6. Lastly, you can save your calibration profile and set a reminder which will add a small icon to your taskbar. Only thing is I don’t really know where to put the Spyder till then. My table is busy enough as it is.

After Calibration
Technically, the if the Spyder stays connected to the computer, there is a sensor of the back of it that ensures that lighting conditions will not affect the calibrated monitor. I have not used this feature.
Pros
- Super easy to use. All you need to know is where are the button on your monitor.
- You now know that your printer / graphic designer and you are watching photographs in the same way.
- Small form factor – it is about as big a fist. stores easily.
Cons
before going into the cons thing, I gotta say that I did not really find anything major, and my “cons” are more of improvement suggestions than things you should be put off by.
- No bag – this was kind of a small disappointment for me. A Spyder costs over $200 and there is no place to set it in between calibrations if you want it off the desk.
- This is minor, but I wish they removed the “activation” thing. If you don’t own the hardware, why would you pirate the software?
Conclusion
If you are doing any kind of printing with a printer and wanna send them more accurate files, or if you are working with graphic designers and color is an issue, you definitely want to calibrate your monitor.
the Spyder 4 Elite was a breeze to use, and the first time it saves you a client it pays its $219 for itself.
DIYP gives it 9.5/10 stars. (We are taking half a point off for the lack of bag and for the number of legs entomological error).
Datacolor Spyder4Elite Display Calibration System – $219 at B&H
 Datacolor’s Spyder4Elite is a display color calibration tool well-suited for photographers, videographers and video editors who require the highest level of color control in the studio as well as flexibility in post-production.
The Spyder4Elite features a full-spectrum 7-color sensor that can accurately characterize a variety of wide-gamut and normal displays. Calibrate your monitor, laptop computer or projector. If you have an iPad or iPhone, you can even calibrate them after installing the SpyderGALLERY app (which is free for all Spyder4 and Spyder3 users). The fourth-generation sensor employs double-shielded filters for longer life and optimal performance. Additionally, several useful step-up features are available that afford greater control.

Udi Tirosh
Udi Tirosh is an entrepreneur, photography inventor, journalist, educator, and writer based in Israel. With over 25 years of experience in the photo-video industry, Udi has built and sold several photography-related brands. Udi has a double degree in mass media communications and computer science.


Join the Discussion
DIYP Comment Policy
Be nice, be on-topic, no personal information or flames.
2 responses to “Spyder4 Elite – Monitor Calibration Hardware Review”
My Spyder4 Elite was great until my PC updated itself to Windows 8.1 after which it was no longer recognised by my system. I contacted support who had no answer and actually agreed with my facetious suggestion that I restored Windows 8, calibrated the screen, saved the calibration file and used it manually to set screen colours after updating again to 8.1. Needless to say the Spyder has remained unused since and will eventually be replaced by something more capable.
I agree with BrideValley. Since my system went 8.1, it is recognized, but when it’s connected, it interferes with other USB drivers and gives read errors such that I cannot update the calibration/recalibrate a screen.
I have not contacted support at this time… my patience for support on a relatively inexpensive device is pretty limited.